If you’ve kept up with me on Instagram, Facebook, or Pinterest, you’ll gather that I’m crushing on all things shiny and sparkly right now. Gold, crystal, mirrors… anything unapologetically girlie and glam has been my latest obsession. Gold, especially.
*This post contains affiliate links. To read my full disclosure policy, click here.
Last week, I shared a free printable that I made using Silhouette’s printable gold foil. Not satisfied with just sticking the gold foil stickers on the paper, I embarked upon a DIY gold foil tutorial hunt.
Surprisingly, there isn’t much information out there in the interwebs about how to DIY gold foil. I know, crazy, right? So I told myself, “Self, you will figure this out.” Luckily, I stumbled across this handy video tutorial. God bless you, YouTube. Unfortunately, the tutorial recommends a pricey laminator. Because I’m cheap not willing to spend that much time and money on a passing trend, I decided to try my gold foil experiment (*experiment being the key word here) using this basic laminator instead. If all else failed, I could use it as an actual laminator. Imagine that. I wanted one that was at least 13″ wide just in case I ever wanted to laminate (or hot foil) 12×12 scrapbook paper.
Okay, onto my DIY gold foil experiment! You guys are going to flip out over how easy this is!
Here are the players:
Alright! Let’s get started (and wish me luck)!
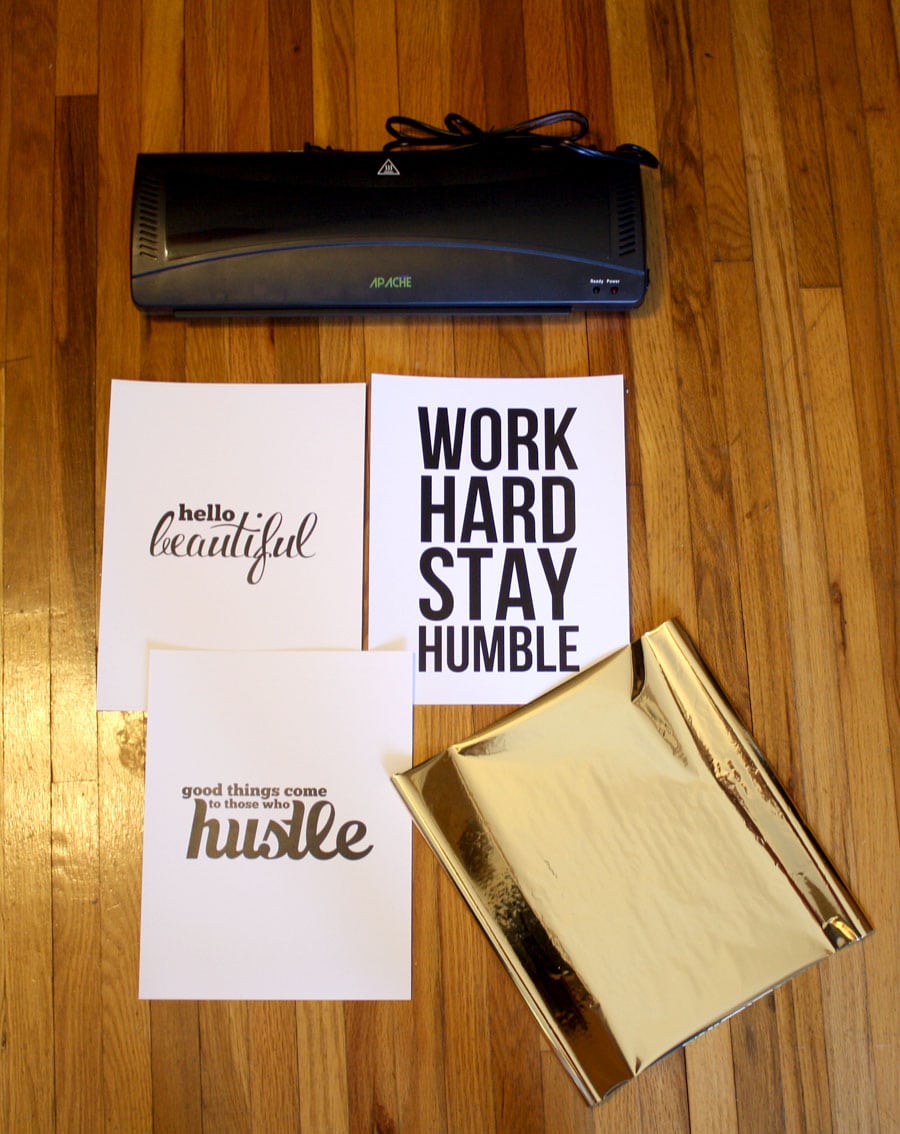
I created these black and white prints in Photoshop and printed them out on a laser printer. You should use a printer that prints with toner because it’s what the foil will react with. You can print your image using a laser printer, or even a photocopier. Just make sure it’s black and white and toner is what’s used (not ink).

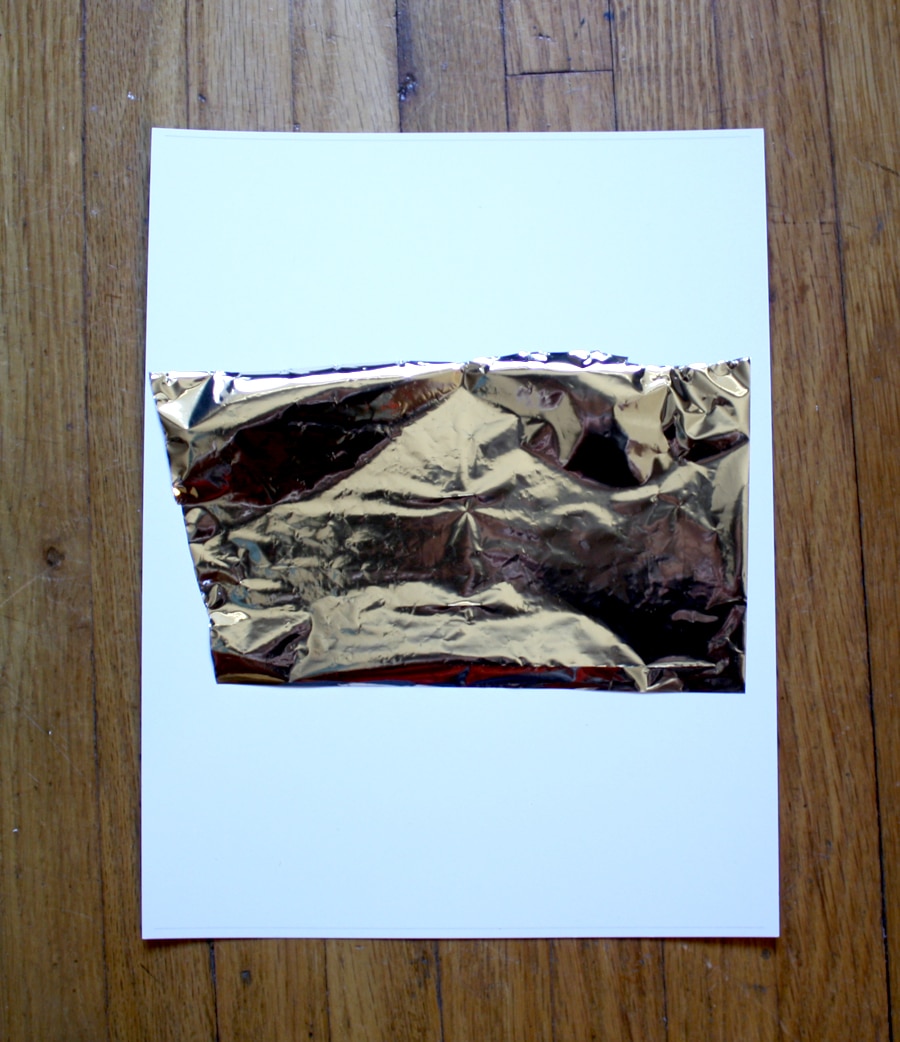
Next, I cut a piece of toner-reactive foil large enough to cover the image, gold side up, smoothed out any wrinkles in the foil, then put another sheet of paper on top, to hold everything in place (so that the foil is sandwiched between the two pieces of paper). Then I sent it through the laminator with my fingers crossed!
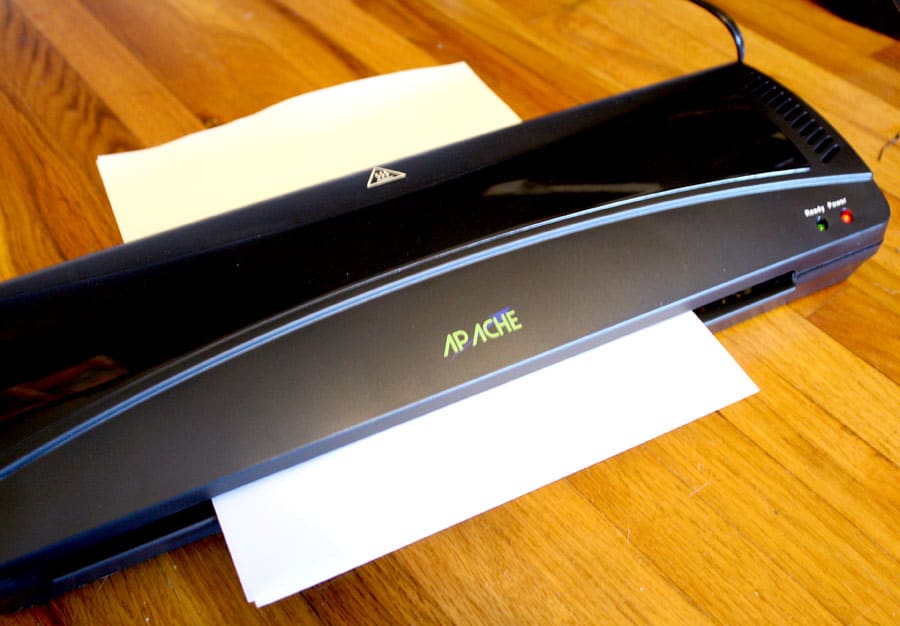
Once it came through the laminator, I peeled back the foil and this is what I found:


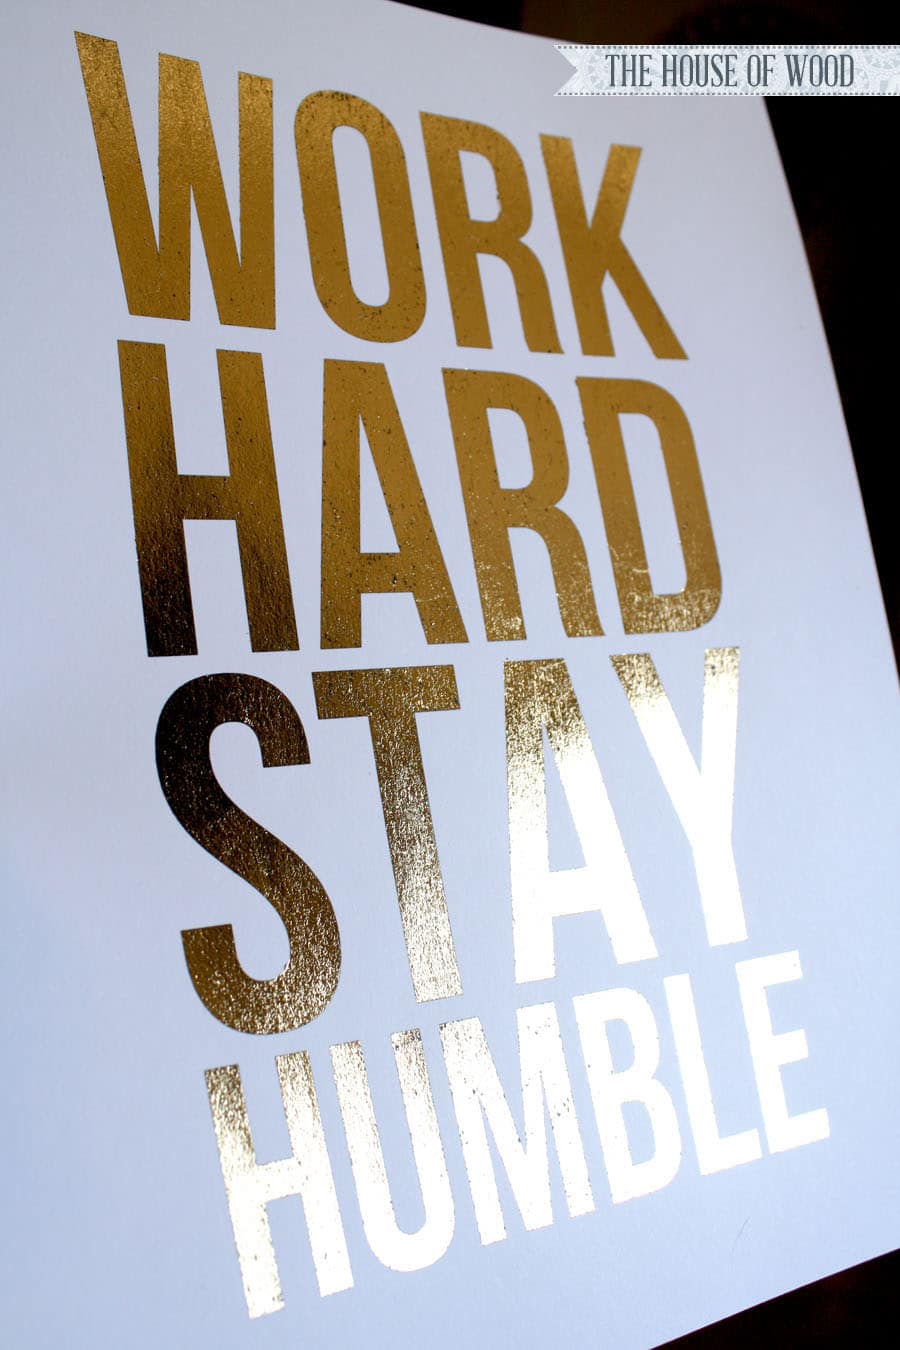
Me, oh, my! My very own DIY! (Gold foil print, that is.) It’s far from perfect, and it certainly won’t buy me a house on the hill if I were to sell them in my Etsy shop, but how neat, right? Here are my 2nd and 3rd attempts:
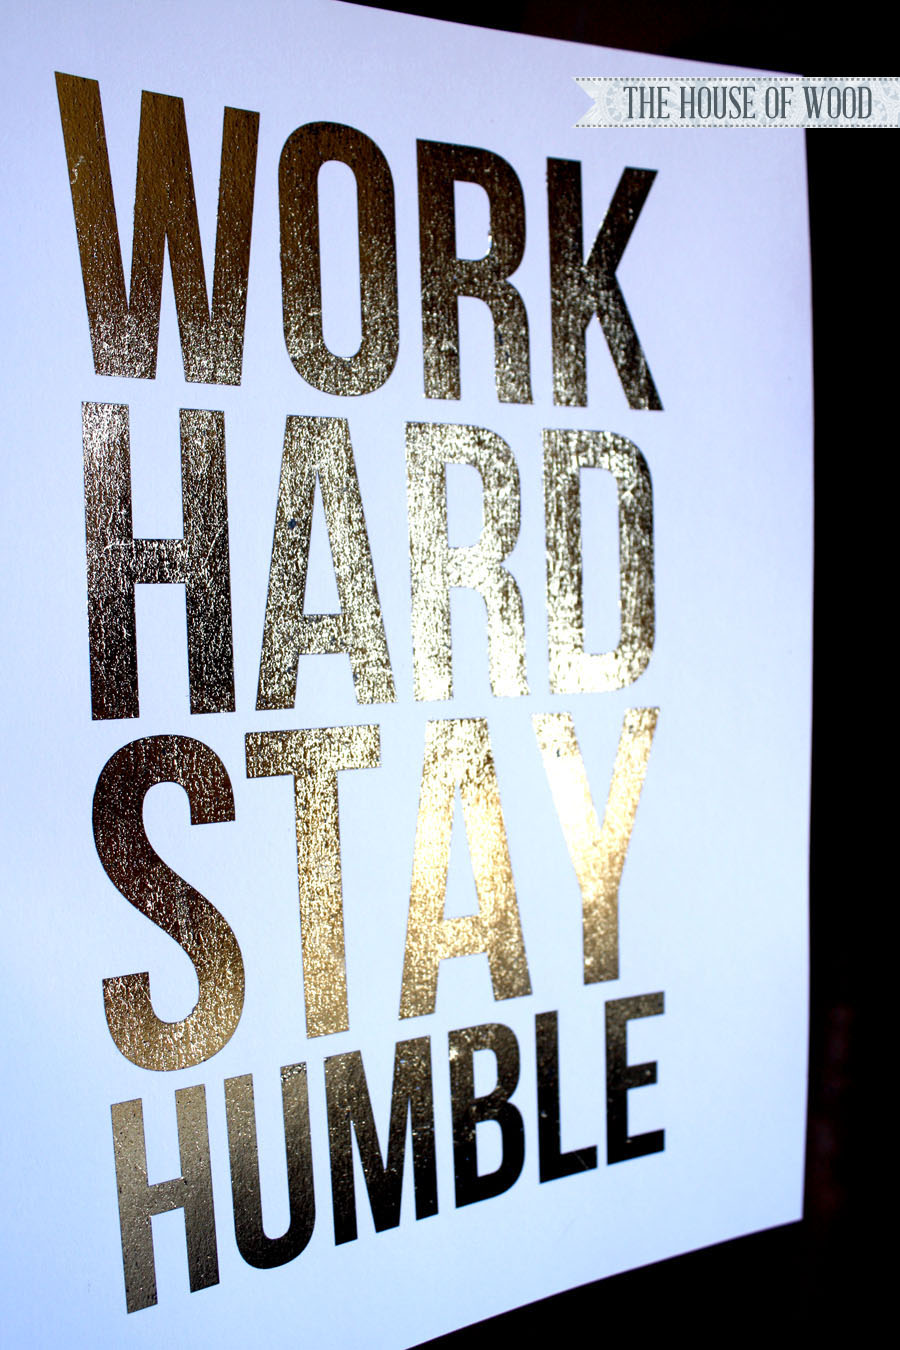
Ahhh, my preciousssss… so shiiiiiiny… And nothing says “Work Hard Stay Humble” quite like glam gold does, amiright? I mean, you can be hard-working, humble, and glamorous all at the same time. True story.
I also learned that lint and dust (or dog hair, in my case) is not good when hot stamping foil to paper. See exhibit A below:
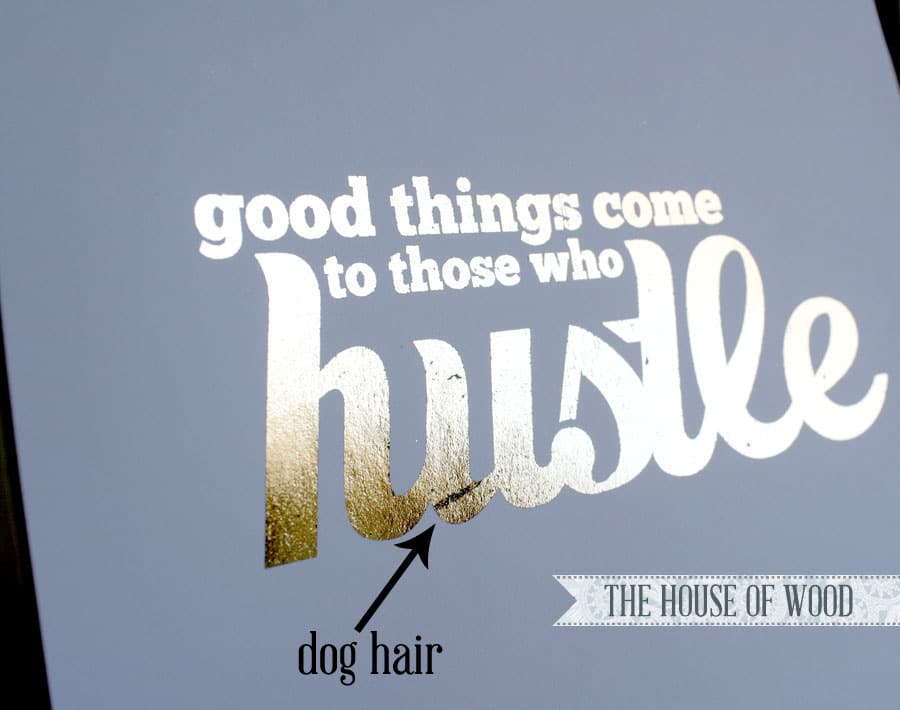
But overall, not a bad little DIY experiment, right? I imagine my DIY gold prints will look even better once they’re framed and hung; you might not even notice the dog hair and other little imperfections (crossing fingers). What do you think? Huzzah for DIY gold foil prints!
my mind is blown! you’re telling me it’s THAT EASY??! gah! As if I didn’t gold leaf everything already, it’s about to get insane over here.
I wonder if you could use a iron instead of a laminator?
I tried to do this on the popular brown craft paper and the laminator didn’t allow the gold to completely transfer so I tried my iron. It did not work either and my transfer folder did not like the iron heat. It did not melt my transfer sheet but it did wrinkle it. My laminator even had a “foil” setting on it. I think my problems may be a combination of the paper, my lazier ink and maybe even the foil.
real question, what kind of gold foil did you use?
Brittany! You are going to flip over this… you can buy foil by the yard (link in the post)! So many shiny pretty colors to choose from!
Did you buy the Chinese gold or the standard gold?
I bought the standard gold.
I’m so confused! The link goes to adhesive backed gold foil and that doesn’t work. Help!
Here is the foil to buy: http://amzn.to/1YgJHdB
Gah! I started looking at how to do my own gold foil projects and came across this! Checked to see the date and realized you’d written it today! How timely. And I’m so insanely excited, I haven’t even read it yet. BUT! I have to say thank yoooooou in advance. Haha. I can’t contain my excitement.
Now that I’ve read it this was definitely a great DIY project. Sadly, I don’t have a laminator so I need to figure out another way to do my gold foil projects. Thanks for sharing though!
Thanks for stopping by, Michelle! I’m glad you’re here! Another option would be to use a laser printer. Gold foil needs heat and pressure to adhere to the toner, so you could run it through a laser printer and do it that way. I’ve also seen where people have used an iron! Hope that helps… good luck!
Hmm, wonder if you can use a blow dryer as a heat source and go over your print (once you’ve secured the gold foil on your print, of course)
Well, you need a combination of heat and pressure, which is why a hot laminator works. I’d say try it and let us know how it goes! Thanks!
How/what is needed to use a laser printer? I ask because you specified toner NOT ink. Thanks!
I recently came across this technique and it is so worth the money in the long run. I have a laser printer. To me this was cost effective bc I wasn’t using the printer any longer since my kids went to college. The ink would dry up then. So with this I can use MSWord and type up any words or sentiments to glue into a card. It has to be black toner(laser) bc the foil sticks to the black toner. Regular ink will not stick to the foil. After printing I cut out the sentiment and do as above with any color foil (and they are beautiful!). I also purchased a heat laminator. Now this is all I do with crafting and designing cards. It is so beautiful it is worth it.
Try the sme technique and use an iron.
so beautiful! i’m loving all things gold these days as well!
I love this! I did a gold foil project this week too and am looking for ideas on what to do with the rest of my sheets of gold foil. Thanks for the inspiration!!! 🙂
NO. WAY. How did you see into my brain and know I’ve been trying to figure out how to do this for weeks?! Now to decide if I can justify buying a laminator for this one thing… but in reality, I will probably just gold-foil everything once I own it, right? So, smart purchase? 🙂 #LieToMe. Awesome tutorial, my friend!!
Confession: I bought the laminator for this one thing! But hey, I can still use it to actually laminate things! It’s a win-win. Do it!
What printer do you have?
I got them printed at the store, they used a laser printer.
Does it matter the amount of time between how freshly printed the toner is on the paper vs when you laminate it?
Hi Ashley,
No, not that I’ve found.
I don’t think it would matter how fresh it was because it is the heat from the laminator re-melting the plastics in the toner… so I’ve read elsewhere
These are so cool! I’ve always wondered how to accomplish this. Thanks for sharing! I hope to try your method out!
Hi Corinna, thanks for stopping by! I’d love to see your project when you’re done!
Thanks for sharing! So pretty! Did u use standard gold or Chinese gold? (Assuming u bought fr the web link u mentioned) And what brand of laminator did u buy? I’m not sure i’ll use the laminator much except for this purpose! Hahaha. I’m like u. Don’t want to spend that much.. 😉
Hi Winnie, Yes, I bought the standard gold – I didn’t want it super brassy-looking. The link for the laminator is in the post. It’s made by Apache and I got it from Amazon for about $30. Hope that helps!
Thanks Jen! Will go check it out. :))
If anyone is looking for a hot/cold laminator, I went out today and bought one from AC Moore on managers special for 24.99, down from 39.99 — if you miss the special, find their coupon printable — typically 40% or 50% off! Excited to try this out!
Awesome deal, Julia! Thanks for sharing!
Hi, I’m from Moldova, I like your blog, 🙂
Hello,
I really liked this little project and tip. Since it’s the June holidays in Singapore now, families get more time with their kids. I shared this post on my blog, hoping that more people would take up art and craft and spend quality time with their loved ones. The entry can be found here: http://www.lacedivory.com/blog/2014/06/06/link-love-lets-go-back-time/
Thank you once again for this post!
xoxo,
Roxanne
Thank you so much for sharing it, Roxanne!
Hey! Thanks for the great tutorial! 🙂
Just wondering what type of paper you had used! I’m not sure what kind of experimenting you’ve done with the gold foil but I was wondering if it would work well with thicker cardstock!
I used heavy card stock… 110 lb weight, I think. It worked great!
This is too great. I want foiled invites for my 30th birthday party and this seems a thousand times better than paying someone else to do it! Now I just have to unearth my laminator from my teaching days and hope it still works!
Yay! Happy 30th!
I have been attempting this process with gold LEAF (don’t really know the difference) and an iron and it really doesn’t work too great, the edges are always messed up or some places don’t stick as well. SO I just bought the exact laminator and foil you recommended from the link and I’m crossing my fingers I didn’t just blow 40 bucks! Do you have any hints to make it turn out best? Should I wait for it all to cool or peel it while it’s hot? Is there a particular way you peel it you have found works better? Thanks!
As soon as it came out of the laminator, I just waited till I could handle it (cool enough to touch) and started slowly peeling back the foil. It’s best if your foil isn’t wrinkled, otherwise those wrinkles will be in your finished product. Also, make sure you don’t have lint (or in my case, dog hair) under the foil because it gets melted in there with everything! Good luck!
Hi there! Can you use any kind of craft foil or does it have to be a special kind in order for it to react properly with laser toner? Thank you!
It has to be toner-reactive foil. I linked the foil in the post.
LOVE this!
I did have one question though… I know you used a toner printer, but was wondering if you could tell me what kind? I saw that you used heavy cardstock, but when I tried to print it out at my office, I realized it only takes up to #20 lb paper for their toner printer 🙁
So now that I have a laminator and the foil, I’m worried I can’t find a place to print my projects with a toner printer without buying a printer too! What do you suggest?
You can try Staples or Kinkos – they should be able to print heavier card stock. Good luck!
This is amazing!
I’ve been dying for some gold foil prints in my apartment, but can’t bring myself to pay $30+ for each one. I’m considering buying a similar laminator from My Binder, but it claims you have to laminate gold foils with a laminate pouch. You didn’t use one, right? You just used an extra sheet of paper over the top?
They turned out great! Thanks for your help 🙂
Thanks! Yes! Just a plain sheet of paper on top.
One last question: How long after you printed out your sheets did you run them through the laminator? I’m assuming fresh toner is better than toner that’s been on there for days, or does it matter?
Thanks again!
No problem! It didn’t matter for me – I had them printed and they sat for awhile before I put them through the laminator.
Hello!! I love this I’m going to try it it can’t be an ink jet printer and must be printed on card stock?! Thanks:)
Your print needs to be printed with toner (like a laser printer or copy machine). Good luck!
LOVE this!!!
Now I have to get me a laminator!!
My to do list is getting too big…I think this is a winter time project!
Hi:
Love this DIY and tried it yesterday but somehow was not getting the gold to stick to the cardstock. I used toner and black ink on white cardstock with a high resolution print but the gold was not staying. Could it be the quality of the foil? Or maybe my laminator was not hot enough? Also, how does it work with a laser printer?
Thank you for doing this!
Have a great day
Kathia
Oh no! I’m sorry it’s not working for you. The foil needs to be toner-reactive. I linked the foil in the post.
why does it not work with ink jet printers?
The toner-reactive foil is reactive to the toner.
Hello,
I have used her DIY with card stock, ink jet printer, the exact gold foil and exact laminator and it did not work for me at first either! Make sure that the image you are using has been processed through a program such as photoshop. I found some images online and copy/pasted into word. For whatever reason, it did not work but as soon as I screenshot the image, imported it into photoshop and put it right back into a word document, it worked. Why? No clue. But it does. Perfectly. Hope this helps!
It won’t work with an ink jet printer, because the foil is toner-reactive, meaning there needs to be toner for the foil to adhere to. Because an ink jet printer uses ink, the toner-reactive foil won’t stick. This is why you must use a laser printer or copy machine that prints with toner.
Thank you! I hadn’t been able to get this to work, even though I was using black toner and a laminator! I was designing in Illustrator, but once I took a screenshot and printed from Photoshop, it worked great! And Jen’s tip about the coated stock helped, too. Now I need to find some coated black paper so the foil will really pop.
Is there anyway this can be done without a laminator ?
I used to this at my work place for signs and invitations. There is also a product that comes in rolls sort of like duct tape sized rolls. I cant remeber the name or maker of it. They come in many colors of metallic foil, not just gold. (Purples, blues, reds etc.). The box the rolls comes in just tells you to print your words or image with the laser printer, then tape the foil in place. Go to a blank document, put your foil prepared printed page, back in the printer and press print from the paper feed not the tray. The paper with the foil side must face the rollers in the printer which is where the heat comes from. When it comes out, remove the tape and the foil plastic and the image will be foiled.
Hi Jen
this is awesome and I can’t wait to give it a go!
I live in Australia and am looking for somewhere local to purchase the gold foil. Do you know the correct terminology to search for and also, do you place the gold foil gold side down against the printed text?
Amy xo
Thanks, Amy! I’d search for “gold foil” or “toner-reactive foil” … something along those lines. Also, you’d put the gold side up, over the text. Good luck!
Thanks lovely
sorry…so gold against the black text or gold side up against the top piece of paper?
so sorry for the silly question xx
Gold side up – facing you.
Thank you Jen xo
Hi Jen
When I am passing this through my laminator, I can still see speckles of black ink left on the print where the foil hasn’t taken. I am thinking my laminator may not get hot enough.
Do you think this process would work by using an iron rather than the laminator?
Amy x
Yes, I’ve heard of people using an iron, but I haven’t tried it myself. Let me know how it goes! Good luck!
Do I have to seal it ?
What do you mean? Seal it with what?
Thank you for the tutorial! I bought that exact laminator, and got prints made at staples so that they would be toner ink, used the gold foil, and ran it through the laminator after I let it heat up for 10 minutes. But it didn’t work at all! Help! What am I doing wrong?? I’d love to learn how & get this down! Haha 🙂 X
Oh no! Sorry to hear that! Did you use the toner-reactive foil? If so, it should stick to the toner on the paper. What’s not working? Is the foil not sticking?
Did you have the foil the right way? You need to make sure the shiny side is up (ie. not facing the text).
I know this because I had it the wrong way the first time! Oops!
Ah yes, figured it out! Thanks!
I’m so glad it worked out! What was the problem?
Great! Good luck!
Great tutorial. I LOVE gold foil anything!
I’ve also tried this project & found that my prints worked out better when I didn’t have a piece of paper on top of the gold foil. I think it just lets that extra bit of heat through, because the gold was definitely less patchy that way.
I just used a little extra gold foil and folded the top of it over the paper slightly to hold it on as it went through the laminator (if that makes sense).
Yeah I found this too, wouldn’t stick at all with another piece of paper on top, not enough heat I guess. Only done a couple of test prints so far but its hard to keep the crinkles out.
I tried this with icraft Deco Foil that I got at Michael’s and it worked. Its a little bit patchy though, I used the laminator at my work and I’m not really sure if I had it hot enough or too hot, what temperature was the laminator that you used?
Great post 🙂
This is straight up bliss. BLISS I tell you!!
Me ha encantado la idea, me hubiera gustado enterarme mejor si hubiera habido un traductor porque no me he enterado muy bien. Aún así le pongo un 10! Muy original
Do you know how to gold foil over an existing image? For example, I have a photo of roses and wanted to write LOVE over them in gold foil. (In you tutorial, you print on just white paper) thanks 🙂
Will you be selling these in your etsy store?
looks so great just ordering the foil and was wondering if you use the standard gold or the Chinese gold? x
Thanks! I used the standard gold. Good luck!
Hey I know this is off topic but I was wondering if you knew of
any widgets I could add to my blog that automatically tweet my newest twitter updates.
I’ve been looking for a plug-in like this for quite some time and was hoping maybe you would have some experience with something like this.
Please let me know if you run into anything. I truly enjoy reading your blog and I look forward
to your new updates.
Sorry, I don’t have any input to offer on twitter updates. Thanks for reading!
Hello,
First, LOVE THIS.
I am having difficulty getting good text print quality.
I design the Print through photoshop, 4800px X 6600px with 600dpi. (8X11)–usually save it under TIFF or BMP.
I’m also using a Toshiba e-studio 2500c printer.
Do you know what I might be doing wrong? Or have any recommendations.
Thanks, Michelle! I usually design the print as an 8″x11.5 (standard letter size) at 300dpi and save it as JPG. The quality turns out fine for me. I hope it’s the same for you. Good luck!
Thanks i’ll try it out
Hey what printer do you use or recommend?
A laser printer.
Has anyone tried any DIY foil methods where you can have foil and a digitally printed design? I’m hoping to make cards with a floral print with a phrase in gold foil. Thanks!
print the background with a ink jet printer and then run that paper back through a toner printer. The gold leaf will only stick to the toner and not the background
You can you the same laser printer if you don’t have a laminator. And please NEVER use “photoshop” for type/fonts/letters/numbers/copy-based designs. (Cringe)
It ruins the integrity of the typeface. Photoshop is for…. Photos!
Honestly, this is is for home DIY’ing cheap prints, I’m reasonably sure the DIY’er is not concerned with the ‘integrity of the typeface’ or whatever other stuff that makes graphic designer types ‘cringe’. It looks pretty and satisfies the end user, that is sufficient enough.
I cannot believe this! I was considering to get it done at a professional printing place that would of cost me hundreds of dollars. I’m working on a major project right now for uni and I’m just watching my money waste away with all the special printing I need to get done. And now I can just do this! Have you tried it with different sized paper and paper stock? Also have you tried it with layering the foiling onto of an illustration? So some parts are foiled but the rest are left untouched?
I haven’t tried that, but I’m sure it would work if you just put the foil onto the parts that you want to be foiled and leaving the rest untouched. Good luck!
Really wish I would have seen this a few months ago! Could have been great for some wedding invitations I was making. Better late than never though – I will definitely be testing this out! Thanks for sharing!
I know this is an older tutorial, but I’ve just stumbled upon it and I’m definitely interested in trying it out so I hope you’ll see this question!! Did running the foil through your laminator damage the machine in any way? I use mine quite often for actual lamination, so I’d hate to ruin it!
Hi there! No, no damage that I know of. But I haven’t used it as an actual laminator yet, so there’s that… Sorry I’m not much help!
Hi Jen
Your gold foil prints look amazing!
I’m trying to do the same but using an iron and the foil isn’t sticking properly. It’s patchy, like a leather or zebra print design. Do you have any ideas why this might be happening? I’ve tried different heat levels but still not working properly. Thank you !
Hi Tammy,
I’m not sure, I haven’t used the iron method myself. The laminator is the only thing I used and it worked with that. Sorry I’m not much help with that!
HI! Does the Silhouette’s printable gold foil work as well as the Laura Murray? Thanks!
No, it has to be toner-reactive foil.
This is amazing. Do you think it would work on a woodgrain cardstock? I really want to incorporate this into my save the dates. Thank you!!
Hi! Do you know if gold leaf would work instead of gold foil? I already have some so I was hoping I wouldn’t have to go buy the foil too.. Thank you!
I’m not sure. I’ve never tried it with gold leaf. The thing about the foil is that it’s toner reactive. Not sure if gold leaf is too. Try it and see what happens!
Hi! Does it work the same if the toner of the prints is dry? Because I do not have a laser printer at home, so I was wondering if I should get the same result going to print my creations to the printer and then come back home to gold foil them.
Yes of course! That should work 🙂
Hi Jen! I recently was asked by one of my friends to help create some wedding invites so this is the perfect tutorial that I need in order to accomplish her gold foil lettering. Real quick question for you! Do you know if there is a way to have the gold lettering on top of a background image? For example my friend is hoping to have an engagement picture in the background with the lettering on top. I’m stumped and google searching isn’t providing any answers.
Thank you so much for the help!
Hmmm… maybe if the engagement picture is printed with ink (not with toner) and then the lettering is printed with toner – the toner-reactive gold foil only reacts to the toner, so in theory, that might work. Good luck!
That’s what I was starting to think, but of course I couldn’t find anywhere whether or not that is a terrible idea (putting an ink-based print into a laser printer)… But I might just do it and see what happens since we are both thinking the same technique would work (at least in theory). Thank you so much!!
If the toner supplies heat and pressure wouldn’t an iron suffice?
Yes, though I haven’t tried it myself. I’ve heard mixed reviews from people who have used an iron for this project. Try it and let me know how it goes!
wow…..good work !!
very inspiring
hi. I can’t wait to try this! Does the font matter? I’m assuming something thicker and not too much script works better. What fonts have been most successful?
I think heftier fonts work better – the thicker space allows more real estate for the gold foil to stick to. I haven’t tried it with thin fonts, though – let me know how it works for you. Good luck!
Hi Jen, great post and inspiration for all of us! I just wanted to clarify for a few people who may be getting confused about the Silhouette’s printable gold foil which was mentioned in the post. Although it was brought up in the comments, I just want to clarify that people shouldn’t buy that paper to do the gold foil prints. Also, I have a website where I sell gold foil prints – check it out at http://www.myblueavenue.com – I’ll have more new prints up soon. If anyone can’t get the foiling to work and wants to buy one, check out my site. I hope you don’t mind the link – feel free to remove it if needed. 🙂 One quick tip – if some of the gold foil won’t stick perfectly to the toner, try setting the temp a little lower and then leave the gold foil exposed. This will create a strong bond and will not result in many, if any, black spots. Try one paper one cover sheet on the bottom, leave top exposed and it will stick a lot better. You’ll have to mess with the temp a little to find the sweet spot – depends on paper thickness and foil used.
Thanks for sharing those tips, Savanna! Off to check out your print shop now… Thanks for stopping by!
I’ve heard that the foil sticks better to coated cardstock than uncoated cardstock. Can anyone report what kind of cardstock you have found to work the best? Will your standard $10 pack of 100 sheets from Wal-Mart do the trick? Or is there a better (reasonably-priced) option out there?
I just used regular ole cardstock, bought at Staples, in a pack. Good luck!
Savanna – Thanks for the tips! Your prints look great. Can I ask what model of laminator you use?
Thanks for the awesome tutorial, Jen! The best I’ve seen! 🙂
just to make sure I don’t ruin my laminator at work- you would layer the paper with the foil and put it through? Foil going through the laminator?
Thanks!!!
I sandwiched the foil in between two sheets of paper.
That was the best….and easiest DIY directions. I completely love the pics you did. Thank you for taking the time to put that up…..Awesome!!!!
What font did you use for “Beautiful” and “Hustle” (the one with dog hair)?
Use that laminator to etch copper also. https://www.youtube.com/watch?v=B9LmE-H-SHU
Awesome! Thanks for the link, Jerry!
i was just wondering if the paper with the gold foil goes into a laminating pocket or not??
I did not use a laminating pocket.
I love the idea. Have any ideas on how i can put the print on say a planner cover that is leather? But will not fit through the laminator?
I’ve heard people have used an iron – but I don’t think you can iron leather without damaging it. :-/
hi! i loved this tutorial!! i want to do it already ! 😀
is it essencial to use the hot laminator or can i use an iron?
thank you,
Hi, do you have to use a laminator which takes 10ml pouches? That’s what the MyBinding.com tutorial said, but I have a 5ml laminator. The foil didn’t turn out that great, there were a lot of black spots where the foil didn’t transfer. Your pictures look great because it looks like the foil covered everything with toner.
This is the laminator I used: http://www.amazon.com/Apache-AL13-Thermal-Laminator-Pouches/dp/B0012UEXTQ/ref=sr_1_8?ie=UTF8&qid=1423717099&sr=8-8&keywords=laminator
I also bought the foil from mybinding.com
And my print outs were from a few hours before I transfered the foil.
Hi!
I tried this DIY project and it worked!!! However wanted to ask do you know if I can use color cardstock and will the gold foil still stick to the paper?
The toner-reactive foil sticks to wherever there is toner applied, so I don’t see why colored card stock wouldn’t work.
Hi, love your tutorial. Can you tell me if you have ever tried to gold foil vellum.
Hi Jen, thanks so much for sharing your process. Have you tried stamping onto letterpress paper? Are you using coated or uncoated stock for the template, and for the final product?
You’re welcome, Ann! No, I haven’t tried hot stamping onto letterpress – that would look beautiful though. I don’t know if the card stock was coated or uncoated – I just bought whatever was on the shelf at Staples. 🙂
Quick question. I lived this idea. I was thinking for table numbers at my wedding I could do this, then modgepod the paper into the inside of a vase. Can this work with thinner paper? Or just heavy card stock? I will be reading your blog more to get more ideas.
I just used card stock because I wanted my prints heftier. I don’t see why this wouldn’t work with thinner paper. Give it a try and let me know how it goes!
Do you think this would work for wedding invitations? Does it come off if you touch/scratch it?
No, I haven’t found that it comes off if you scratch or touch it.
If it works from heat do you think you could just use an iron?
I’ve never used an iron for this project, but have heard people have mixed results with it.
Would this work on other types of paper such as pearlescent, nettuno and silk? Also is it possible to emboss the gold foil letters? x
Hey Jen –
I’m working on some wedding invites for my sister and she is looking for this gold leaf look. Do you think that it would work if I printed in black on a navy paper? I noticed in the tutorial you said it needed to be black on white. I am thinking it would work because the toner would still be there to cause the reaction…any thoughts?
Thanks in advance!
I’m not sure, but it would make sense that it should work! Try it and let me know how it turns out for you! Good luck!
Hi, amazing tutorial, good advice given! Don’t worry, i’m not going to ask if you can do it with an iron…
I’ve been working on this recently and find it hard to get really good results, most often the result having heavy set creases through it. I’ve tried putting paper over the top and it didn’t really work, and i’ve tried tracing paper which worked better, but still i’m looking at 1 in 3 which I can use. Do you have any tips on reducing crease lines etc?
Thanks in advance
Smooth out the foil as best you can, because once it goes through the laminator, it goes in and comes out as is, wrinkles and all. So try your best to smooth it out as much as possible. If you have a crease in your foil, try to use a section that is crease-free and you should get better results. Good luck!
I found your blog via Pinterest & this tutorial was EXACTLY what I needed! I’ve been foiling for a few years but with spray adhesive & gold leaf. I must say this rocks all the other types of foiling/leafing! I did purchase the laser printer & laminator for under $50! I ordered the foil from Amazon & found some multi colored foil at Michaels (half off). The 1st laminator left me with very wrinkled gold foil & not so pretty gold letters, I exchanged it for a Scotch brand & that did the trick! I’m beyond thrilled & you’re so right, IT’S ADDICTIVE! Thanks for your post & even more for answering the questions in the comments. That’s speaks volumes!!
Yay! I’m so glad you found my tutorial helpful! When I first posted about it, I found ZERO tutorials on it, which surprised me! So glad it turned out well for you!
Fantastic information mate thanks so much, Can you tell me does the Laser print have to be straight out the printer to work as im getting my Wedding invitations printed commercially and then sent back to me will they still work when i try to gold foil them ?
I got mine printed and then waited a few days before I got around to putting them through the laminator. No problems here.
HI there! I just came across your blog. I love it! I have a couple questions for you… So I have HP Deskjet 2514 but it does have a scanner? If I copy my projects will it print on toner?? Maybe you don’t know but I thought I would give it a shot in the dark. Also, How do you get your prints to fit in a 8X10 and still making them pretty? Because obviously you have to cut it down a size to make it pretty from a standard printer sheet but how do you make it look good? Does that even make sense? I wish I could explain what is in my head hahaha! Thank you!
Why is the foil not only sticking to the toner buy my card as well?
You need to use toner-reactive foil, so that it sticks to just the areas with toner on it. Here’s the link: http://amzn.to/1YgJHdB
Hmm… this didn’t work for me and I’m confused. I printed a design at Office Depot on 110 lb silk cardstock. (They do use laser printers, which I confirmed.) The foil I had left over from a Heidi Swapp Foil Laminator—which didn’t work for me either and I’m returning.
Am I not using the right paper? Is her foil not good either? I have an Amazon laminator and I used it on both the 3m and 5m setting and all it did was heat up my project, but the foil didn’t stick. It all peeled right off.
Any advice? I was hoping this would work and I could add to my crafting projects.
Was your foil facing the right direction? Meaning the silver side is against the image and the gold side is up because when you lift the foil after it’s gone through the laminator the gold is still what you want to see.
How hot does your laminator get? When I did this, the foil stuck to the lettering and left gold streaks on the paper.\Thanks Bonni
Oi Bella!
I recently went to Joann’s and was obsessed over the DIY Gold Foil paper & images. I knew there was a cheaper way to gold foil without buying the $150 Minc Machine. I was just talking to my best friend about trying it out with a laminator. Glad it works, I might try it with a different laminator to see if I get a better result. I’ll be blogging about it within the next month so feel free to come check it out!
oohBella.com
Ciao Bella!
I’m with Bonnie! My foils stuck to the letters but ALSO all over the paper below 🙁 is this maybe because I have heat foils and not toner??
I’m not sure… I used a toner-printed print and toner-reactive foil. The links to the products I used are in the post.
Buying these today!!
A couple questions please…
1. Do you know if you can reuse the foil in the spots that didn’t peel off?
2. What technique got you the absolute best coverage!? Thanks
Yes, you can use the foil that didn’t adhere to the toner! Just be sure to smooth out the wrinkles as much as possible – and keep lint (or dog hair, in my case) from getting in between your foil and paper, otherwise it’ll be part of your print!
Hi!
Thank you for the tutorial – I can’t wait to try it out!
Are you selling the black & white prints you made? I really like all three prints – they’re exactly what I’ve been looking to hang up in my room.
Hey there,
I have been experimenting with foil printing using my laminator. I run in through and sometimes when I remove the foil, you can see where the square of foil was, like the outline around the words and there is a shimmer where the space with no letters is (I hope this makes sense)..:any ideas on preventing this? Have you had this happen before?
No, I didn’t run into this issue. I’m sorry I can’t be more help!
Great tutorial but I have to laugh at the exact same questions getting asked again and again. Does it just drive you nuts? I’m getting mad at reading them over and over I can imagine how frustrating it must be to have to politely respond with the same answer repeatedly – patience of a saint! 🙂
Haha, thanks for visiting Andrea! Perhaps I should revise my post to include a FAQ section. 🙂
Hi! I was wondering if you have tried this with labels or stickers? Wedding DIY and wondering is the adhesive on the labels/stickers would get weird with the laminator. Thanks!
Hello!
Forstly, well done on the DIY gold leafing, your images are awesome!
I just want to ask you, after the prints were finished (in the gold state), does the gold come off in any way? As in, if you rub it?
I’m hoping to do something similar for a project
Many thanks for the inspiration
I wonder if an iron over the second sheet of paper would have the same effect as the hot laminator?
I bought the gold foil sheets that were linked in the post and was really bummed to see that they don’t work :0/ After having the project belly flop I came back to your website to read the post again and noticed several other people having the same problem. Could you possibly change the link in your original post to the correct product? Thanks!! :0)
Sorry to hear it didn’t work out for you! It could also be an issue with the printer – I’ve heard some folks saying that some printers don’t put out enough toner on the print.
THANK YOU for this tutorial! I tried it and it worked out beautifully!
For commenters who are having trouble: I found that the issue could be the printer. I used Jen’s gold foil tutorial to make my wedding invitations and it worked well, but not after a bit of trial and error. We used 3 different laser printers with brand new toner cartridges and I was getting splotchy results with 2 of the printers. Printer #3 finally yielded beautiful results.
Thank you Jen!
Jess, may I ask what brand and model was printer #3? I purchased a fairly high-end laser printer today for these projects but the results were splotchy no matter what setting I used. I think I need to find a laser printer that applies more toner.
Thanks!
Jen, you are such a lifesaver- These are the best tips, evah! 🙂
Quick question: Have you uncovered a way to create this on a non-papered surface, such as a candle or pillow?
I had this process of gold/laminating bookmark do for 3 months. I finally tried it and made great gifts to put into frames. The perfect idea to show my babies not all gifts come from toys r us! Merry Christmas!
Seriously LOVE this technique. I love anything to do with art and glam so this is the perfect combo of both! One question though, where would I find the toner for a printer. Is it a certin printer you need or can it work with any printer. Also any idea on pricing for the toner?
I’d recommend getting your prints printed at a professional place, like Kinko’s or Staples.
The HP LaserJet P1102w works amazingly well, and the printer is inexpensive. Other laser printers that I tried did not leave enough toner on the paper for a solid foil application.
Thanks so much for the tip!
Love this!
Question: If I wanted to have a black background and then have my text be gold foil how would I go about this? I wasn’t sure if I would have to print on black paper?
Now, to figure out how to do this on canvas (this easily!)
Do you think using an iron would work? I don’t have a laminator. Thanks for the tutorial!
Hello,
I tried your technique, it’s great, but I can not get something perfect, there are some places where the gold foil does not take. Do you have an idea why ? What is the temperature of your laminator ? Or it doesn’t work with tinny texts ?
Help please !!!
It could also be because the toner is not evenly distributed on the print.
Hello. Thanks for the wonderful tutorial. Do you know if this same project would work on black cardstock? Meaning, I want to print text onto black cardstock paper and have the gold foil laminated over it. If so,would the text be visible enough to place the foil over it?
Hope this makes sense. Thanks in advance!
Ooh, that sounds awesome, Dee! The toner-reactive foil will stick to everything that has toner on it, so the color of the card stock shouldn’t matter. I would give it a try and see what happens! Good luck!
Anyone can help me? When I run the paper through the laminator, there are many tiny dots of gold foil that sticks on my paper on the non printed area. Is it my laminator heat setting is wrong or the gold foil is of bad quality.
Hi!
Great post!
I’ve given it a go and am getting some small black dots (I made sure it was totally dust free first),
Just wondering if you’ve tried it on coloured toner?
I’m thinking if i use a colour behind it , it might not be as obvious that the gold hasn’t stuck 100%.
What do you think?
Get idea. I am highly interested in the fonts you use on the word HUSTLE and Beautiful. I heart fonts.
Hi!
Great tutorial. Will the foil only react with solid black toner? I’m asking because I might have other colored text on the page that I don’t want to react with the foil.
Thank you,
Lena
Hi, how high heat should the iron be? Don’t hv a laminator unfortunately…
Hi Ky,
I’m not sure about the iron settings – I’ve only used a laminator. Best of luck!
Simple but very detailed. I want to try this and hopefully, mine will turn out as good as yours.
Thanks for posting a great tutorial.
Regards,
Lily
What type of cardstock in terms of “#” did you use? Thank you.