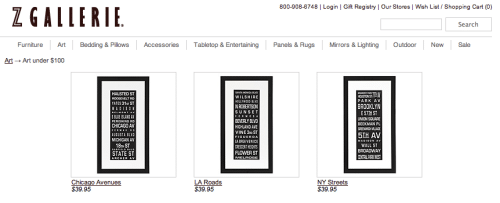
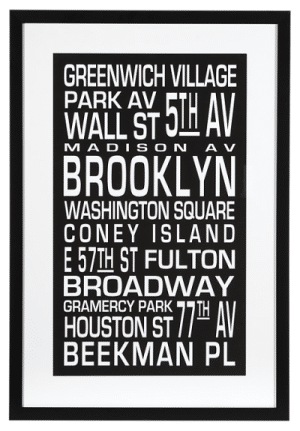
When searching for artwork to hang above our bed, these destination art prints from ZGallerie caught my eye:
But because I am NOT willing to shell out about $300 bucks just to own the set ($89.95 + tax, shipping & handling per print!), I chose the DIY route (especially when I look at something and my first thought is, ‘hey, I can do that!). So armed with my trusty Adobe Photoshop, I put my basic graphic design skills to work. The first task at hand was to find the font used in the original prints. My initial guess was ‘Eurostile,’ but since it’s not a free font, I googled “free Eurostile font” and found a worthy substitution: a font called ‘Waukegan.’ I had to scale and stretch the font to my liking, but it turned out pretty well in the end.
Also, I’m psyched I was able to DIY this project because I could personalize it. The ZGallerie prints feature New York City, Los Angeles, and Rome. While LA and Rome are fine cities, they have no significance to Adam and me. Instead, New York City, Fukuoka (Japan), and Nashville are three cities that hold very special places in our hearts, so they were the obvious choices.
After tweaking everything in Photoshop, I headed to the printers to have my artwork printed. I bought three black 11.75″x36″ frames at Michaels for about $35 a pop (on sale, 40% off!) and called it a day. Also, it’s probably not worth mentioning, but if you suffer from pregnancy brain like I do, I’ll let you in on a little secret: one should find the frames first and then create the artwork according to those frame dimensions. Otherwise, one might have one helluva time finding frames to fit wonky artwork dimensions (not that I know anything about this). Anyhoo… I framed the prints and dear Husband hung them up on the wall above our bed. I think they look pretty city chic, don’t you? And saving about $180 makes them look even better!
*Update: After getting numerous requests for these prints, I’ve started selling them in my Etsy shop! Of course, this is totally do-able on your own, but if you want to save yourself the time and effort, feel free to place an order with me! I’d be happy to create a custom piece for you!


Jen….those are SO cute!!! Very nice.
Those look awesome! I may try to make something similiar to this only with some color. Congrats! They turned out great!
Awesome!!!! Hmmm…. I want one too…. 😉
For future reference, the Garden Ridge store chain also sells frames, has a larger selection than Michael’s and sells them for less.
That said, the result looks very nice!
I’ll have to hunt around for a Garden Ridge around here… thanks for the tip, Mike!
Love these! What size did you make the pictures in photoshop before printing? Thanks!
Rachel,
They can be any size! They’re fully customizable and I sell them in my Etsy shop: http://jenwoodhouse.etsy.com
xo
Awww, the nashville roads make me happy! I use to live there several years ago. Good times! The prints are awesome.
I absolutely love this project. I have been eyeing this artwork over at Z Gallerie for a while now and never had the guts to pull the trigger on the price. Thank you for sharing this project! It came out great! I am definitely inspired to try it out on my own. And its really nice to be able to personalize it to your own life story.
Those look awesome! I'm going to have to try something like that!
What did you have Staples do to print these up? Different sized paper? 2 sheets? Cardstock?
Wendy,
They're considered oversized prints, so just ask them to use the printer they use for banners and blueprints.
These make me especially happy since I lived in Nashville for 10 years…we miss it so much! Great job, I've been toying with all the options of creating DIY subway art too.
love it!!! i'm definitely going to have to check out our shop becuase i've been trying to think of a way to "remember" all the places my husband and i have been stationed, and this looks like a fabulous idea!! plus, the colors would go great in our bedroom! 🙂
Those are FAB!!! You did great with your 'basic' graphic design skills!
Shannon
http://www.akadesign.ca
Thanks for the information Jen! These are wonderful.
Awesome project–it looks totally professional! Thanks for the tutorial and cost breakdown!
These are absolutely fantastic! I have been totally drooling over this idea for a while but really want two that are personalized to our home cities (St. Louis and Columbus). Any chance you can be hired out to do the design work?? Let me know. Either way – I love what you've done!
Jen, Thanks for sharing this. I got inspired and made two of my own. My husband and I are also a military couple, and while he's stationed in Pensacola, FL, I'm now living in New Orleans, and we're back and forth on the weekends. So, with that in mind, I made my two pieces of Pensacola and New Orleans where we both live part time. They came out amazing. I made them both 11×14 to fit into black frames from Michael's that were on sale and reasonably priced. The background of each piece is dark grey, and there's a thin white boarder on both sides. The font I used a font called Capitals (done on a Mac). They came out fantastic. Thanks for the inspiration.
I LOVED your version of "subway art"… it's right up my alley! I featured it here. Can't wait to make one for myself!
Maggie,
I sell these prints in my Etsy shop: http://jenwoodhouse.etsy.com
Jen, great idea! I was trying to do something similar but gut horribly stuck:
I bought 4 canvasses of same size and wanted to make a template where I cut out the letters and then paint over them to transfer the letters onto the canvas. I did that because instead of the words zgallerie uses I wanted to put words with more personal meaning for both of us on there. For example, I painted 1 canvas in brown, 1 in sand, one in purple and one in turqoise. each color stands for one city, e.g. sand is dubai where we lived, turquoise the island on the maldives we vacationed at, etc. Now, I am trying to find out on my mac how I can change height and size of the font you suggested in your post. but can't find that function. plus, I don't have photoshop for mac.
Could you tell me how I could resize the font, maybe online or some freeware?
I need to finish these pictures by friday (= date of housewarming party!! *yikes*) so any help will be appreciated!
all the best from Austria,
Nathalie
I just linked this project on our diy projects list…come see!
Also, for online freeware, I use gimp instead of photoshop and inkscape instead of illustrator…free is good!
Shannon
http://www.akadesign.ca
These are great. I did a similar one with street names. I wish I would have seen these first. . . framing them seems so much easier. Well done.
I know…I'm just a year late…but I was wondering, what options you chose on the Staples printing services. I'm uploading a PDF to their website (18×24") and it's coming to $24! I see yours came to $5, so I was just curious. Thanks!
Lauren,
I think you're using their glossy photo paper and they charge by square foot on that… I just used regular paper – if I ever re-do them, I'll go for the good stuff, but for now, it works for me!
Jen