Welcome back to the 2nd installment of our West Elm Knockoff Decor Series! Myself, along with four other DIY rockstar bloggers are sharing our West Elm-inspired projects throughout the summer. For this month’s challenge, we’re turning our attention to organizational items in the West Elm catalog. I chose to knock off this Reclaimed Pine Cubby Shelf. The price tag on that baby is $179.00. What the duck?! I knew I could build a knockoff version for much, much less, if not for F-R-E-E.
Well, friends, turns out I was right (I love when that happens). I raided my scrap wood pile and built my little cubby shelf for…
Wait for it…
zero dollars!
Yep. It’s about to get real up in here.
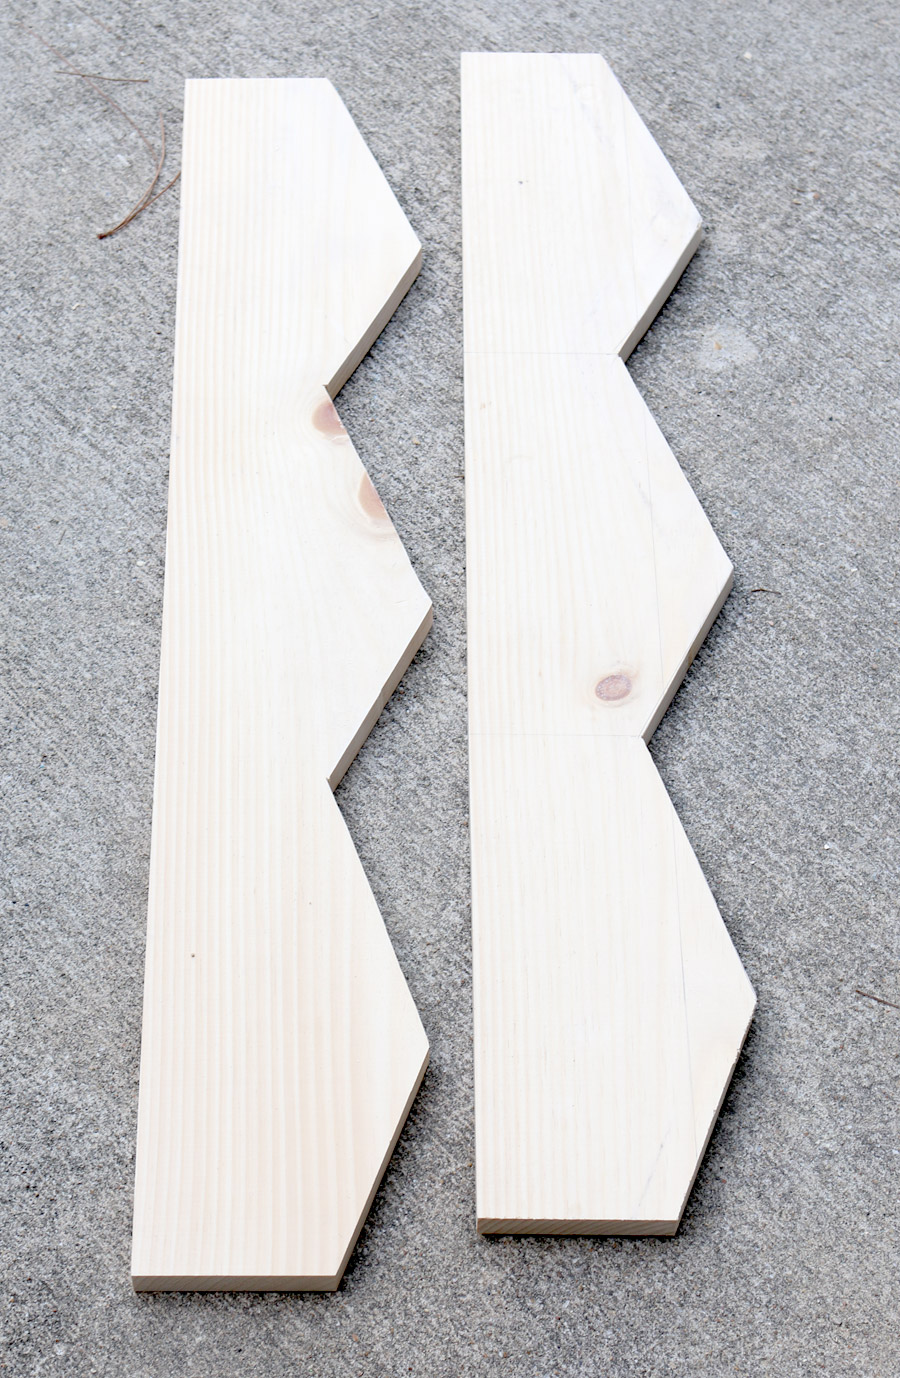
I had one 1x12x10′ pine board in my scrap pile so I cut it up to get all my different pieces. The plans include various board widths in the materials list just for the sake of ease, in case you don’t have a table saw to rip the boards to specific widths.
I’d estimate your cost to be around $20-$30 if you were to purchase new pine lumber from the store. Still a far cry from West Elm’s pretentious price tag, amiright or amiright? If you have some reclaimed wood lying around, even better! I purposely drew up the plans to include boards with different widths to mimic that ‘reclaimed’ look from the West Elm version.
First, cut the side panels out from a 1×8 board. Use a jigsaw and get jiggy with it. It helps to clamp the two boards together and cut it in one pass, so the boards are twinsies. Also, clamp a straight edge to guide your jigsaw so that you cut a straight line, but don’t beat yourself up if your cuts aren’t perfect. We’re going for ‘rustic’ and ‘reclaimed,’ remember? No pressure.
Then you’re going to want to construct the back panel. Do this by attaching them plank-style with pocket hole joinery. This is the pocket hole jig I would marry, if it were a human. Then attach the side panels to the back like so:
Next, attach the three shelves, again with pocket holes and pocket hole screws.
Finally, attach the fronts with brad nails and wood glue. Oh, and it’s worth mentioning: if I were a patient little DIYer, I would have used different color stains and stained the boards separately, before assembling everything. But no.
They tell me patience is a virtue, but I wouldn’t know anything about that.
Instead, I chose to do things the hard way and taped different boards off to stain them different colors.
Yeah. I’m kicking myself over it. After the stain cured, I wiped on a couple coats of Arm-R-Seal (my new favorite finish!) on it then attached a couple of D-ring hangers to the back.
Here’s how it turned out:
What do you think? Not a bad knockoff project that not only saved me $179, but took just one afternoon to build! Well worth the investment, IMHO.
Welp. You know what this means, don’t you? This completely justifies the future purchase of a $179 pair of shoes. I mean, it’s only logical right? Glad you agree.
Wait. Did we just become Best Friends?
Yup.
Be sure to show some love to my partners-in-DIY. These girls are my people. Hop on over to their blogs and take a peek at their beautiful and brilliant West Elm-inspired organization projects:
My blogging buddies and I will be back next month with our final round of West Elm knockoffs and we’re saving the best for last. You don’t want to miss it.
I’d love for you to pin and share this project using the image below. Thank you!
Did you catch last month’s West Elm Knockoff post? Click here to see our outdoor West Elm-inspired projects.
I’m using this as a project in my highschool wood shop class and I don’t think I’m doing anything wrong but when I cut all the measurements out I made sure they were correct and the project was all over the place. For example the back, it’s two pieces 3” and two pieces 4” which comes to 14” in total which is not the 12” it suggests on the front view diagrams. Now when I lined up the shelf bottoms which are 10-1/2” on all the cut out back boards I had a whole 2-1/4” on either side so I had to take off 1” on both 4” boards making them all 3” and I had to take 1/“2 off the 10-1/2” board. Like I said I don’t know if I’m just in the wrong here or if this diagram is off, so I would like to know if I am doing this wrong.
Hi Mason,
Great question! The plan assumes you’re using lumber from the home improvement store – they typically sell nominal width boards, not actual width. So a 1×3 actually measures 2.5″ wide (not 3″) and a 1×4 measures 3.5″ wide (not 4″). Hope that helps!
 Well, friends, turns out I was right (I love when that happens). I raided my scrap wood pile and built my little cubby shelf for…
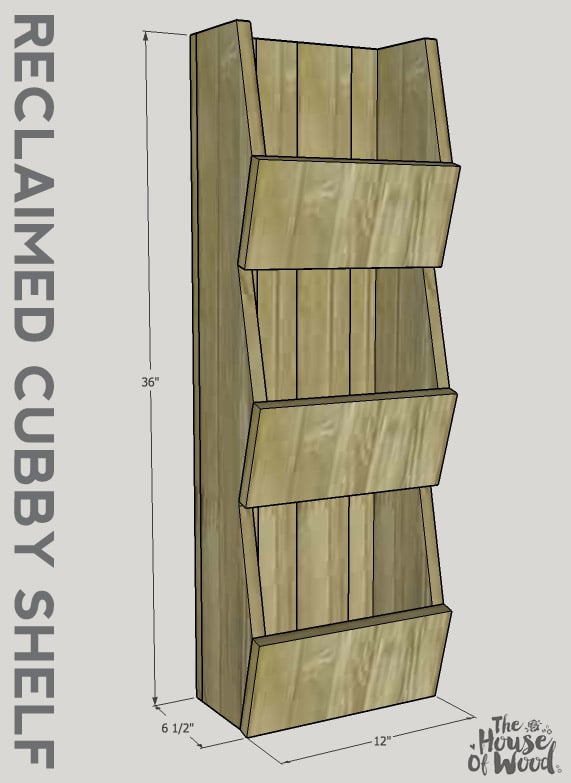
 Then you’re going to want to construct the back panel. Do this by attaching them plank-style with pocket hole joinery. This is the pocket hole jig I would marry, if it were a human. Then attach the side panels to the back like so:
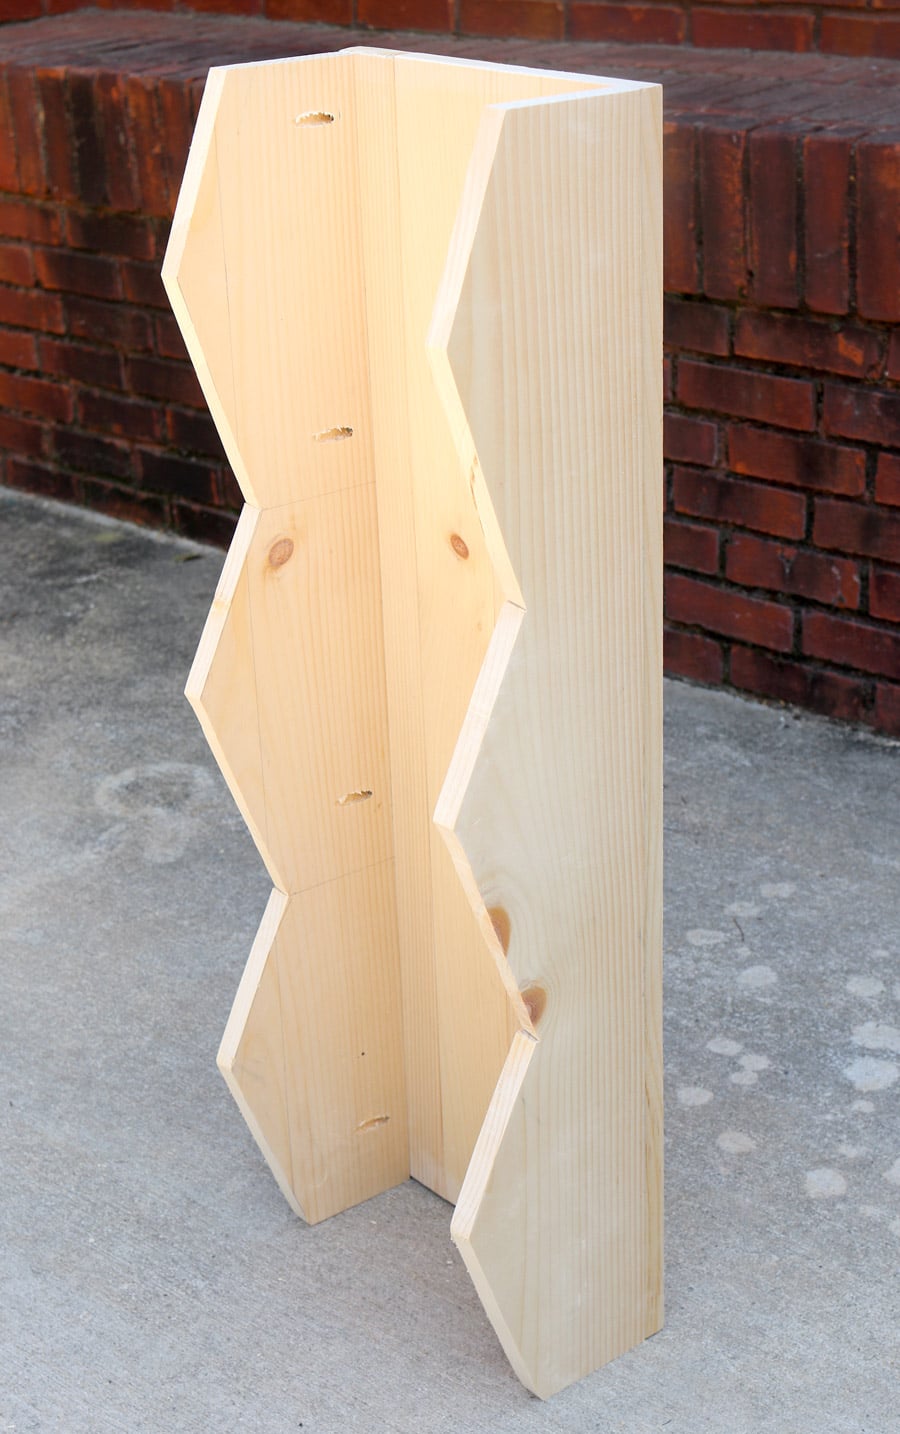 Next, attach the three shelves, again with pocket holes and pocket hole screws.
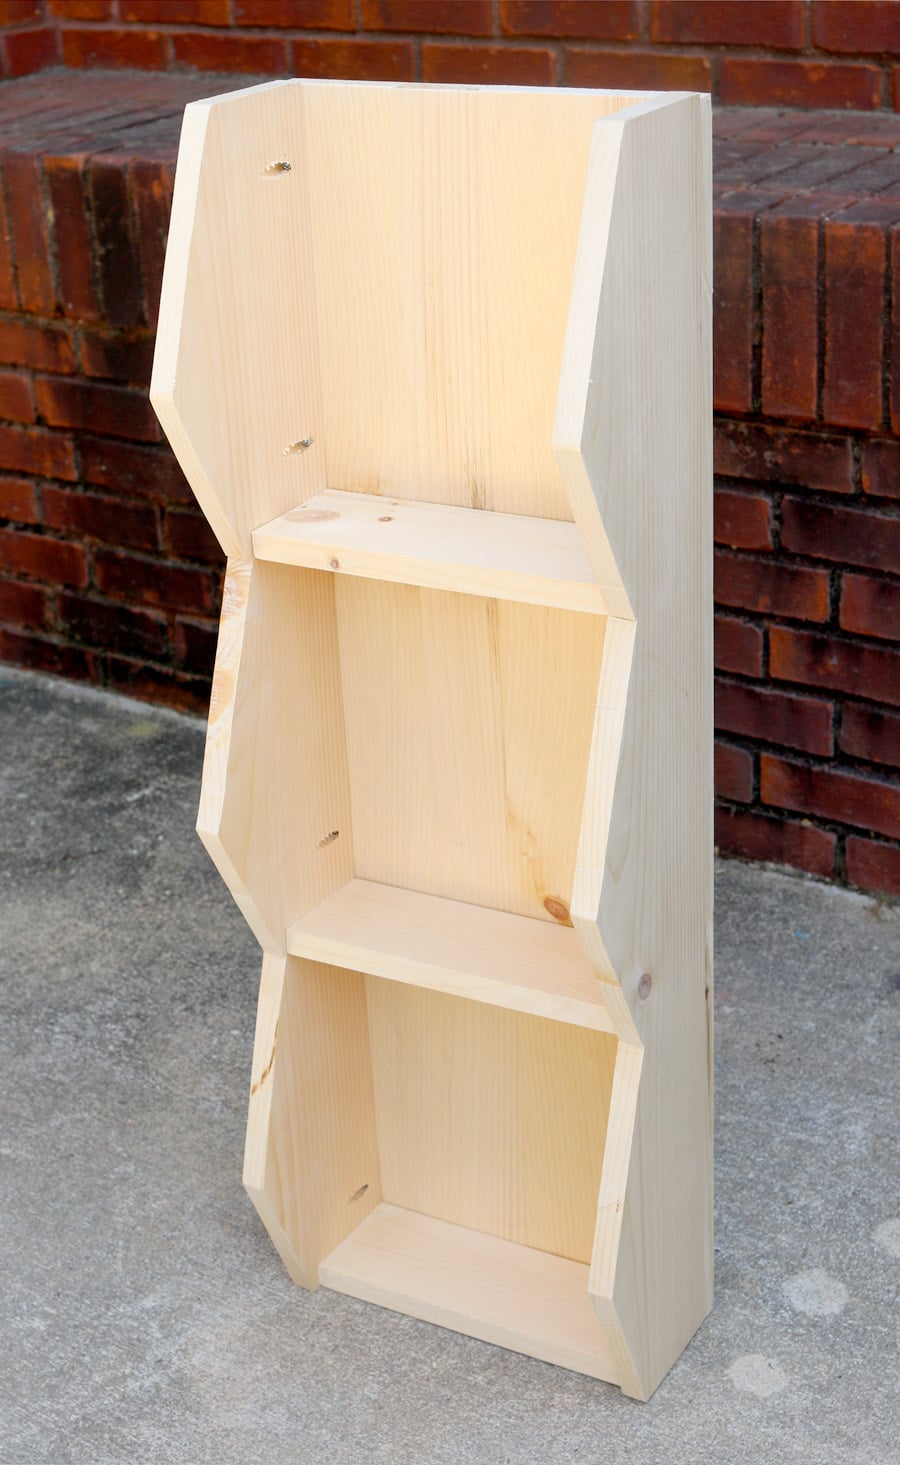 Finally, attach the fronts with brad nails and wood glue. Oh, and it’s worth mentioning: if I were a patient little DIYer, I would have used different color stains and stained the boards separately, before assembling everything. But no.
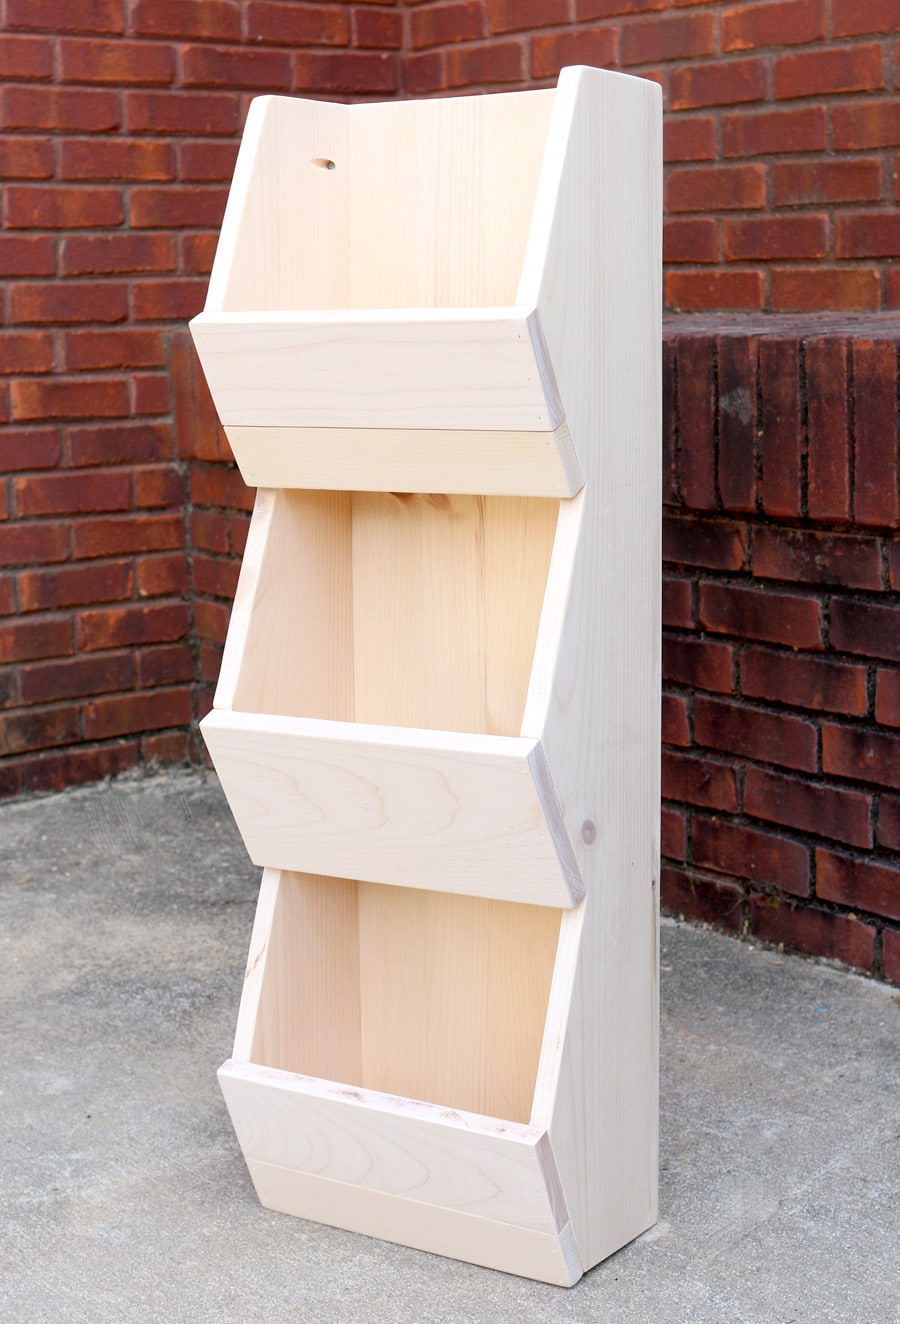 Instead, I chose to do things the hard way and taped different boards off to stain them different colors.
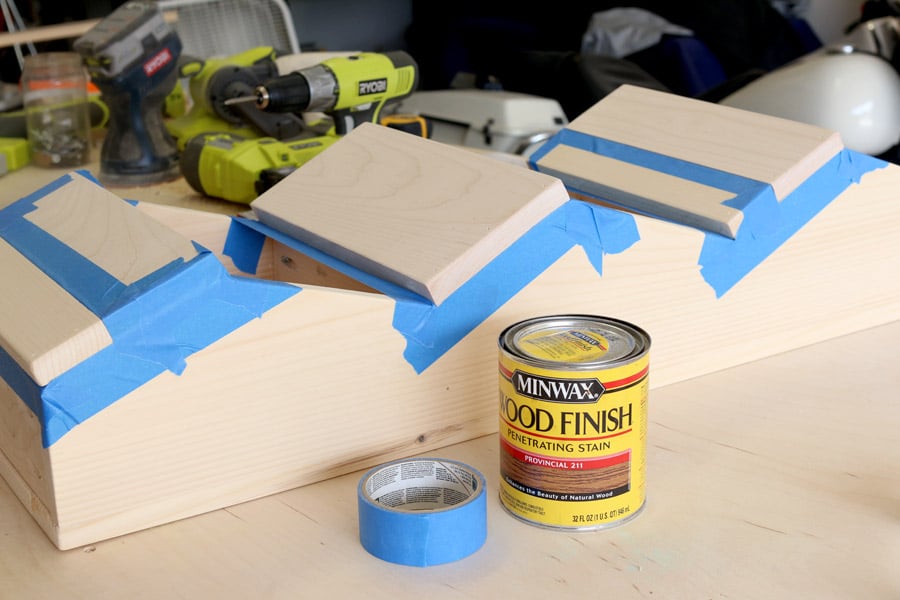
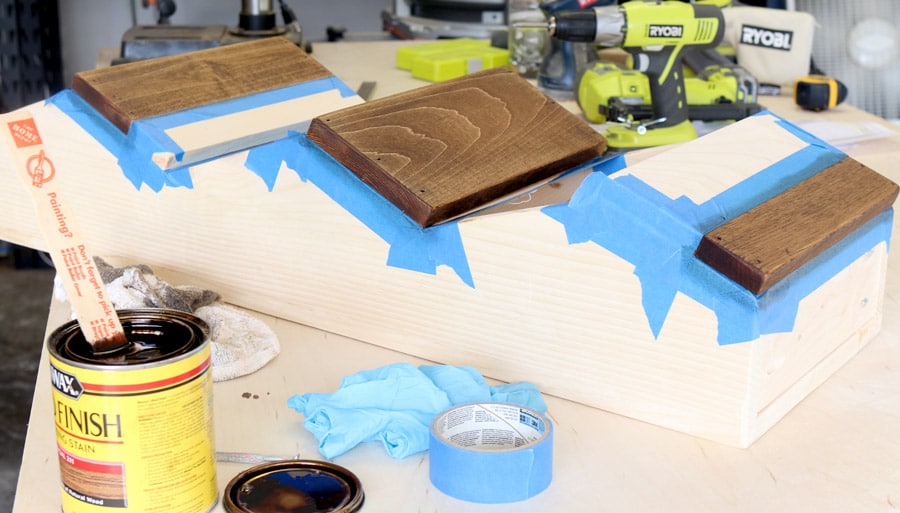 Yeah. I’m kicking myself over it. After the stain cured, I wiped on a couple coats of Arm-R-Seal (my new favorite finish!) on it then attached a couple of D-ring hangers to the back.
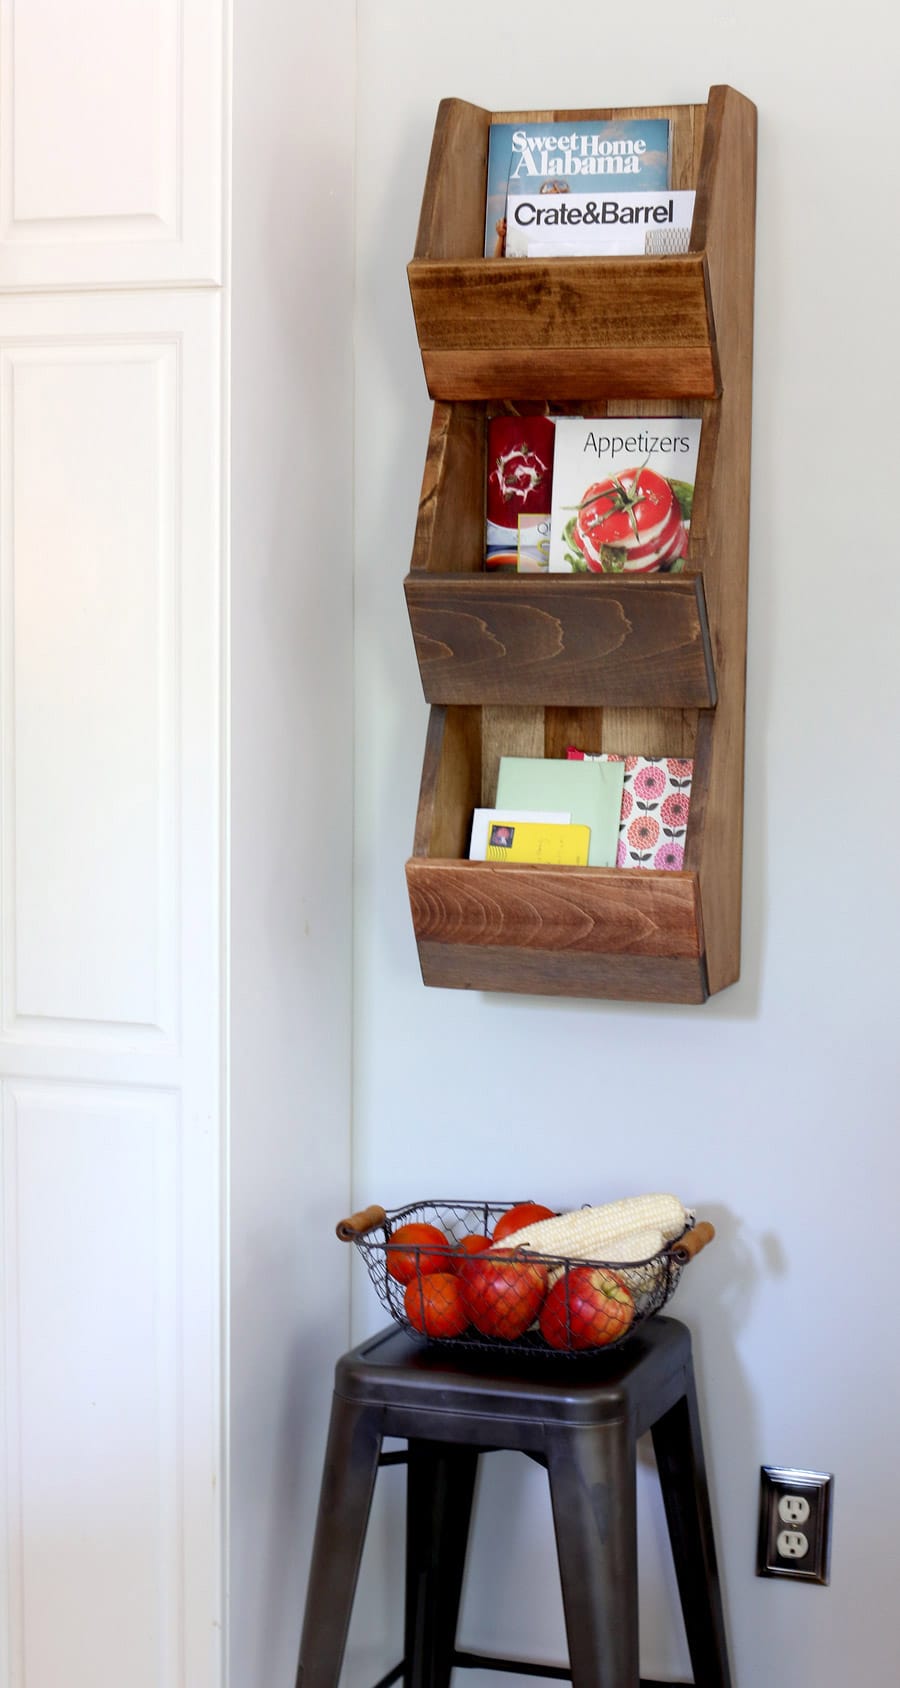
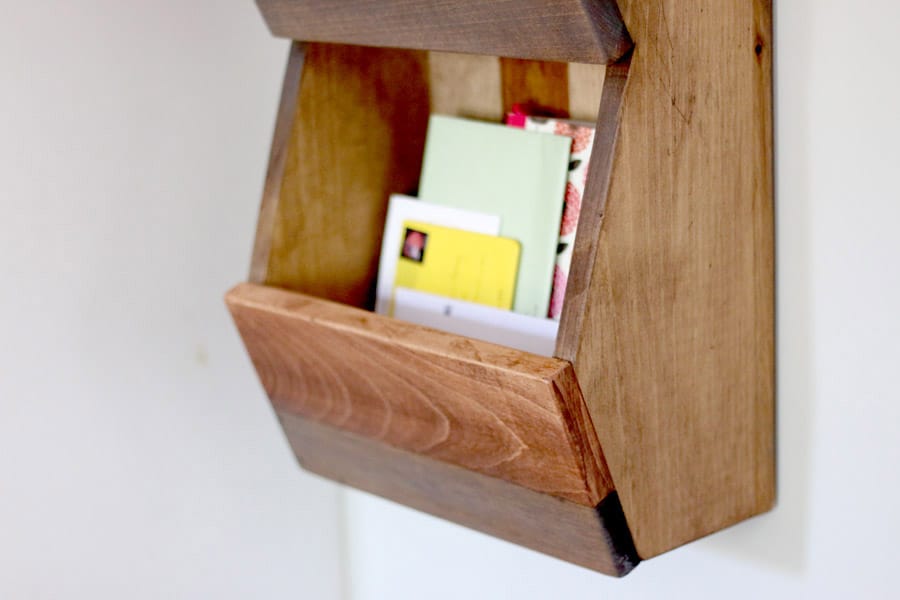
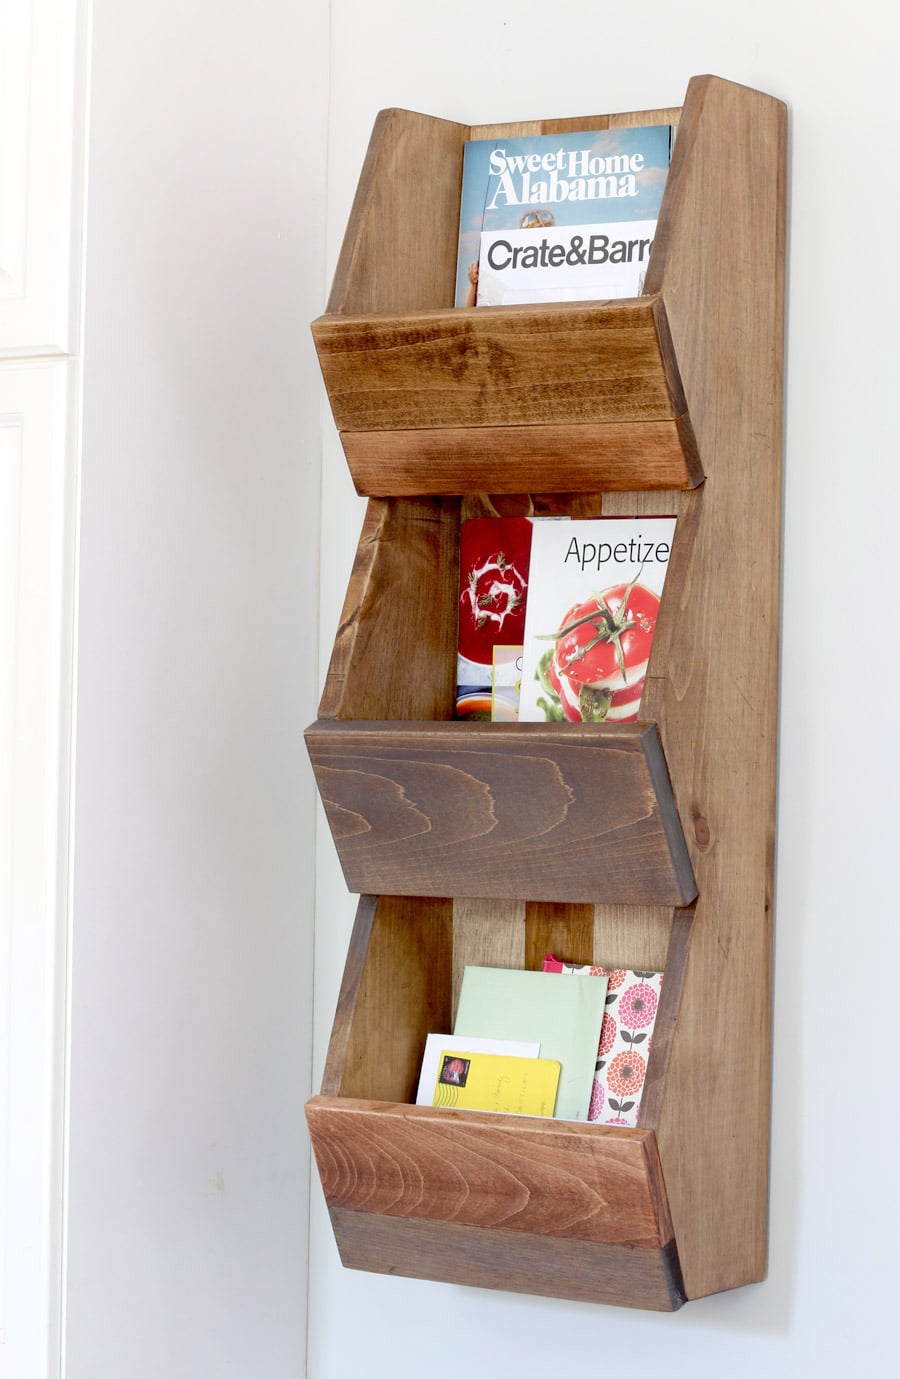 What do you think? Not a bad knockoff project that not only saved me $179, but took just one afternoon to build! Well worth the investment, IMHO.
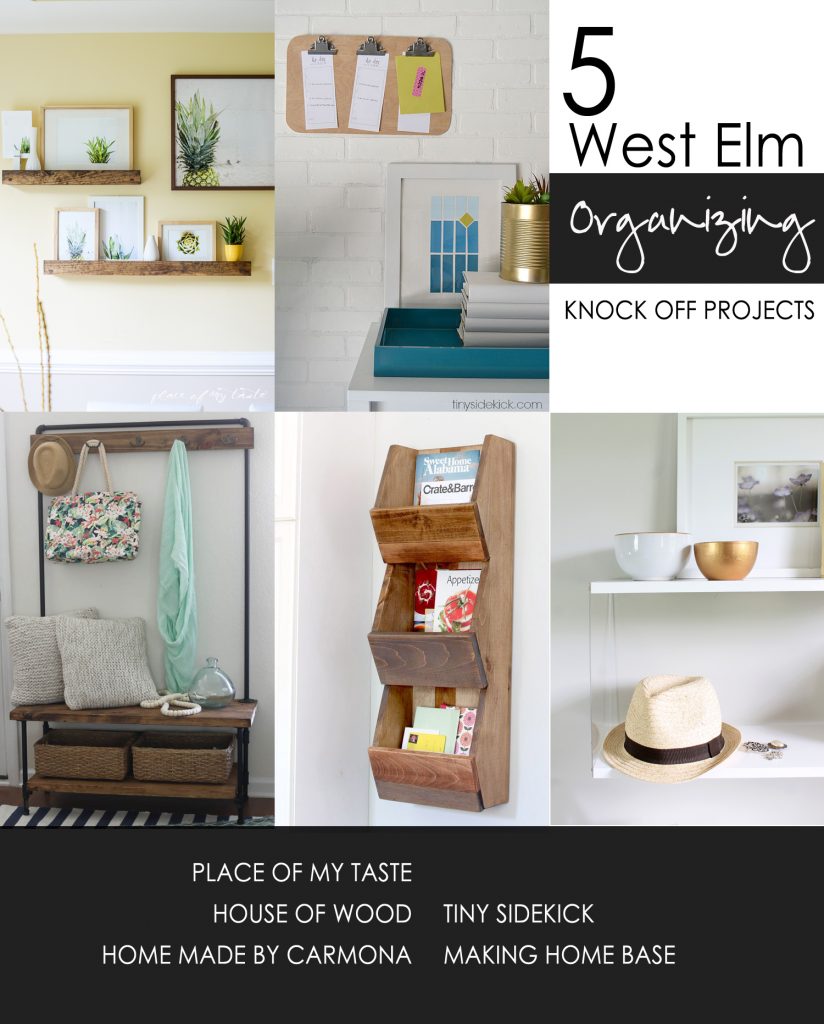 Be sure to show some love to my partners-in-DIY. These girls are my people. Hop on over to their blogs and take a peek at their beautiful and brilliant West Elm-inspired organization projects:
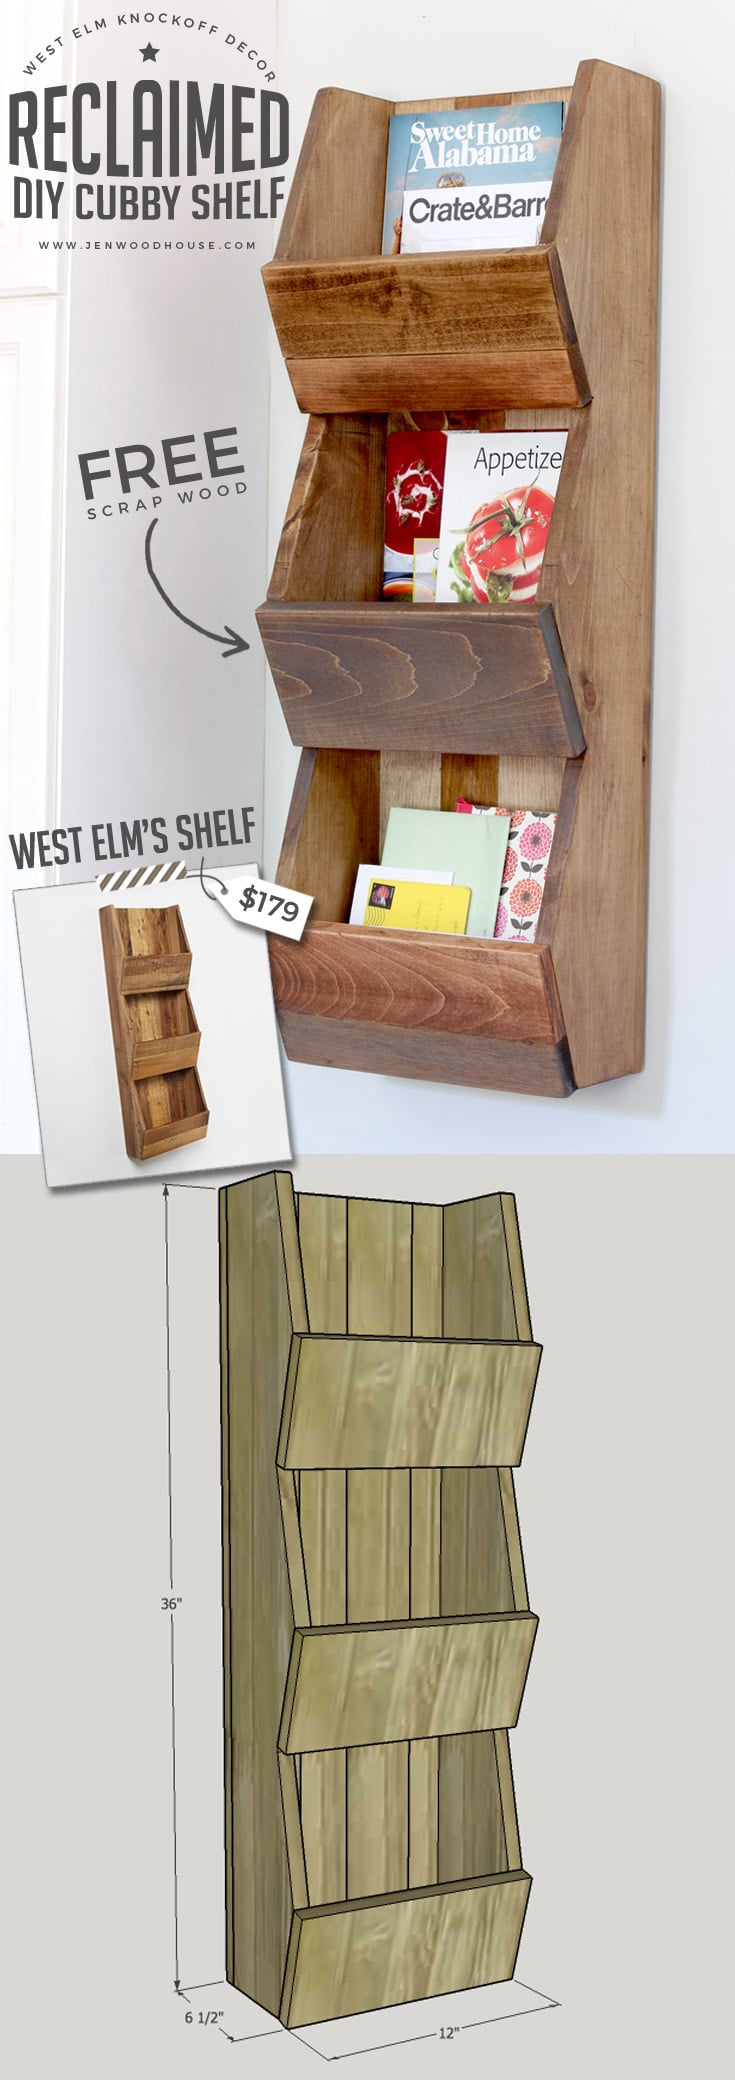


I’m using this as a project in my highschool wood shop class and I don’t think I’m doing anything wrong but when I cut all the measurements out I made sure they were correct and the project was all over the place. For example the back, it’s two pieces 3” and two pieces 4” which comes to 14” in total which is not the 12” it suggests on the front view diagrams. Now when I lined up the shelf bottoms which are 10-1/2” on all the cut out back boards I had a whole 2-1/4” on either side so I had to take off 1” on both 4” boards making them all 3” and I had to take 1/“2 off the 10-1/2” board. Like I said I don’t know if I’m just in the wrong here or if this diagram is off, so I would like to know if I am doing this wrong.
Hi Mason,
Great question! The plan assumes you’re using lumber from the home improvement store – they typically sell nominal width boards, not actual width. So a 1×3 actually measures 2.5″ wide (not 3″) and a 1×4 measures 3.5″ wide (not 4″). Hope that helps!