Materials:
*Affiliate links used.
- (1) 4 x 8 Ft. Sheet of 3/4-inch Plywood
- (1) 1 x 8 x 8 Ft. Board
- (2) 1 x 6 x 8 Ft. Boards
- (1) 1 x 3 x 8 Ft. Board
- (2) 1 x 2 x 8 Ft. Boards
- (1) 4 x 4 Ft. Sheet of 1/4-inch Plywood
- 3/4-inch Veneer Edge Banding (optional)
- 1 1/4-inch Pocket Screws
- 1 1/4-inch Brad Nails
- 1-inch Staples
- (2) Sets of 16-inch Drawer Slides
- (4) Concealed Hinges
- (2) Drawer Knobs
- (2) Cabinet Pulls
- (4) Furniture Feet
- (4) Hanger Bolts
- (4) Tee Nuts
- Wood Glue
Tools:
- Tape Measure
- Pencil
- Carpenter’s Square
- Cordless Drill/Driver
- Table Saw or Circular Saw with a Plywood Blade
- Pocket Hole Jig
- Brad Nailer or Hammer
- Stapler
- Concealed Hinge Jig (optional)
- Safety Glasses
- Hearing Protection
- Dust Mask
Cut List:
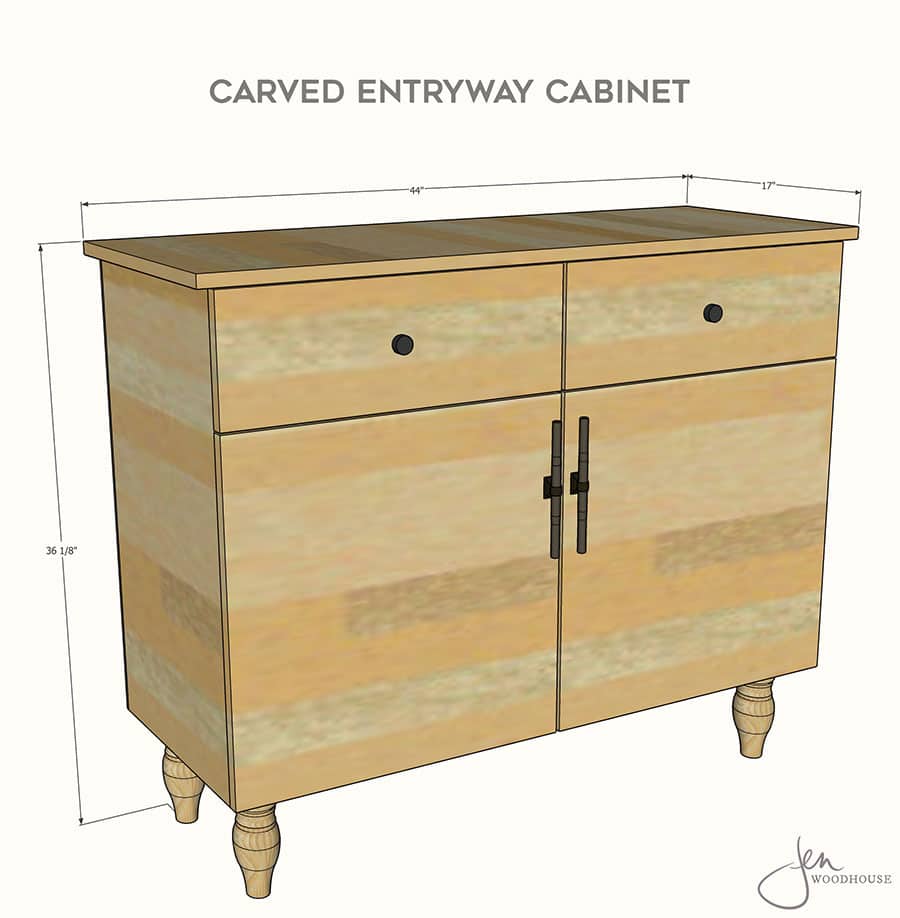
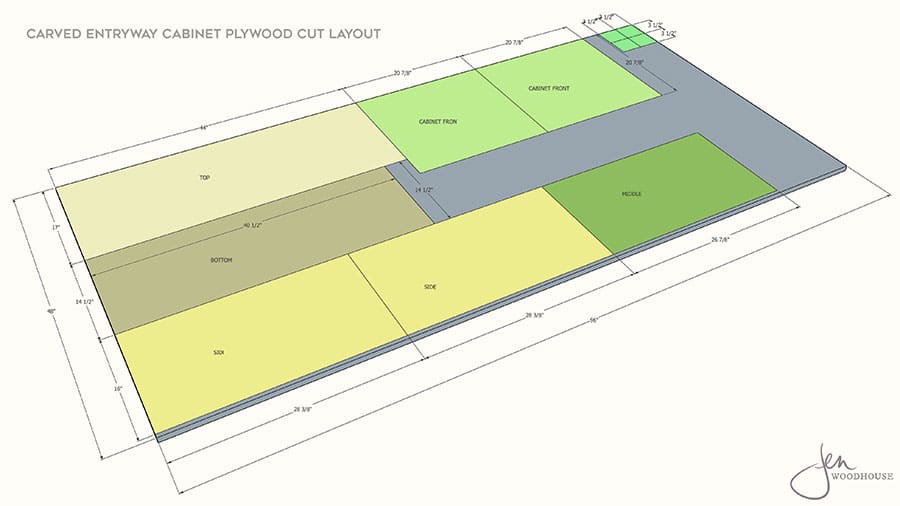
- (1) 3/4-inch plywood @ 40 1/2 inches x 14 1/2 inches (bottom)
- (4) ¾-inch plywood @ 3 ½ inches x 3 ½ inches (feet blocks)
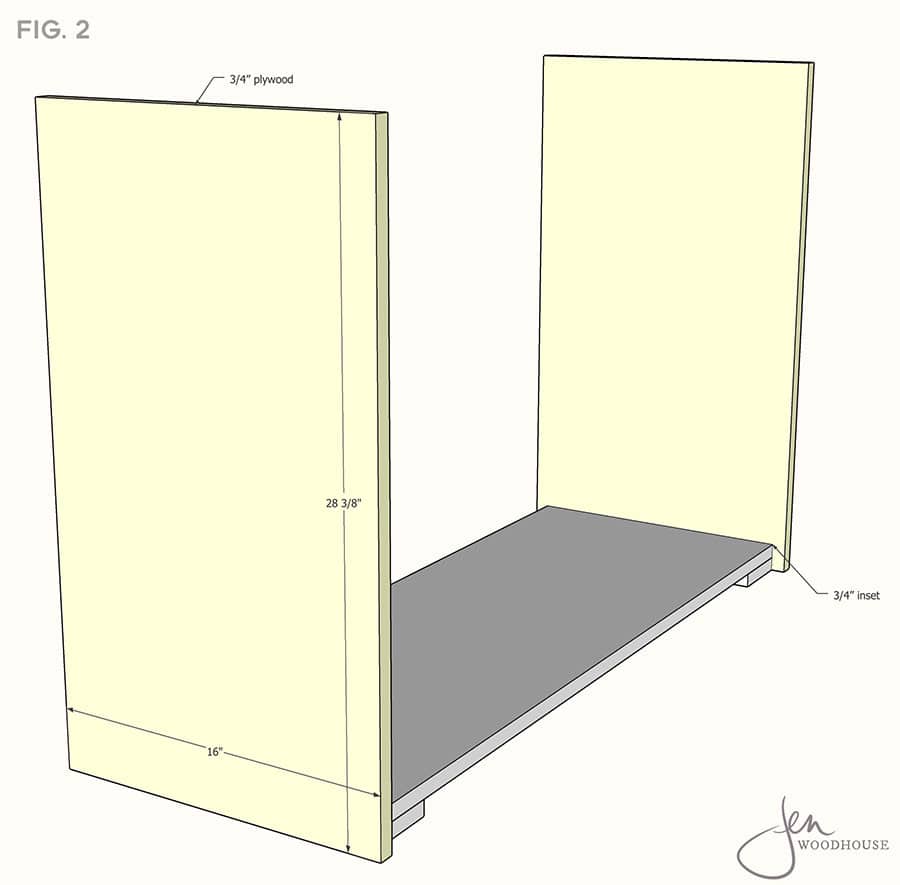
- (2) ¾-inch plywood @ 28 3/8 inches x 16 inches (side panels)
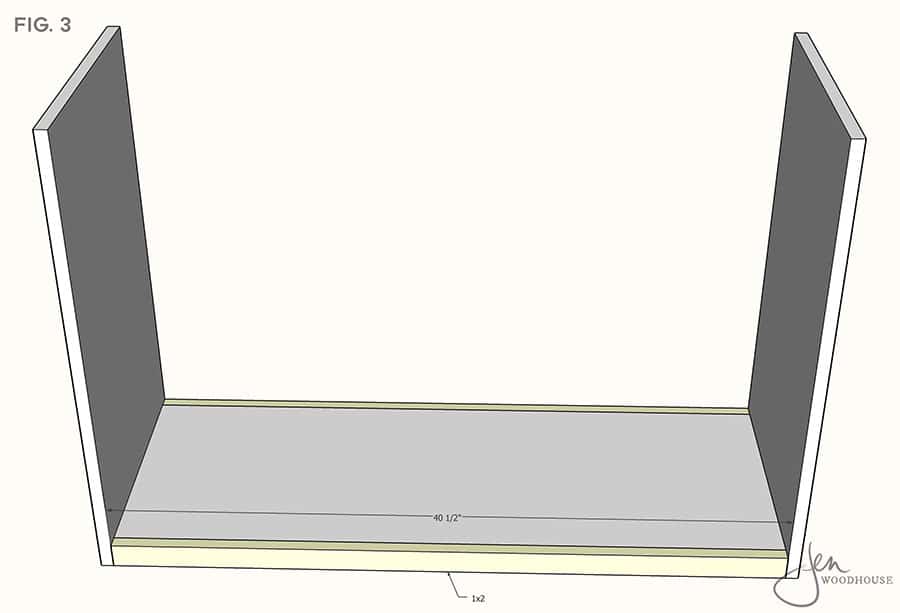
- (2) 1×2 @ 40 ½ inches (trim)
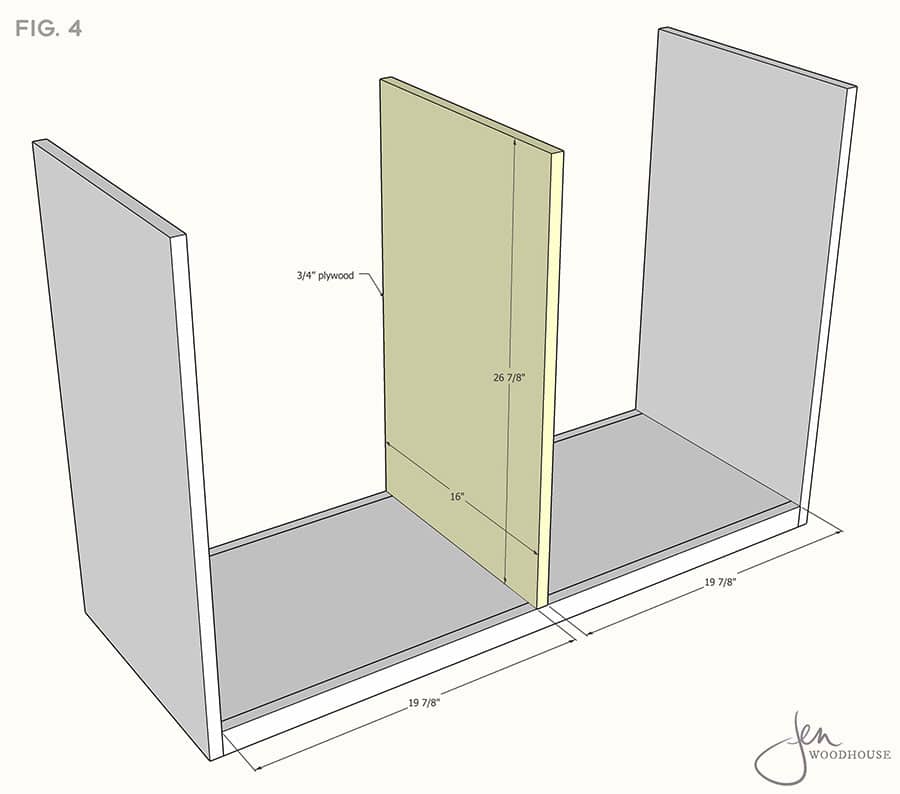
- (1) ¾-inch plywood @ 26 7/8 inches x 16 inches (middle panel)
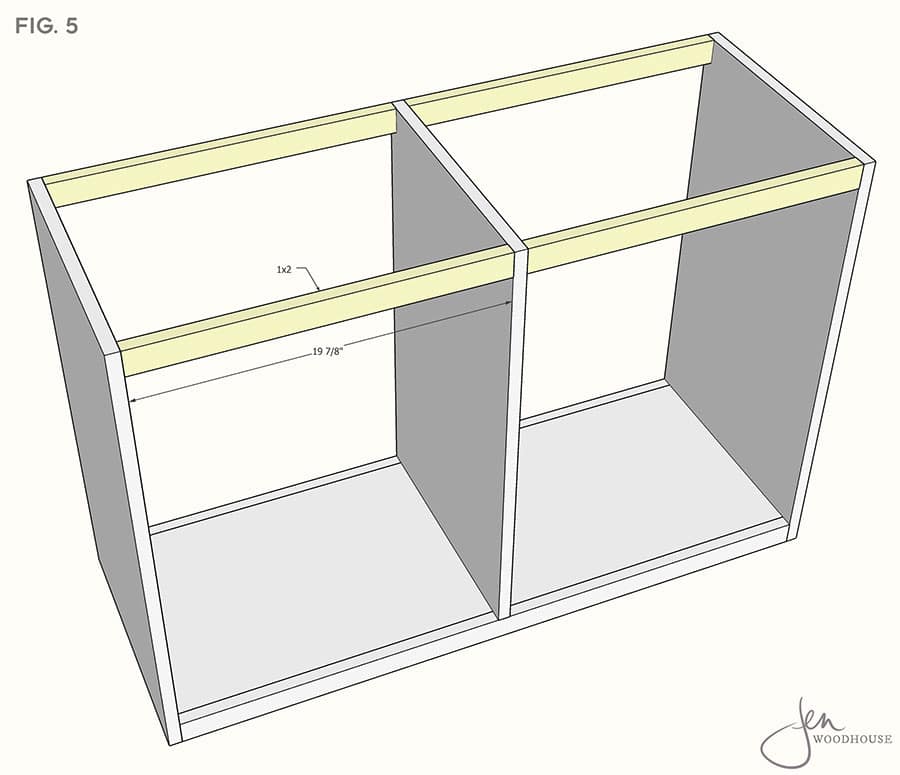
- (4) 1×2 @ 19 7/8 inches (support rails)
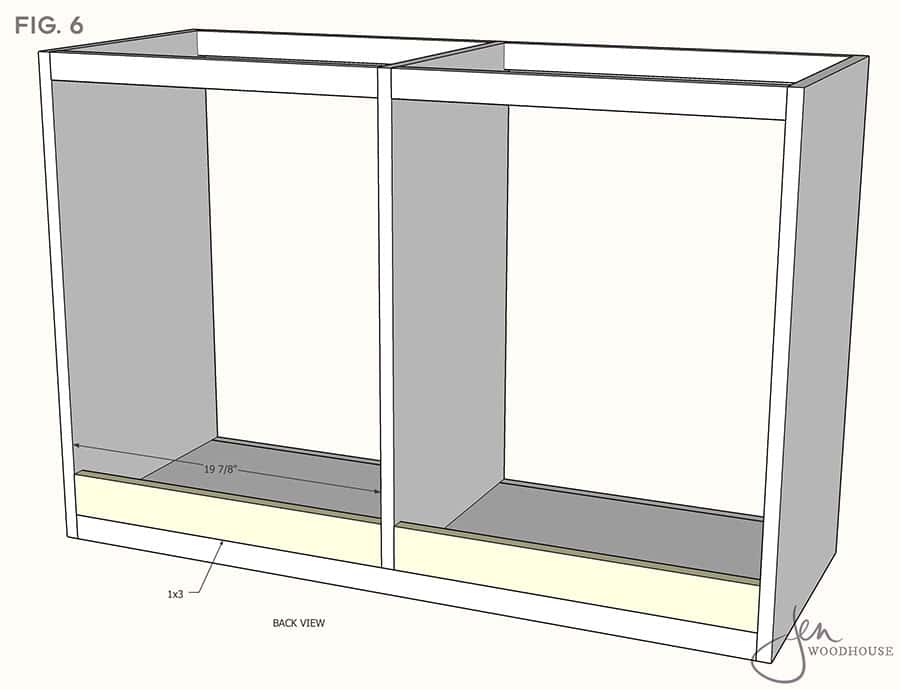
- (2) 1×3 @ 19 7/8 inches (back supports)
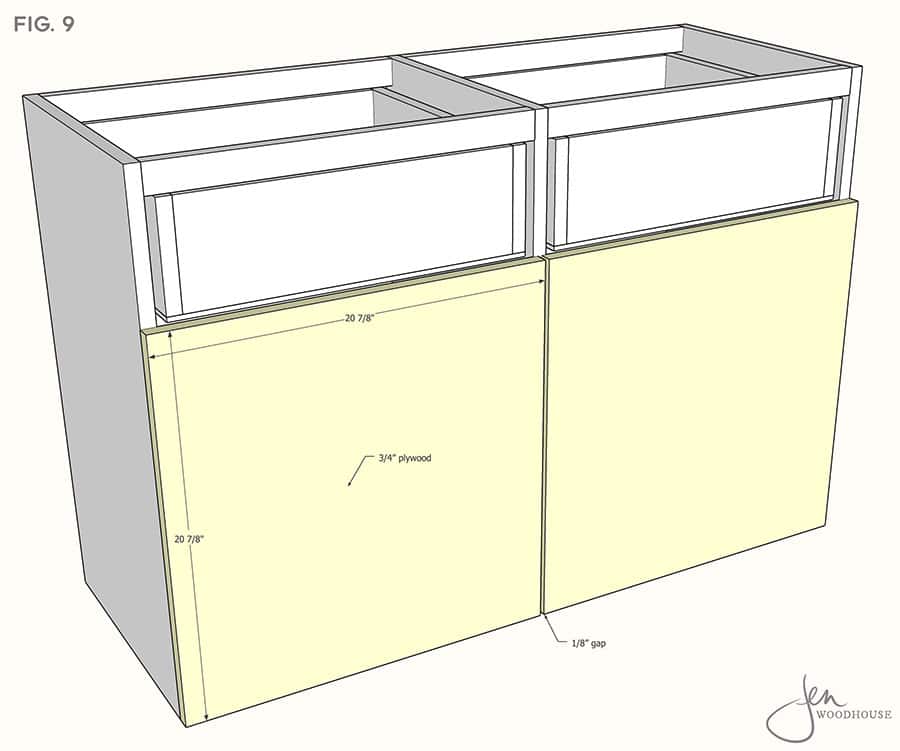
- (2) 3/4-inch plywood @ 20 7/8 inches x 20 7/8 inches (cabinet fronts)
- (1) 3/4-inch plywood @ 44 inches x 17 inches (top)
- (1) 1/4-inch plywood @ 42 inches x 28 3/8 inches (back panel)
Drawers:
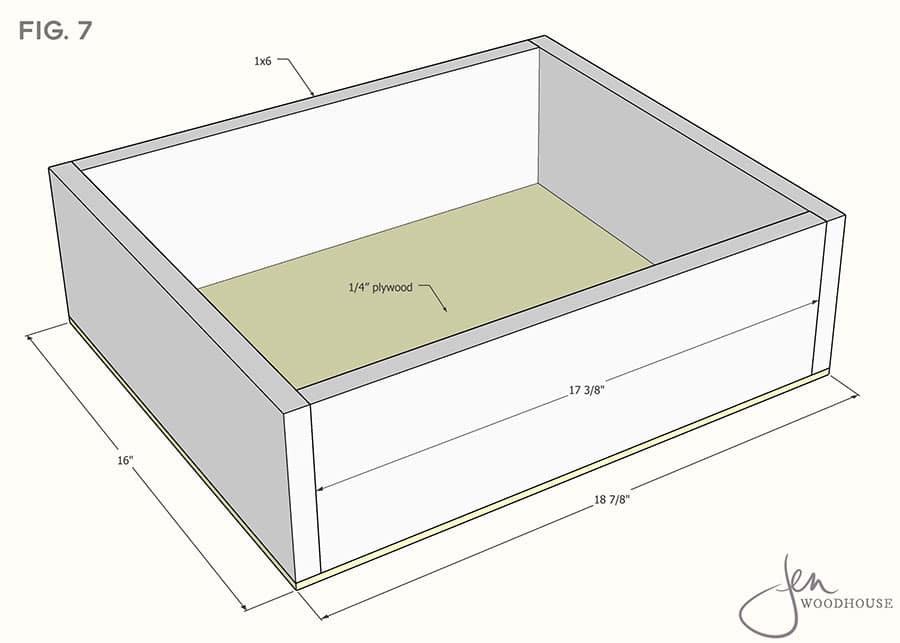
- (4) 1×6 @ 17 3/8 inches (fronts/backs)
- (4) 1×6 @ 16 inches (sides)
- (2) ¼-inch plywood @ 18 7/8 inches x 16 inches (bottoms)
- (2) 1×8 @ 20 7/8 inches (faces)
Step 1:
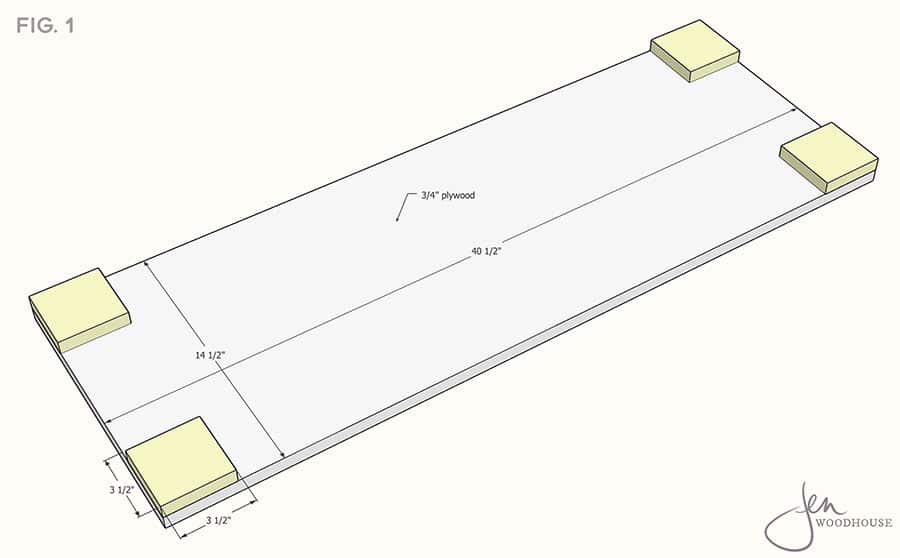
Measure, mark, and cut bottom and feet blocks to size. Drill ¾-inch pocket holes on the left and right edges of the bottom panel (hide pocket holes underneath), as well as at the top edge (for attaching the top in later steps). Attach feet blocks as shown with 1 ¼-inch brad nails and wood glue.
Step 2:
Measure, mark, and cut side panels to size. Attach the side panels to the bottom with 1 ¼-inch pocket screws and wood glue. Notice there should be a ¾-inch inset on the front and back.
Step 3:
Measure, mark, and cut 1×2 boards to length. Attach as shown with 1 ¼-inch brad nails and wood glue.
Step 4:
Measure, mark, and cut middle panel to size. Drill ¾-inch pocket holes into the top and bottom edge of the panel. Center the middle panel and attach to the bottom with 1 ¼-inch pocket holes and wood glue.
Step 5:
Measure, mark, and cut 1×2 supports to length. Drill ¾-inch pocket holes into the ends and attach to the carcass with 1 ¼-inch pocket screws and wood glue.
Step 6:
Measure, mark, and cut 1×3 boards to length. Drill ¾-inch pocket holes into the ends and attach as shown with 1 ¼-inch pocket screws and wood glue.
Step 7:
Measure, mark, and cut 1×6 drawer parts to size. Drill ¾-inch pocket holes into the front and back boards. Construct the drawer box with 1 ¼-inch pocket screws and wood glue. Check for square and adjust as needed. Measure, mark, and cut ¼-inch plywood bottom to size. Attach to the bottom of the drawer box with 1-inch staples and wood glue. Make two of these drawers.
Step 8:
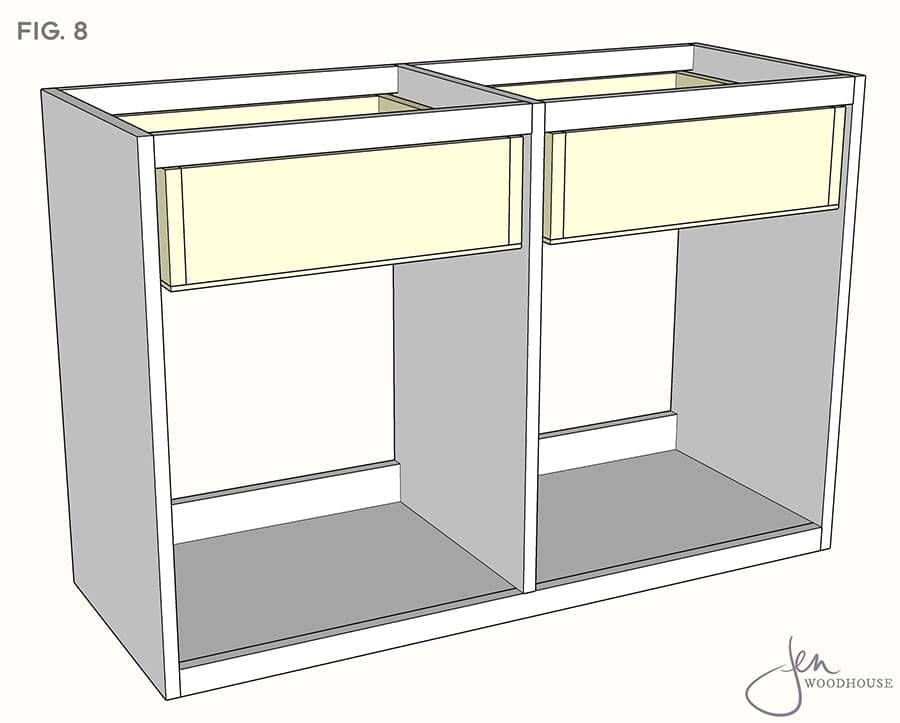
Install drawer slides according to manufacturer’s directions. Standard drawer slides typically require a ½-inch clearance on each side.
Step 9:
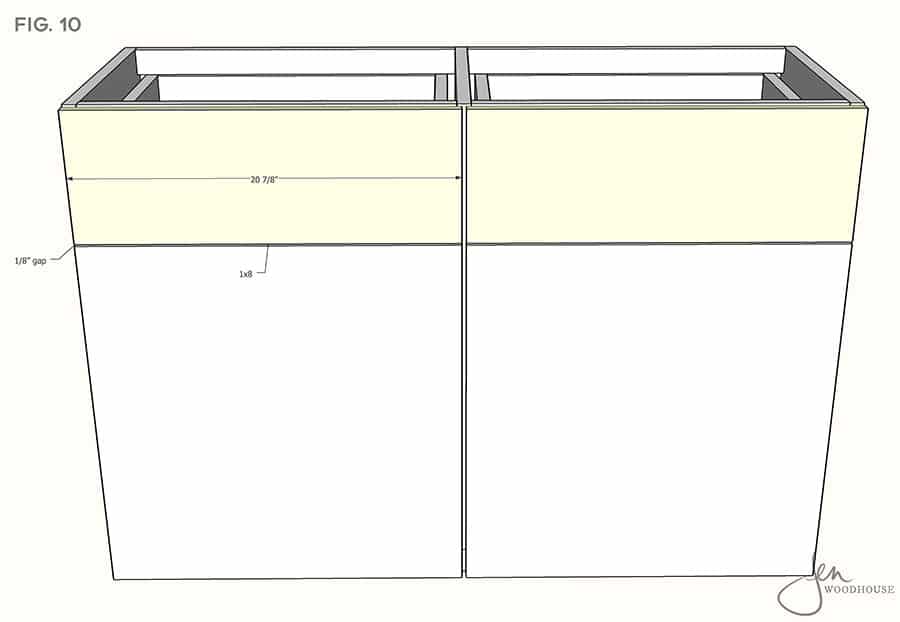
Measure, mark, and cut cabinet fronts to size. Install concealed hinges according to manufacturer’s directions. Hang cabinet doors and adjust as necessary. There should be a 1/8-inch tolerance in between the doors.
Step 10:
Measure, mark, and cut 1×8 drawer faces to length. Slide drawer boxes into place and position drawer faces. Screw drawer faces onto the drawer box from the inside. There should be a 1/8-inch tolerance above, between, and below the drawer faces.
Step 11:
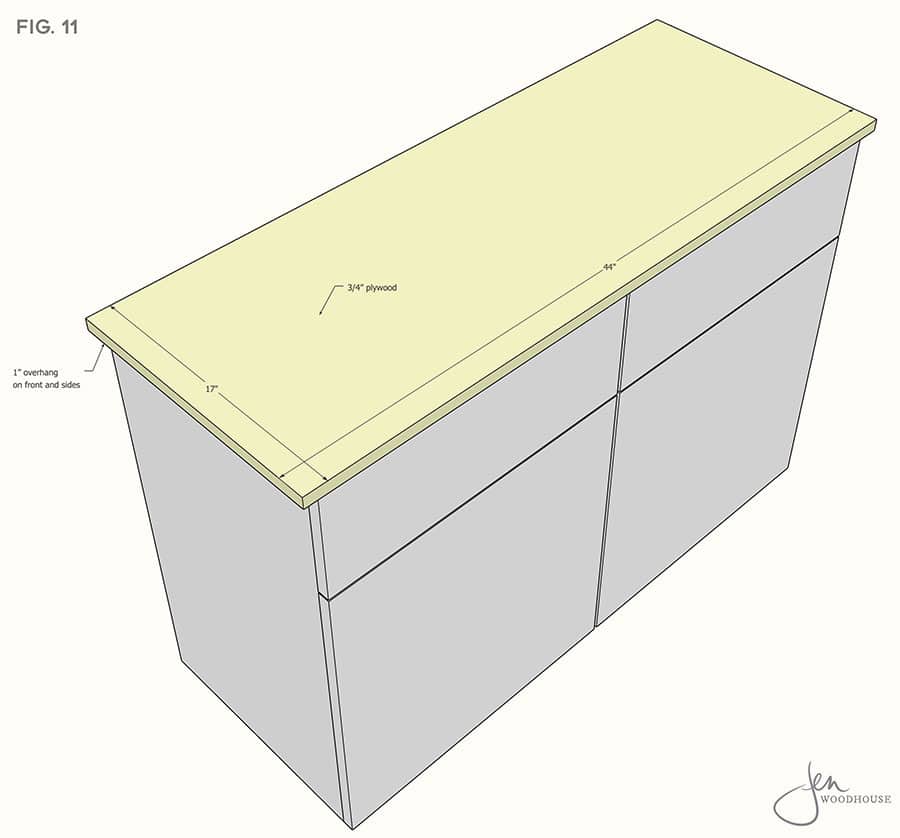
Measure, mark, and cut plywood top to size. Position top onto carcass with a 1-inch overhang on the front and sides and attach with 1 ¼-inch pocket holes and wood glue.
Step 12:
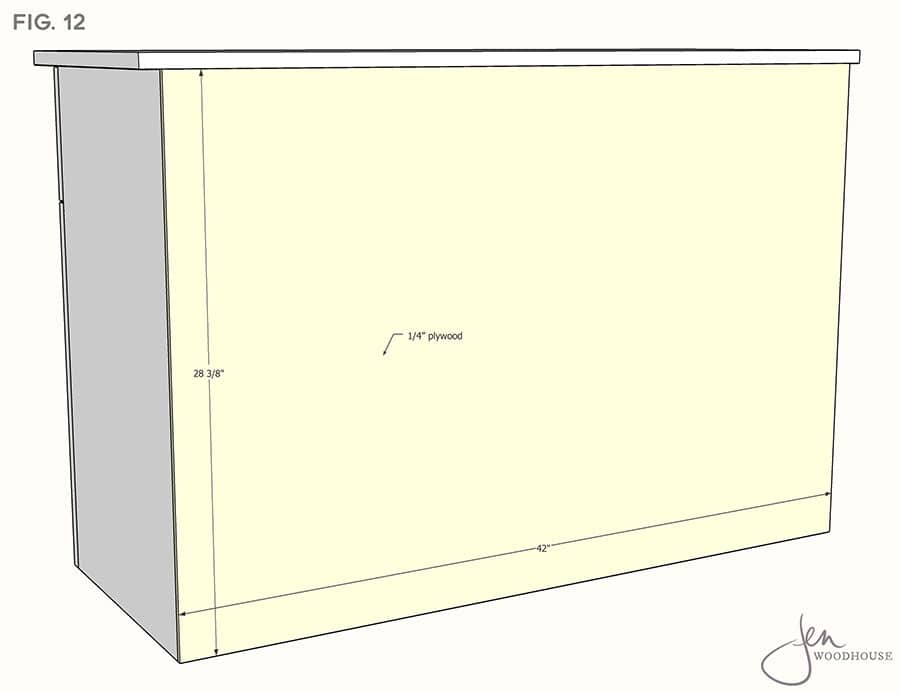
Measure, mark, and cut ¼-inch back panel to size. Attach to the back of the cabinet with 1-inch staples and wood glue.
Step 13:
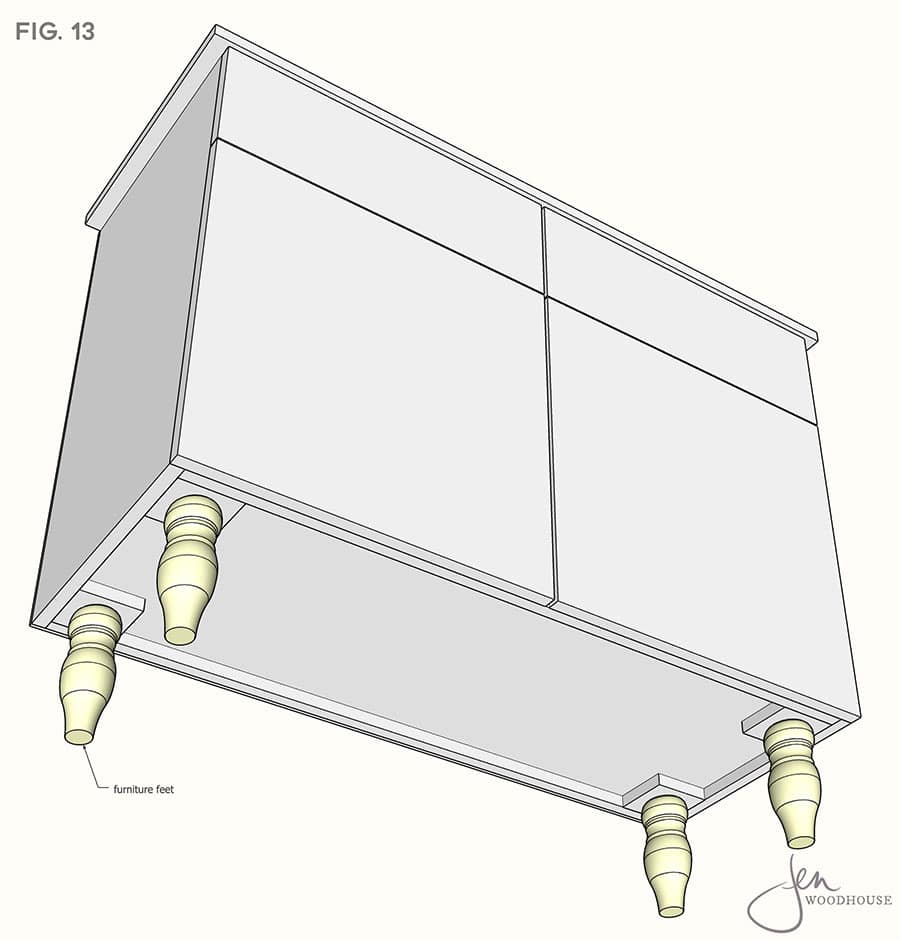
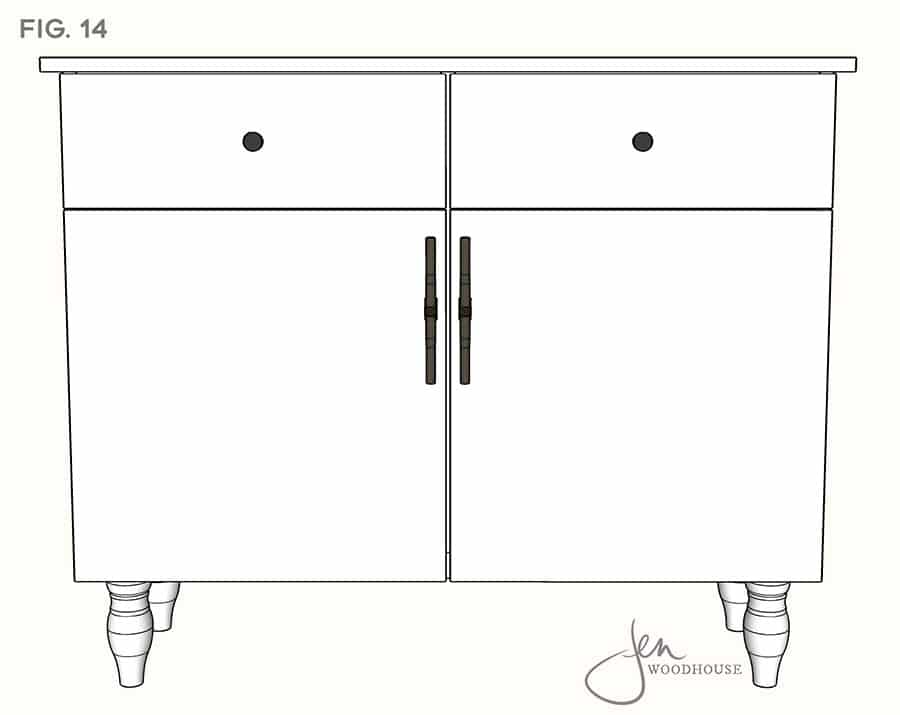
Install furniture feet as shown.
Step 14:
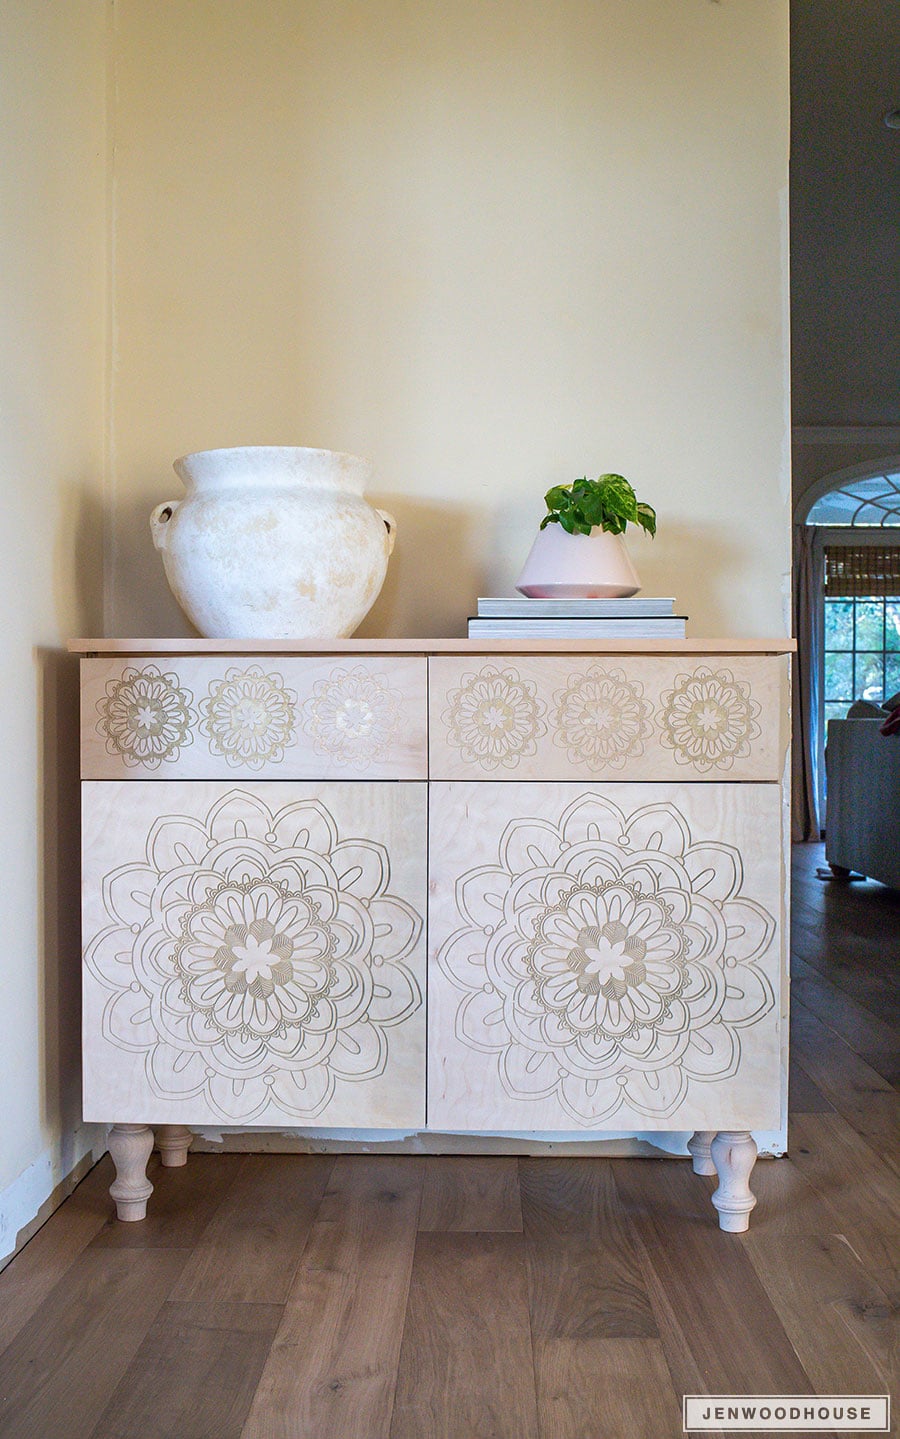
Install drawer knobs and cabinet pulls. Iron on 3/4-inch veneer edge banding to cover raw plywood edges, if desired. Sand, stain and/or paint, and finish to your preference.
How can I print these plans without the ads being in the middle of the page? Is there a pdf that I can download and print? Love these plans and I would love to build this.
Hi Jennifer,
Thanks for your comment! I removed the ads from this page. Hope that helps!