MATERIALS
- (3) 2 x 2 x 8 Ft. Boards
- (1) 1 x 6 x 4 Ft. Board
- (2) 1 x 2 x 8 Ft. Boards
- (1) 2 x 4 Ft. Sheet of ¾-inch Plywood
- (2) 1 x 3 x 8 Ft. Boards
- (1) 1 x 4 x 4 Ft. Board
- (1) 2 x 4 Ft. Sheet of ¼-inch Plywood
- 2 ½-inch and 1 ¼-inch Pocket Screws
- 2-inch and 1 ¼-inch Wood Screws
- 1 ¼-inch Brad Nails
- (1) Set of 18-inch Drawer Slides
- (2) Drawer Knobs
TOOLS
*Affiliate links used.
- Tape Measure
- Pencil
- Carpenter’s Square
- Cordless Drill/Driver
- Circular Saw or Table Saw
- Pocket Hole Jig
- Brad Nailer or Hammer
- Safety Glasses
- Hearing Protection
- Dust Mask
CUT LIST
- (4) 2×2 @ 29 ¼ inches (legs)
- (2) 1×6 @ 19 inches (sides)
- (2) 2×2 @ 19 inches (side stretchers)
- (3) 2×2 @ 37 inches (aprons and back stretcher)
- (2) 1×2 @ 38 ½ inches (drawer supports)
- (2) 1×2 @ 16 inches (drawer supports)
- (2) 1×2 @ 19 inches (drawer slide supports)
- (1) ¾-inch plywood @ 42 inches x 23 inches (top)
- (2) 1×3 @ 34 ½ inches (drawer front/back)
- (2) 1×3 @ 16 inches (drawer sides)
- (1) 1×3 @ 14 ½ inches (drawer divider)
- (1) ¼-inch plywood @ 36 inches x 16 inches (drawer bottom)
- (1) 1×4 @ 36 ¾ inches (drawer face)
STEP 1 – Build the Sides
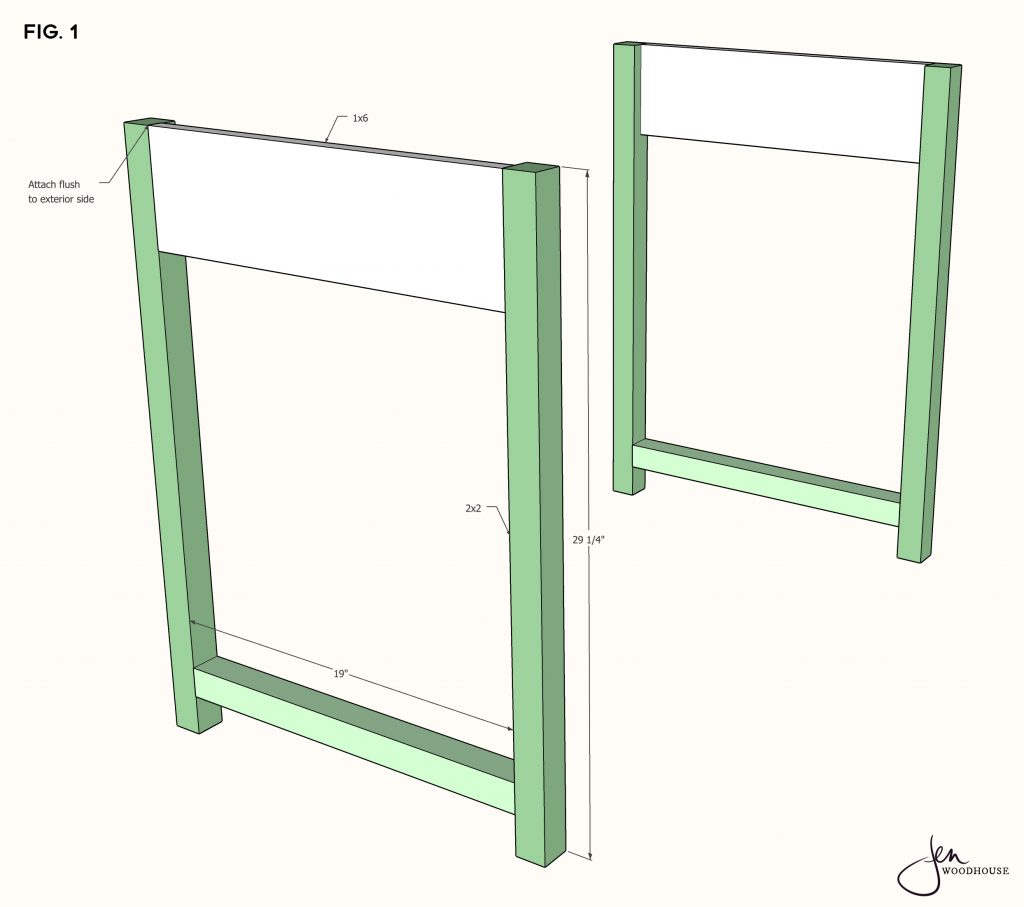
Measure, mark, and cut 2×2 legs and side stretchers to length. Drill 1 ½-inch pocket holes into the ends of the side stretchers and attach them to the legs about 2 inches from the bottom with 2 ½-inch pocket screws and wood glue. Measure, mark, and cut 1×6 sides to length. Drill ¾-inch pocket holes into the ends of the 1×6 boards and attach them to the legs, flush to the exterior, with 1 ¼-inch pocket screws and wood glue.
STEP 2 – CONSTRUCT THE CARCASS
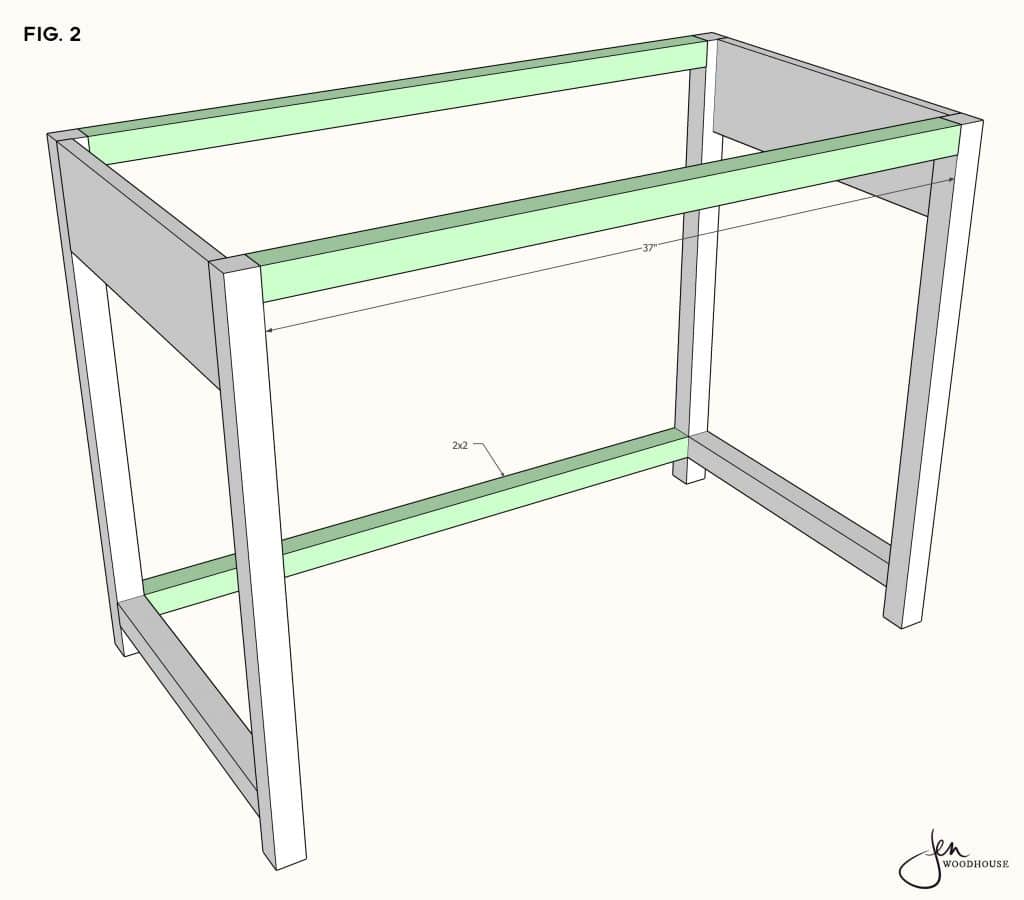
Measure, mark, and cut 2×2 supports to length. Drill 1 ½-inch pocket holes into the ends of these boards and construct the carcass as shown, with 2 ½-inch pocket screws and wood glue.
STEP 3 – Add the drawer supports
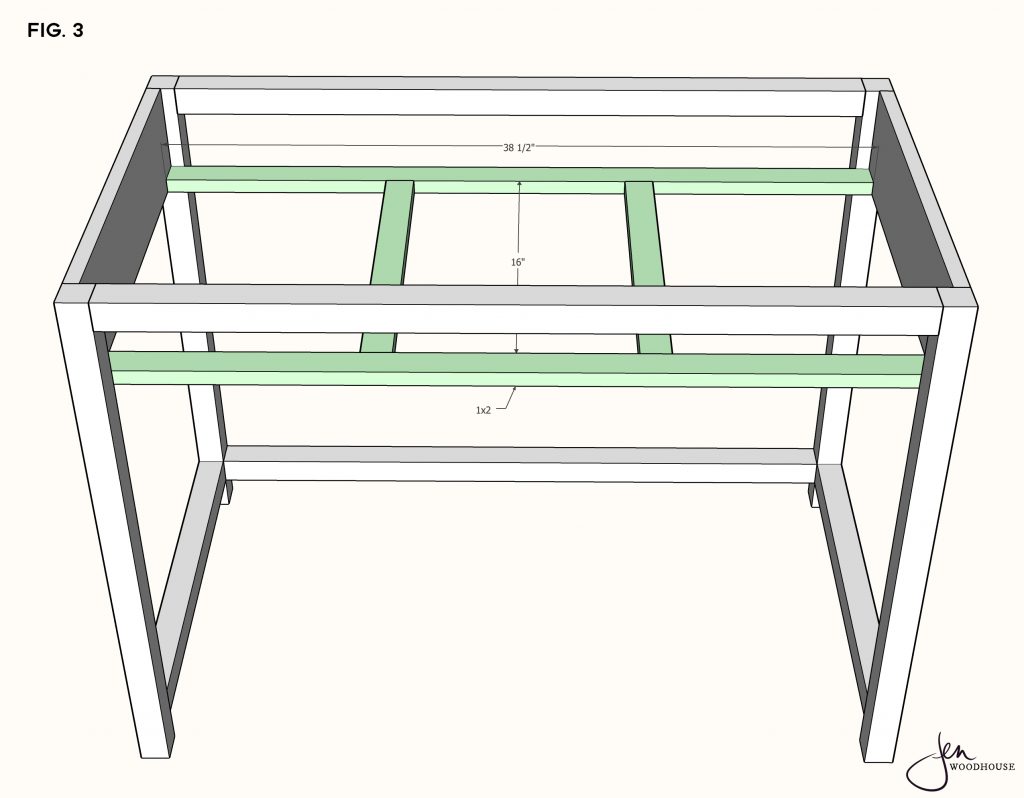
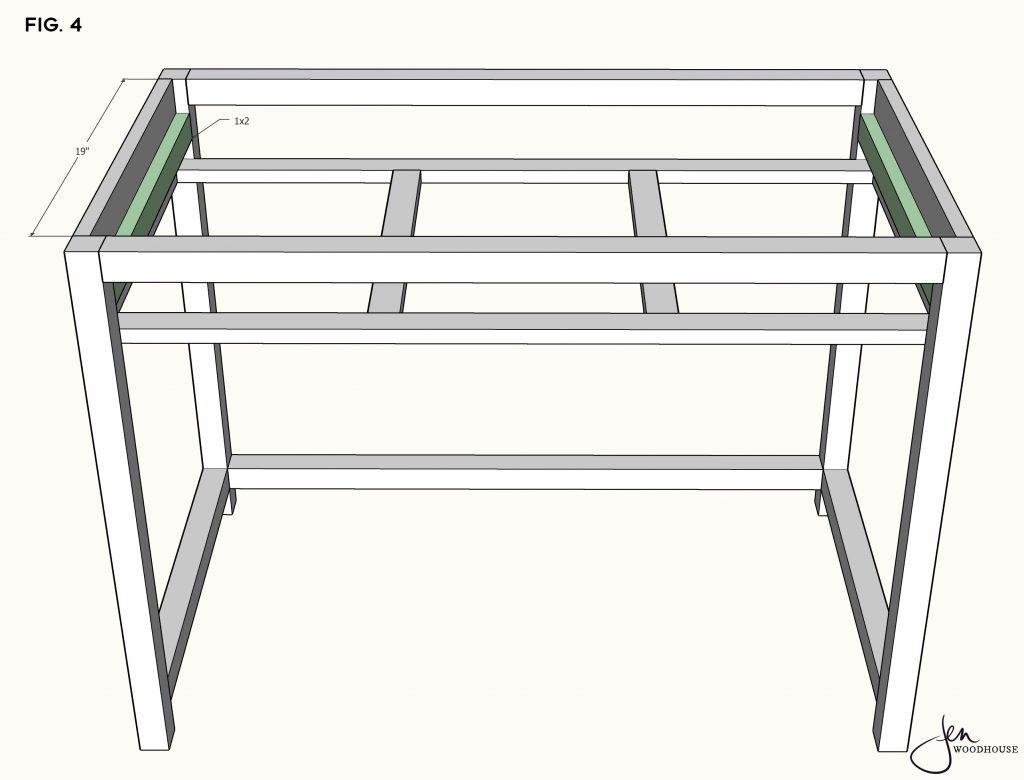
Measure, mark, and cut 1×2 boards to length. Drill ¾-inch pocket holes into the ends and attach them as shown with 1 ¼-inch pocket screws and wood glue.
STEP 4 – add the drawer slides
Measure, mark, and cut 1×2 drawer slide supports to length. Attach to the sides with 1 ¼-inch brad nails and wood glue. Install the drawer slides according to manufacturer’s directions. It will be easier to install the slides now, before you attach the top.
STEP 5 – attach the top
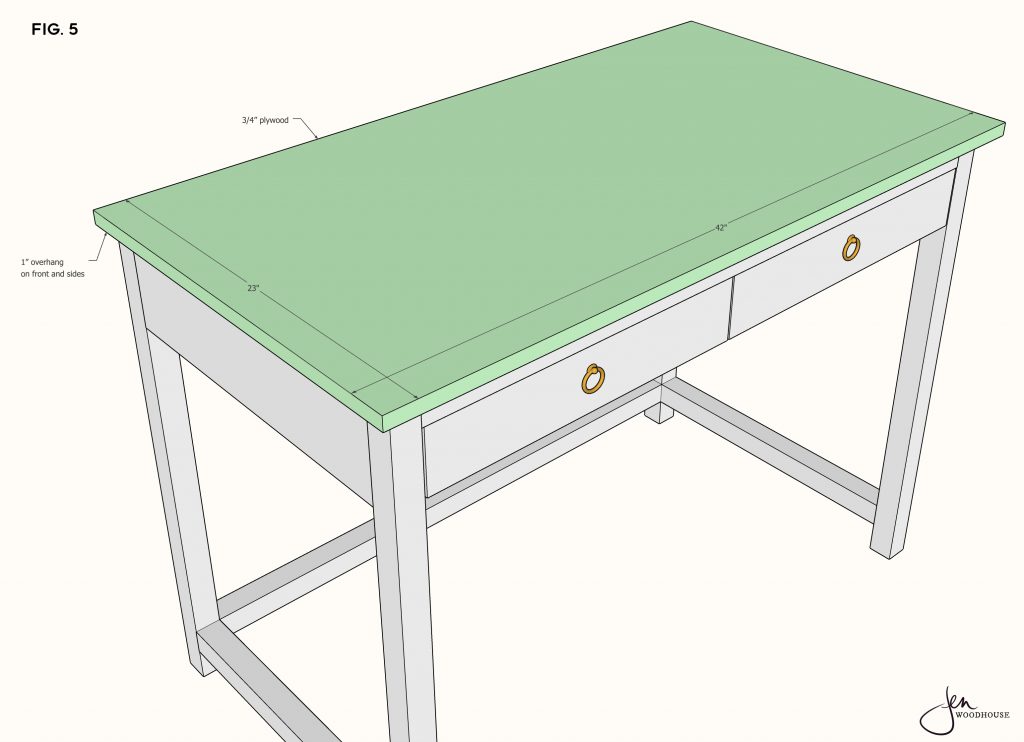
Measure, mark, and cut plywood top to size. Position the top over the carcass so that there’s a 1-inch overhang on the front and sides. The back edge should be flush to the back of the vanity. Pre-drill pilot holes and attach the top with 2-inch wood screws driven from underneath the 2×2 aprons.
STEP 6a – build the drawer box
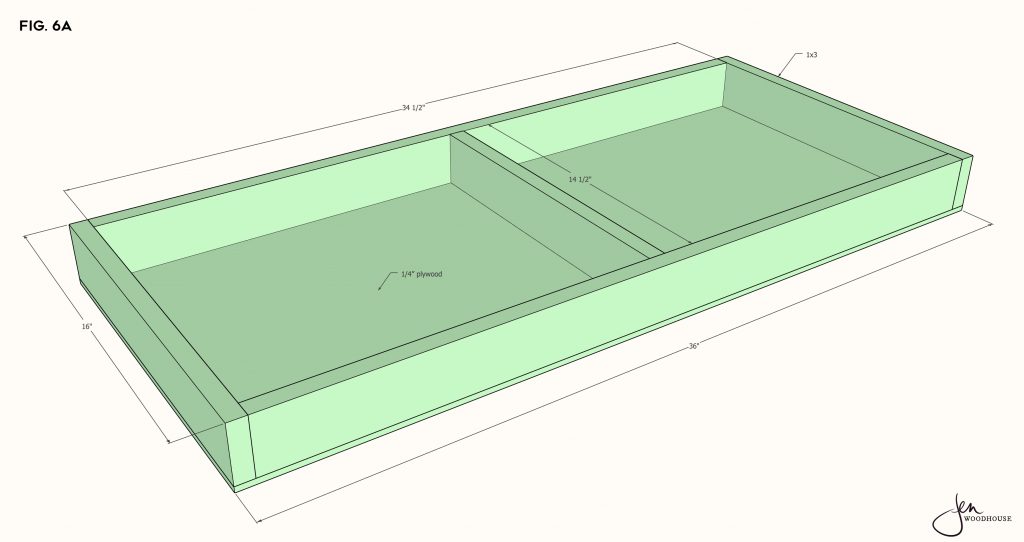
Measure, mark, and cut drawer fronts, back, sides, and divider to length. Drill ¾-inch pocket holes into the front and back pieces. Measure the space where the drawer will go and build your drawer box accordingly. Typically, standard drawer slides require a 1/2-inch clearance on both sides, so your drawer box should be 1 inch narrower than the space it’s going into. Construct the drawer box with 1 ¼-inch pocket screws and wood glue. Position the divider in the middle and secure with wood glue and 1 ¼-inch brad nails. Measure, mark, and cut the ¼-inch plywood bottom to size. Attach to the bottom of the drawer box with 1 ¼-inch brad nails and wood glue.
STEP 6b – attach the drawer face
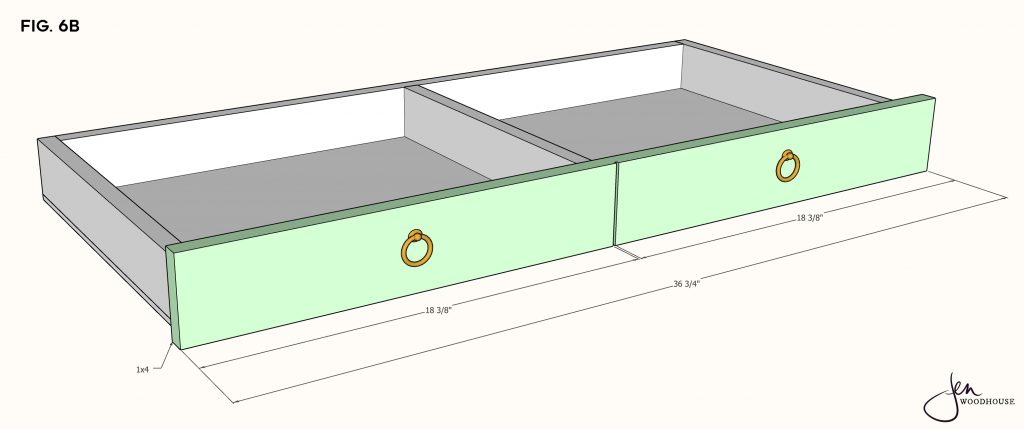
Measure, mark, and cut drawer face to length. Optional: use a palm router to make a groove on the front, for the faux double drawer front. You can also use a circular saw or table saw to do this. Slide the drawer box into place on the drawer slides. Position and attach the drawer face to the drawer box with 1 ¼-inch wood screws. Install drawer knobs.
Sand, stain and/or paint, and finish as desired.


Thanks
Thank you for the plans! My husband and I built the vanity this weekend and it turned out so good!
Thank you for sharing your plans. I am going to attempt making this. Whish me luck
Looking forward to this project for my granddaughter. One question, are you using 2by4 lumber? Or are you using a better grade. I’m wondering about warping and twisting if using a lower grade lumber. Appreciate your feedback. Thanks Dave
I’m looking for the measurements for a piece, would anyone be able to lend a hand? if anyone is able to help me within a day or so that’d be amazing!