Hi friends! If you follow me on Facebook or Instagram (thank you – you rock!), you would’ve already seen sneak peeks of this project. I’m super excited to finally share the plans and tutorial with you! If you’re just joining us, here’s the skinny: this Summer, myself, along with four other DIY bloggers have each tackled a different project inspired by an item in the West Elm catalog. Check out our June and July projects.
It’s the final month of our West Elm Knockoff Decor Series and I’m a little weepy about it because it was so much fun to be a part of. I’m grateful my beautiful friend Aniko of Place Of My Taste included me in this Summer series; she put together a stellar lineup. These girls are all DIY Rockstars and it was an honor to be among the very best.

For this month’s challenge, we each chose to knock off either a piece of furniture or home decor item and this Alexa Reclaimed Wood Bed was my pick. West Elm’s version will set you back about $1,700. I built mine for under $200.
I knowwwww, right? Bananas!
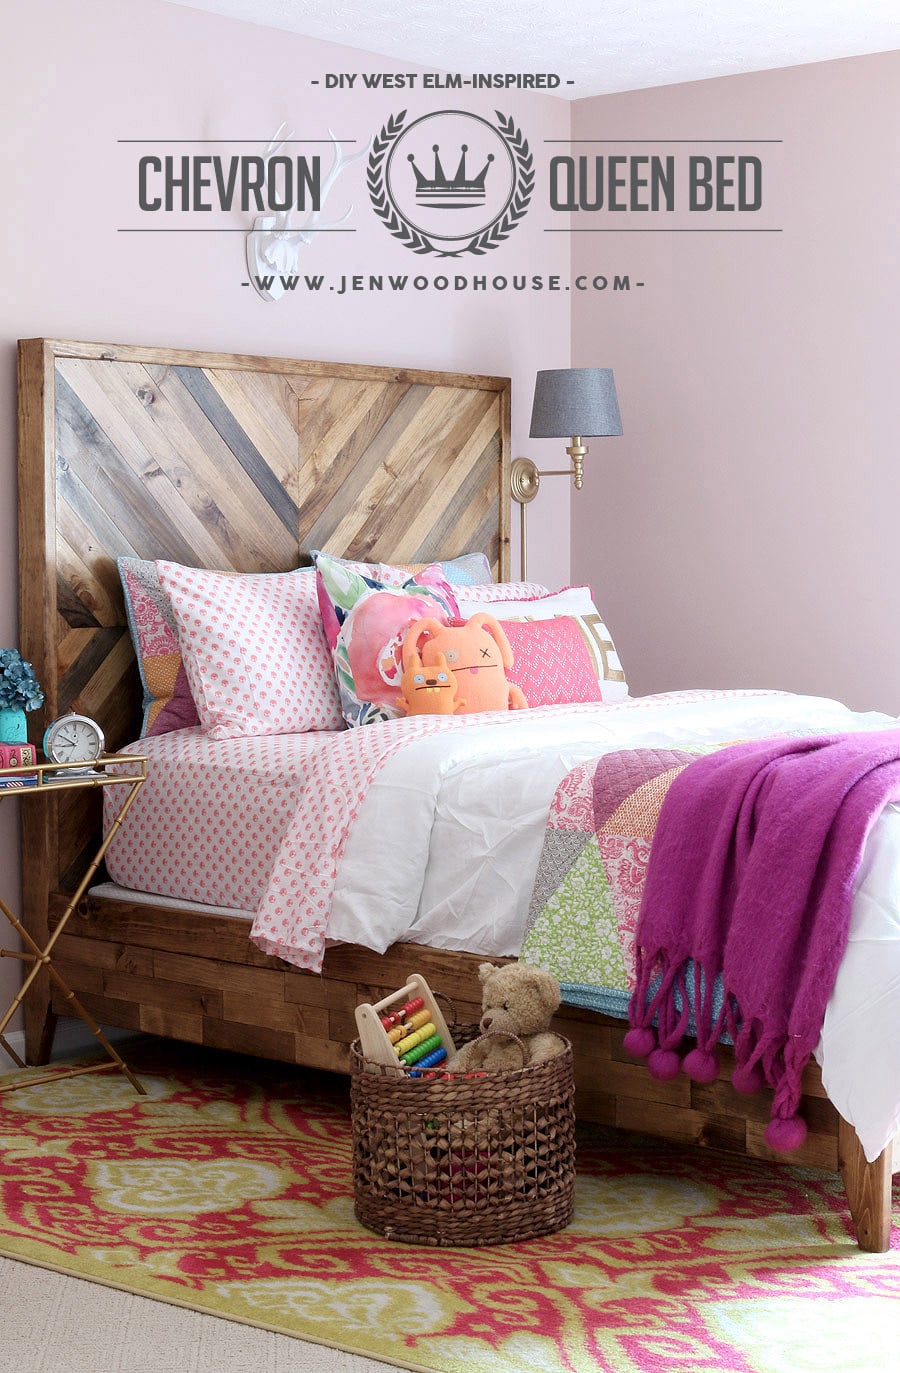
And because I built this bed for my daughter, I’m renaming it the Evelyn Chevron Queen Bed. This is the second bed I’ve built for my four-year-old sweet pea and she’s thrilled about her new ‘big girl bed.’
Check out the Restoration Hardware-Inspired Toddler Bed I built for her a couple of years ago. I love how her new bed turned out, but I’m getting a little teary-eyed about her growing up. She also started Kindergarten this month. You guys. I AM TRYING TO KEEP IT TOGETHER. The days are long but the years are wayyyyy too short, amiright?
*This post contains affiliate links. To read my full disclosure policy, click here.
If you’re wondering where to purchase her bedding or any other item in her room, I’ve included a complete source list at the end of this post.
Alright, so let’s get started.

HOW TO BUILD A WEST ELM-INSPIRED CHEVRON RECLAIMED WOOD BED
You can use any kind of plywood here because it will be hidden from view, but I used my favorite brand, Purebond Hardwood Plywood. Read about why Purebond is the healthier alternative here. The frame is built out of regular ‘ole Spruce 2×4 studs.
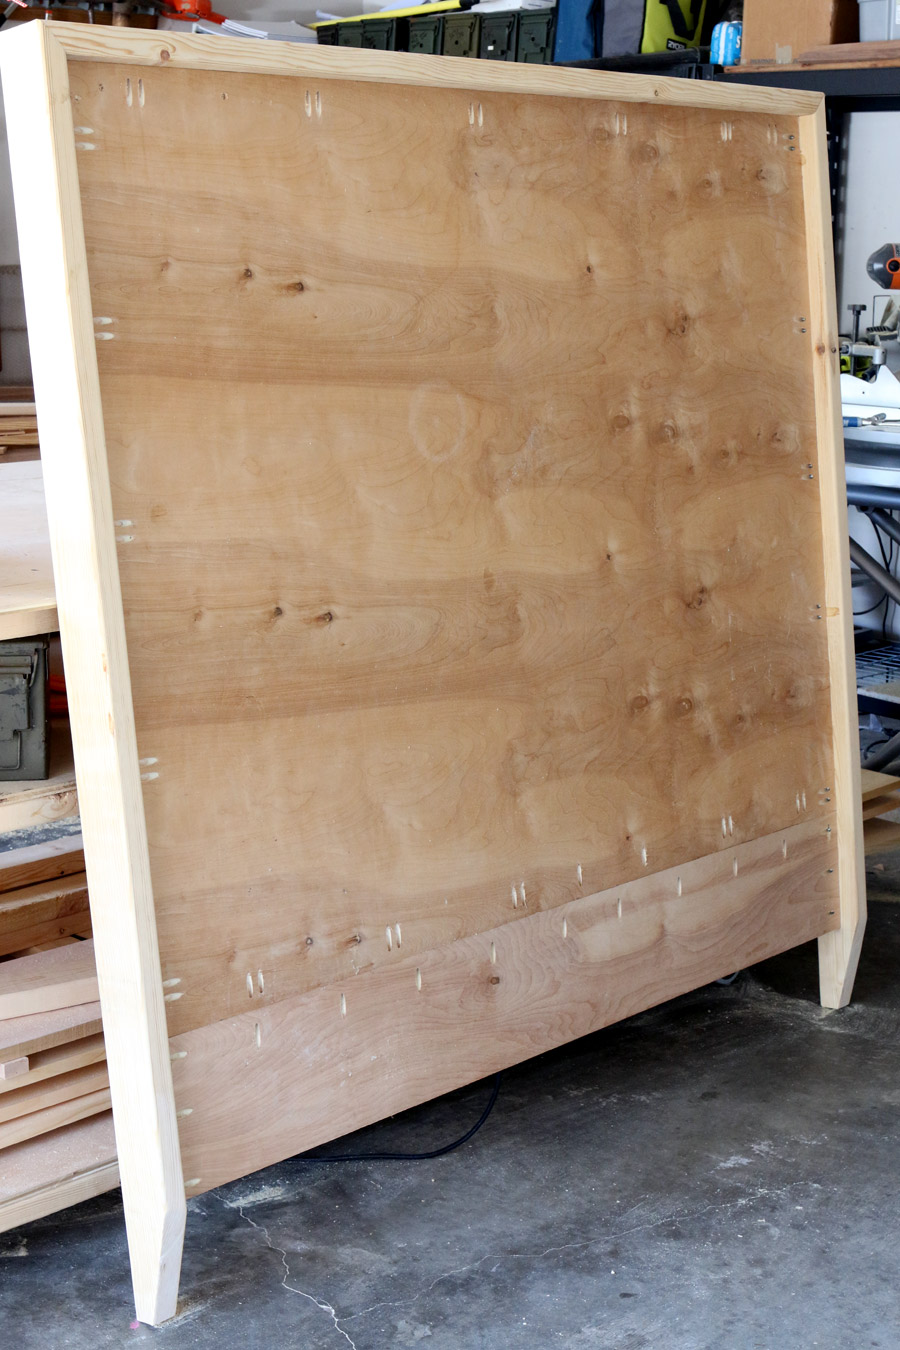
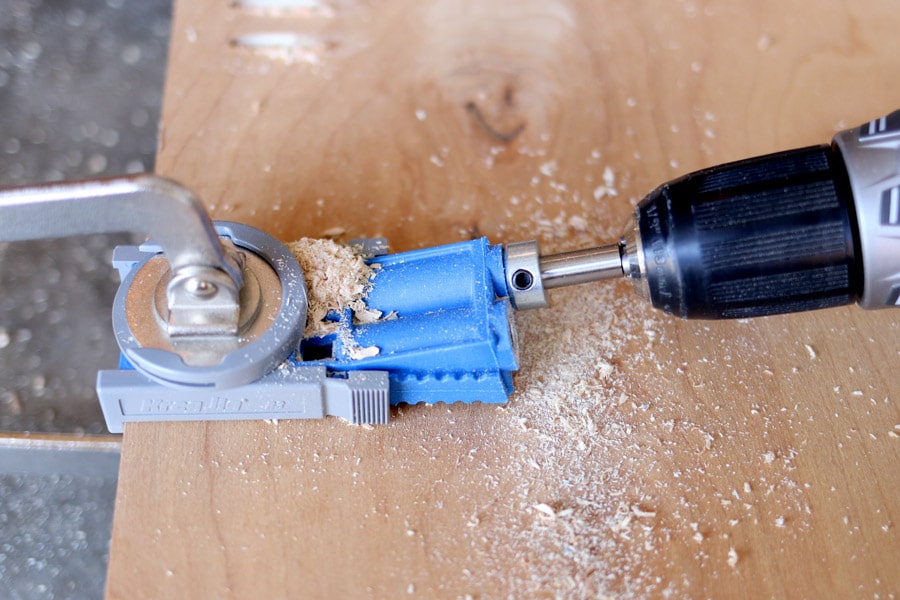
And check out all those pocket holes. If you’ve spent any time around here, you’ll know that I rarely build without my Kreg Jig. Well, this was the first time I used the R3 model. It was so much easier and more efficient to move the tiny R3 around the edges of the large sheet of plywood, rather than trying to wrestle this behemoth into the K4 or K5 model (which would’ve been impossible for me —> tiny Asian lady). #worksmarternotharder
Awww… will you just look at that adorable R3? It’s so cute, it’s like a little baby unicorn! #namethatmovie
Although I built a massive workbench, the headboard was just too heavy and cumbersome to hoist up there, so I had to build on the floor. I am now rethinking that decision because I did about 10 hours worth of squats going back and forth from the floor to the saw. Ouch!
Overall, this is a super simple project to tackle, albeit extremely tedious. You’ll need to hydrate, stretch out your quads, glutes, maybe chug a protein shake or something because it’s “leg day” at the workshop and YOU WILL BE SORE for the next three days.
You’re welcome. But hey, at least your backside will look spectacular.
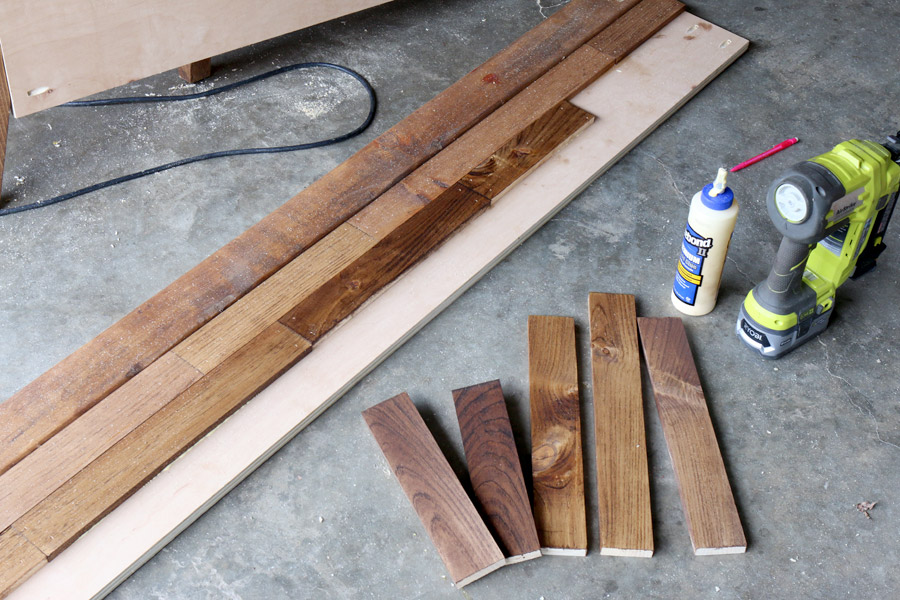
Measure, mark, cut, sand, stain, glue, nail. That will be your mantra for the next 10 hours. Repeat after me: “measure, mark, cut, sand, stain, glue, nail.”
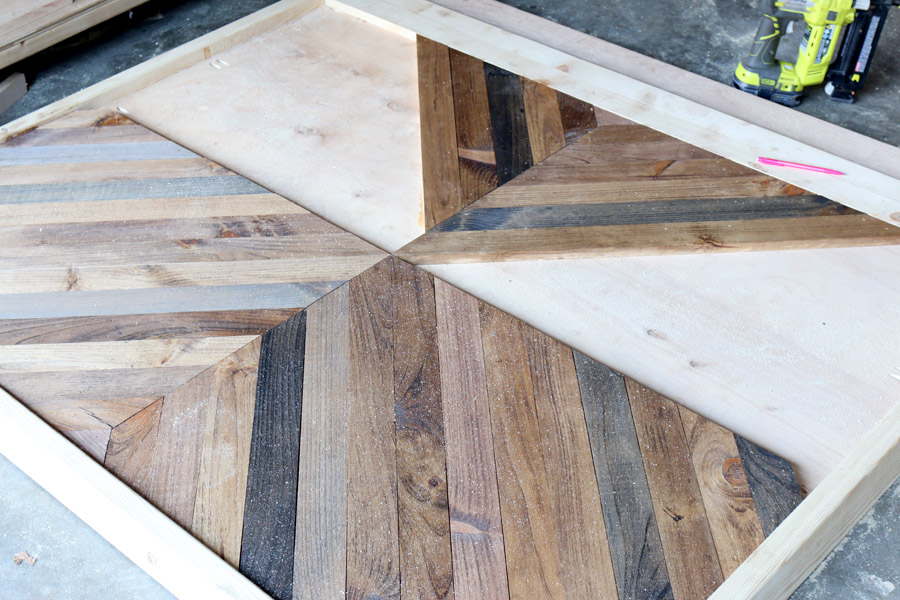
I started with the smallest triangle pieces on the top and bottom and worked my way towards the center.** I highly recommend holding your boards in place and marking them that way, instead of using a tape measure. Cut the boards about 1/4″ long then trim them down 1/16″ (about half a saw blade width) at a time to ensure the most precise fit. All of the ends are cut at a 45º angle. Notice that most pieces are trapezoids but a few are parallelograms.
You like that? Welcome back to 7th grade Geometry, aka my nemesis.
**Edit: In hindsight, I’d recommend starting in the center and working your way outward. Find the center of the headboard, lay down the center boards first, then work outwards toward the outside edge of the headboard.
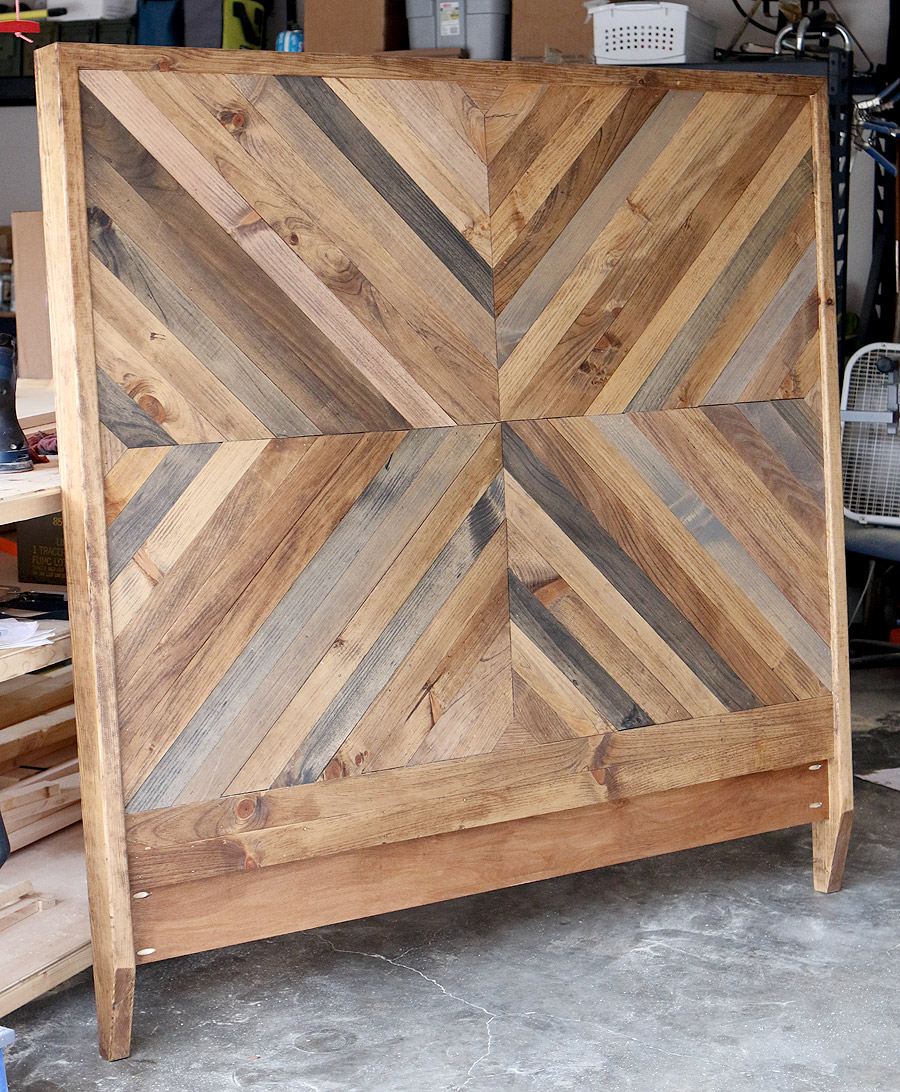
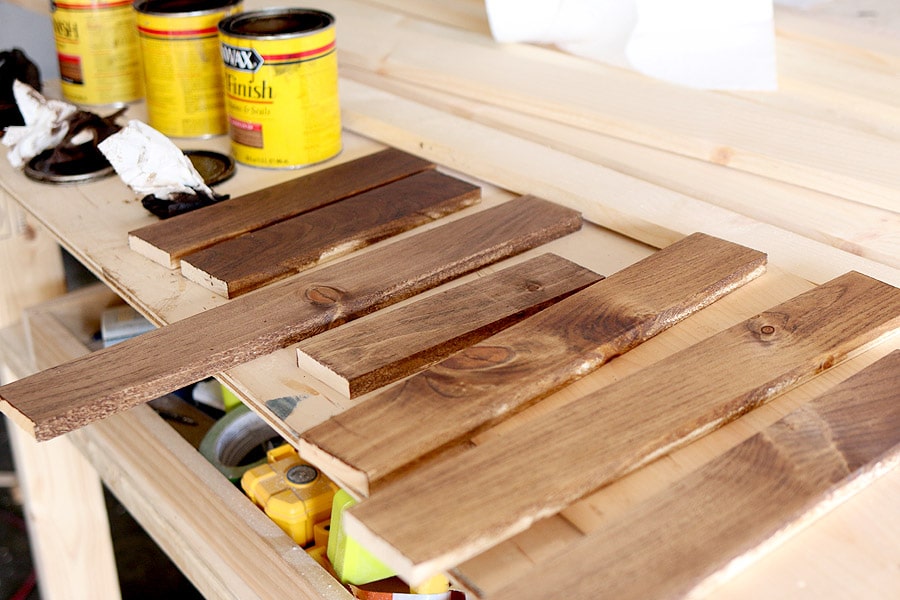
I used ordinary pine for the planks; I just stained the boards a variety of colors to achieve the ‘reclaimed wood’ look. Also, you’ll want to stain them before attaching them to the bed, so you don’t have to worry about taping each board off with the risk of bleed through.
I used several different stains: Provincial, Special Walnut, Early American, and Ebony. I also used a little Weathered Gray by Varathane. Honestly, there’s no method to my madness, no right or wrong, no rhyme or reason – I just stained the boards randomly, sometimes using one color, other times, layering on two or three different stains.
Here’s a helpful video on the basics of staining wood:
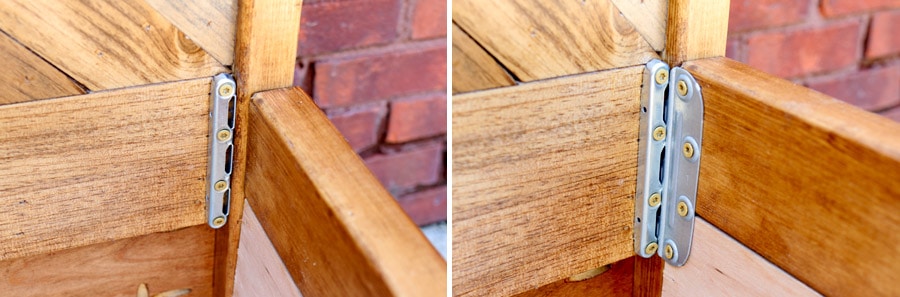
As a military family, we move around a lot, which means we need furniture that can easily be assembled and disassembled. After a bit of searching online, I found these metal bed rail brackets and they were a dream to install. You just screw them into the wood and the two pieces hook into each other. Easy peasy. I love that the headboard, footboard, and side rails all come apart. It’ll make the movers happy, I’m sure.
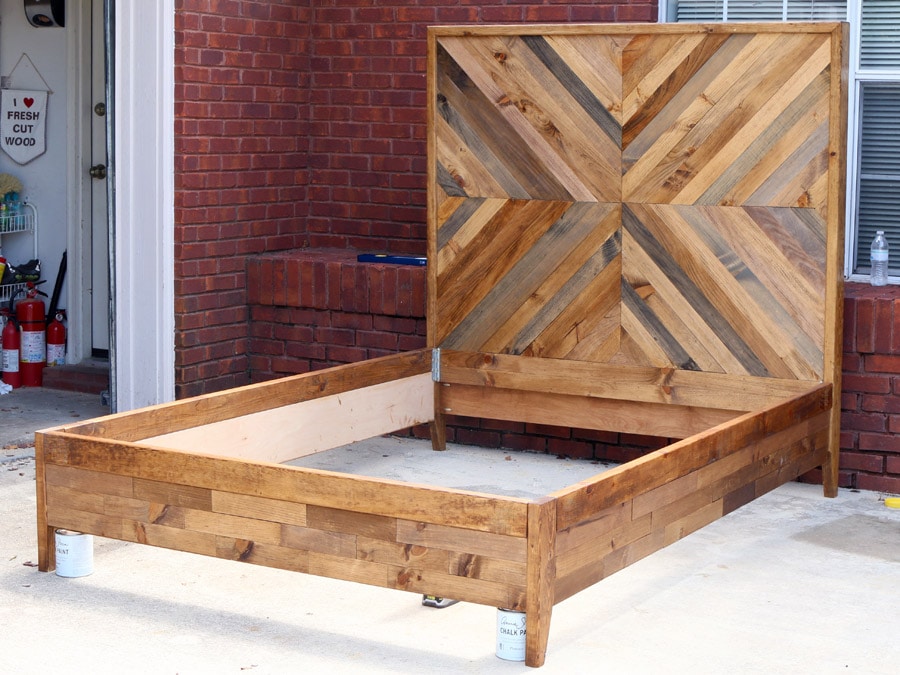
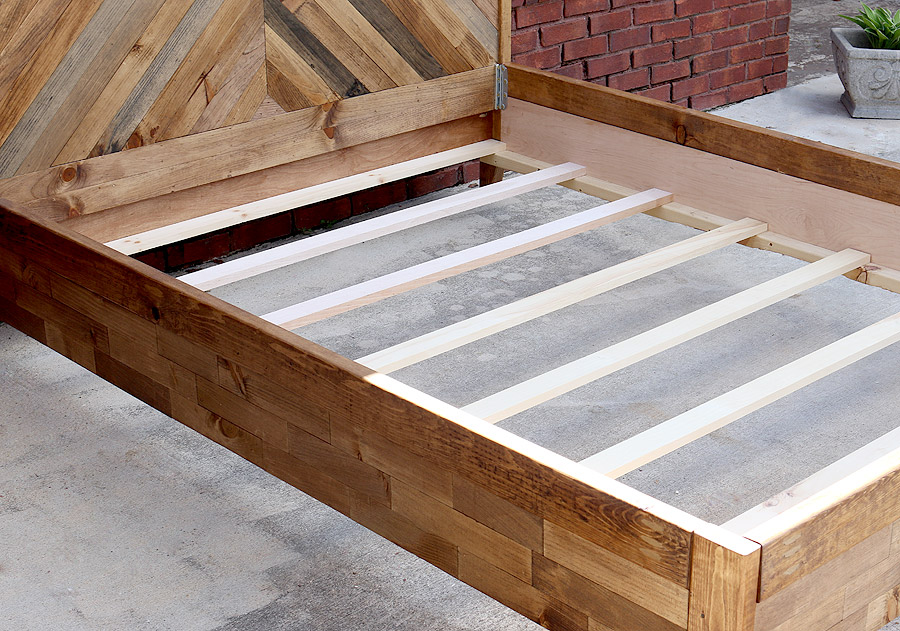
Yay! Now it’s smooth sailing from here on out! Just add the mattress slat supports and mattress slats and you’ve got yourself a queen-sized bed!
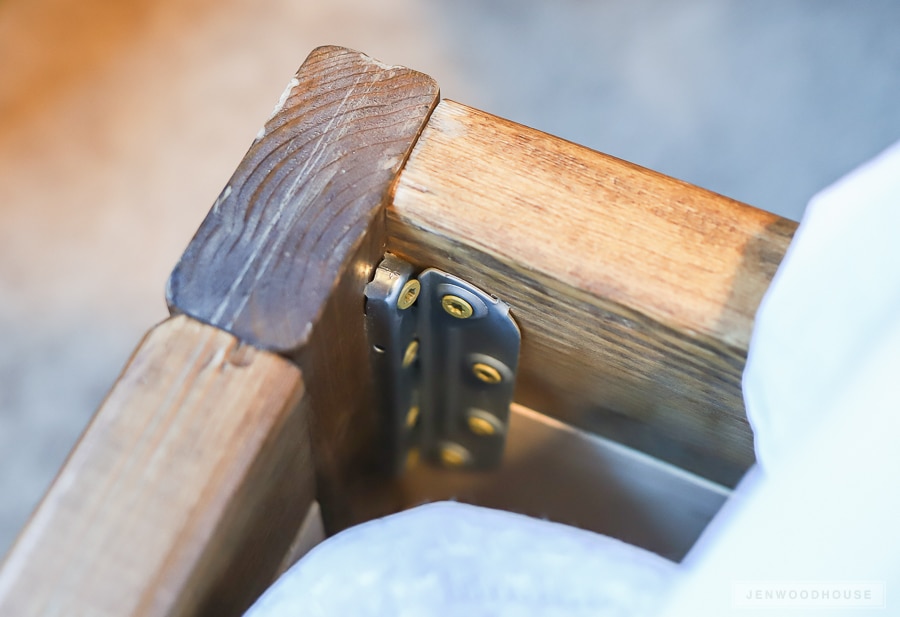
Below is a photo of how the bed rail bracket connects the footboard to the sides:
After finishing the whole thing off with several coats of Arm-R-Seal (my new favorite topcoat!), I got it all set up in her room. And by “I,” I mean, “my husband.” He’s the grunt labor around here. I just build it; he hauls it. We’ve got a great thing going.
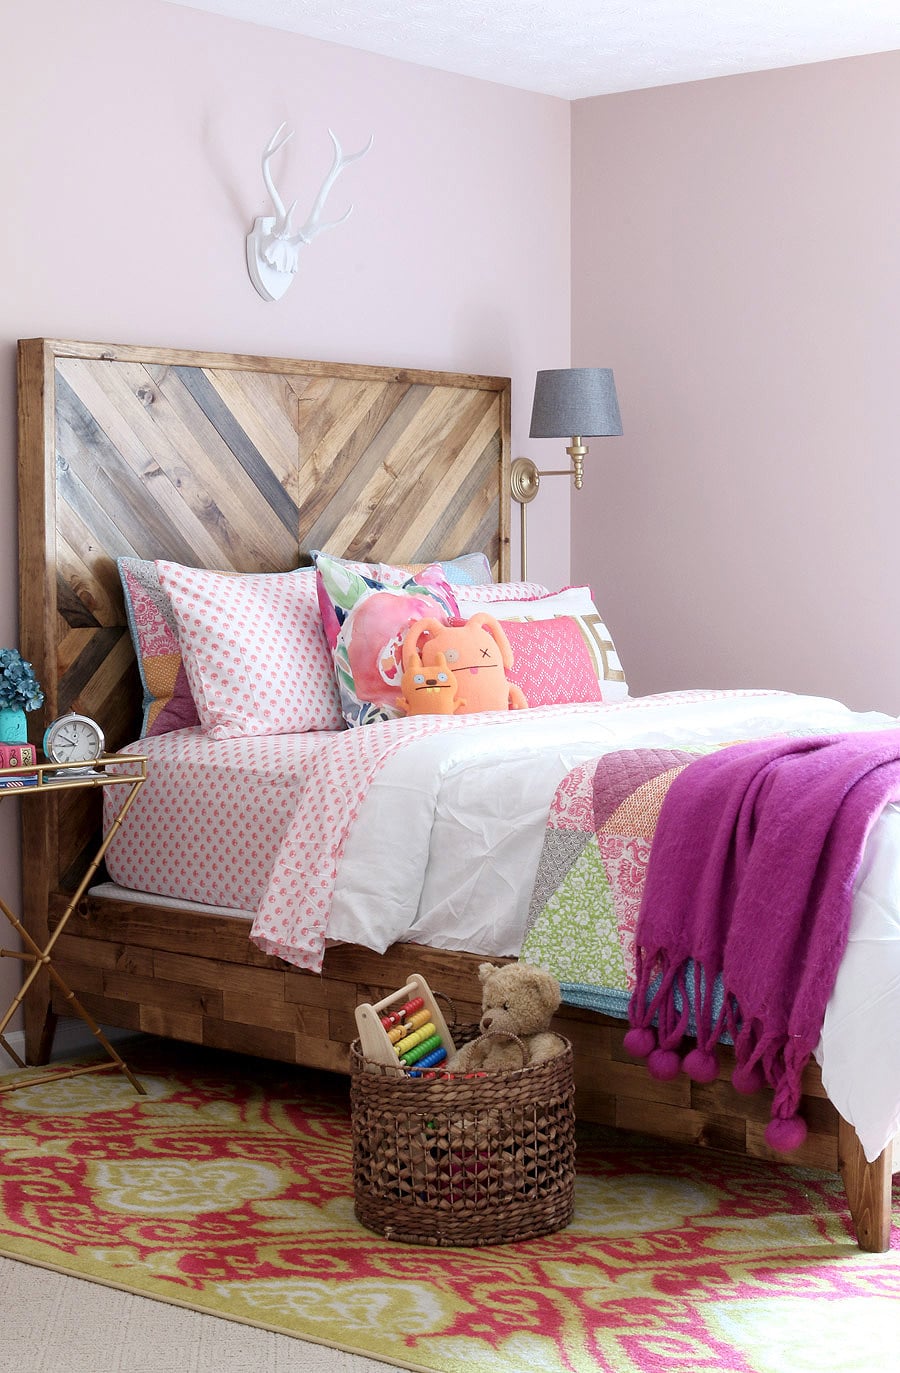
SHOP MY DAUGHTER’S ROOM

- DIY West Elm-inspired Chevron Queen Bed
- Bedside Table – no longer available, similar
- Area Rug – no longer available, Joss & Main
- Round Basket – no longer available, similar
- Sheet Set / Duvet Cover / Quilt and Shams
- Pink Chevron Throw Pillow / Watercolor Floral Pillow / Evie Pillow
- Ugly Dolls
- Pom Pom Blanket – no longer available, World Market
- Swing-arm Lamp (came in chrome, I spray-painted it gold)
- Grey Linen Lampshade
- Antler Wall Decor
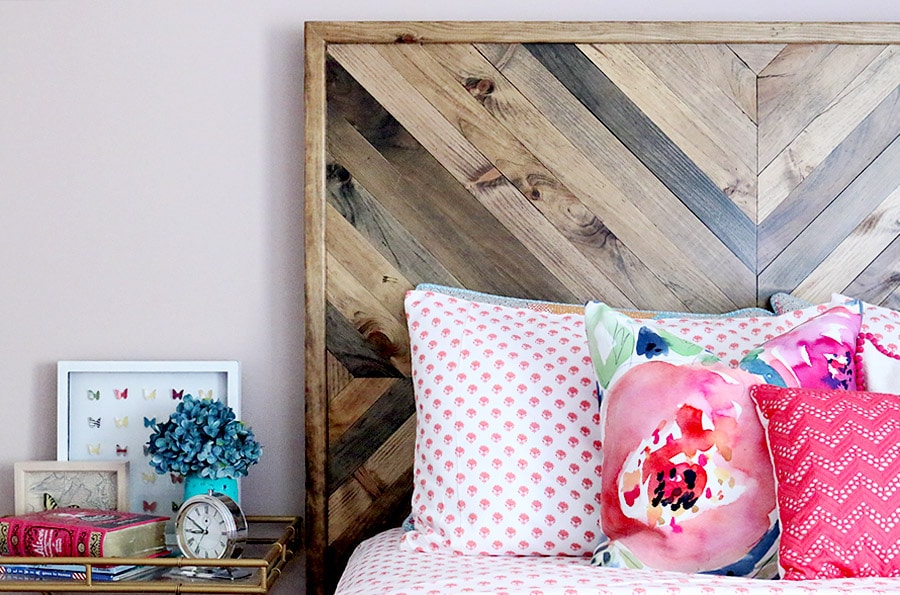
Yes, I realize there are a crap-ton of pillows on this bed for a four-year-old. My husband thinks so too – on our own bed, mind you. I mean, honestly, the absurdity of it all!
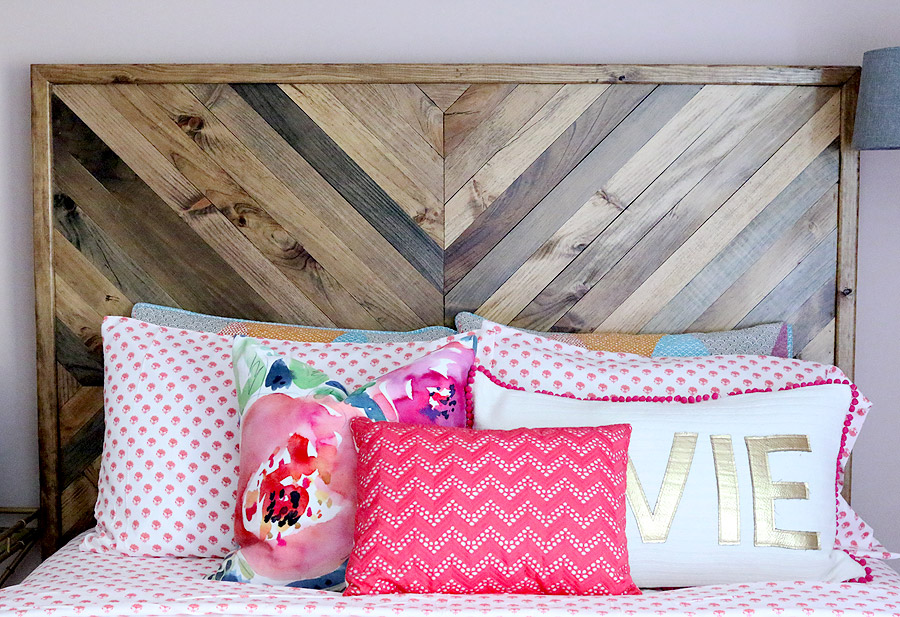
Okay, fine. I’ll take some of the pillows away so you can see more of that beautiful headboard.
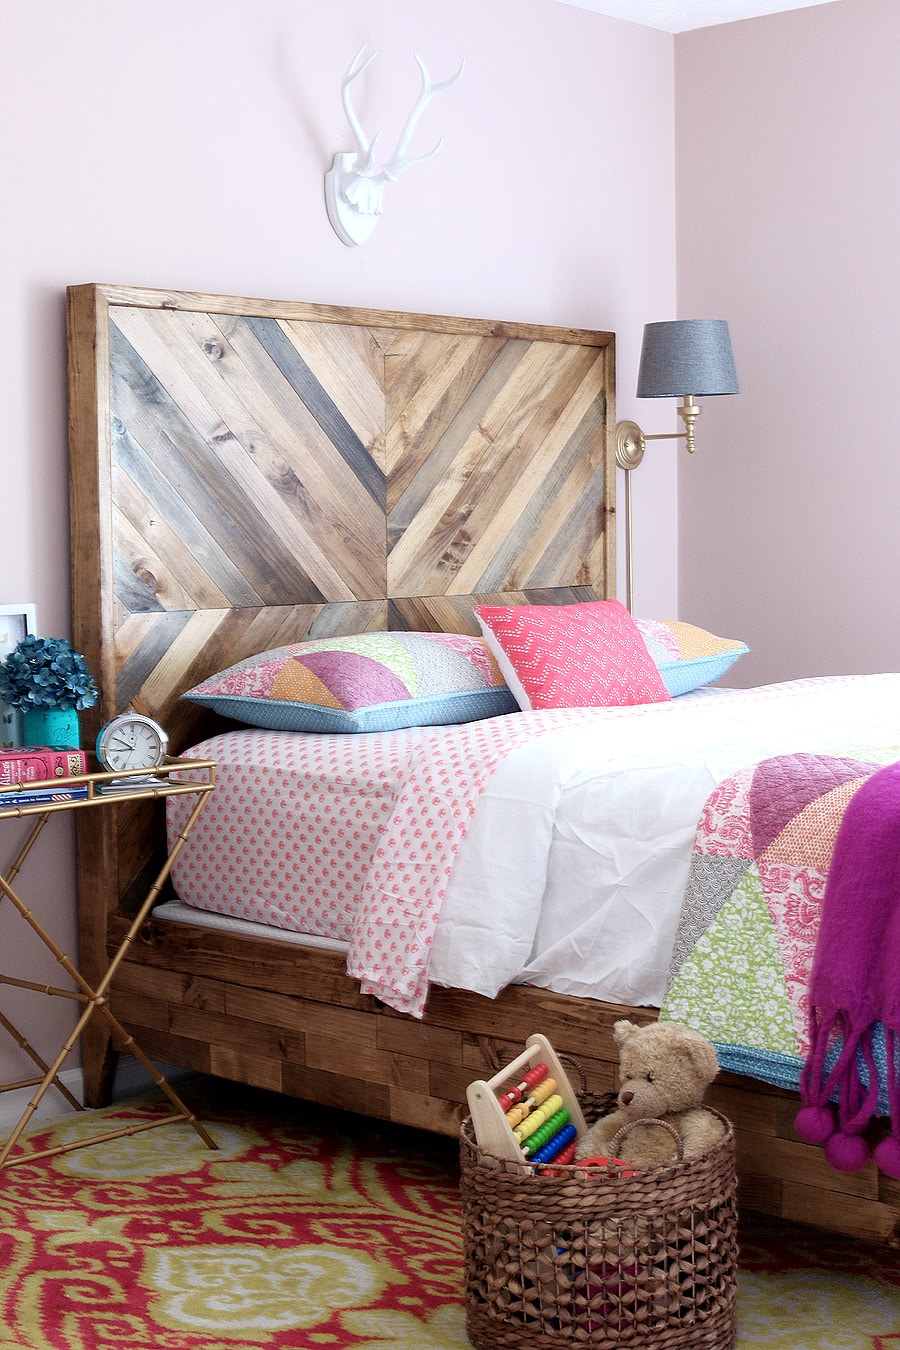
So what do you think? I think I have fallen in love with it. Mostly, because my butt looks fabulous now. #buildingismycardio
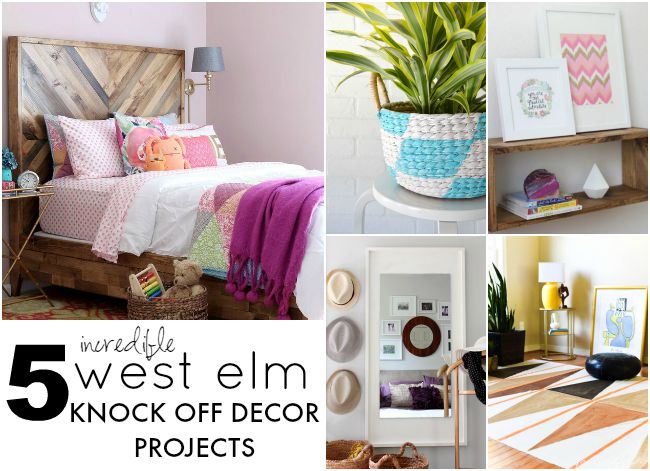
- Jen | The House of Wood | Chevron Reclaimed Wood Bed (you’re here!)
- Corey | Tiny Sidekick | Graphic Printed Basket
- Chelsea | Making Home Base | Reclaimed Pine Box Shelf
- Ursula | Homemade Carmona | Floating Wood Mirror
- Aniko | Place of my Taste | Painted Terrazzo Rug
If you enjoyed this project, I’d love for you to PIN IT so you don’t forget it!
Now go get your build on and be sure to tag me (@jenwoodhouse #jenwoodhouse #houseofwood) so I can see your handiwork! Did you miss our previous West Elm Knockoff projects? Take a peek here:
 SLAB BENCH | FLOATING WOOD MIRROR | ACRYLIC SIDED SHELF
 WOOD AND PIPE ENTRYWAY STAND | WOOD SLAT BENCH | RECLAIMED PINE BOX SHELF
 PAINTED TERRAZZO RUG | DEEP PICTURE LEDGE | HAND-PAINTED STRIPED POUF
 RECLAIMED PINE CUBBY SHELF | CHEVRON RECLAIMED WOOD BED | BUTLER STAND
 WOODEN PLANT STANDS | EXPERT NOTICE BOARD | GRAPHIC PRINTED BASKET
A couple things! First of all, this bed is outrageous! I would absolutely love this! When I saw how big it is, I immediately wondered how difficult it was to get through the door, but then I read about disassembling it and that you guys are military! Woohoo! We are too! I love love LOVE finding other military family bloggers, especially those who create beautiful homes regardless of the fact that they’ll be moving soon. 🙂 Anyway! Just had to pop in and tell ya that I was tickled to read this post. 🙂
Hi Erica, Absolutely! Those bed brackets are a lifesaver! Thanks for stopping by and for taking the time to write me a lovely note!
What did you do to hide the nail holes on the chevron pattern? Putty or just leave them?
Hi Donna, I didn’t bother filling the nail holes.
This is AMAZING! I would LOVE to build two for my little girls who share a room. Is there any way you could adjust the sizes to twin sizes (because I have NO idea how to even begin to do measurements for a twin sized bed)!
I will put it on the request list, Christie! Thank you for stopping by!
…eagerly awaiting those specs for twin beds. My Littles share a room. I’d love to make one for each of them.
Great news! The plans for this bed are now available (link in post)! The original West Elm bed doesn’t come in a twin, so had to come up with my own dimensions. Be sure to tag me @jenwoodhouse #jenwoodhouse so I can see your creations! Good luck and happy building!
This is amazing! I REALLY want to build two of these for my little gals who share a room. Is there anyway you could tell me the measurements for a twin bed (because I have NO idea how to measure for a twin bed versus a queen). You’re such an inspiration, and thank you for sharing these plans!
Christie, I’ve gotten a couple requests for the twin bed plans, so I will work on drawing up those plans as soon as time allows! Thank you!
Update: plans for a twin size are now available (link in post)! Yay! Be sure to tag me @jenwoodhouse #jenwoodhouse so I can see your creation! Good luck and happy building!
Beautiful bed. I so enjoy following your builds. I love to build too but between homeschooling one child and driving the others to school 30 min away, There’s not much time right now. I’m living vicariously through your blog 🙂
Awesome!!! What a beautiful bed! You do amazing work!!
Thanks Liz! <3
Jen, it’s absolutely beautiful! Your daughter must truly feel like a queen in that bed:) Thanks for the tip on the bedrails. I’m building a bed for my oldest soon and I was trying to figure out where exactly I would find that hardware.
The bed is wonderful. Thank you.
Jen this bed is seriously AMAZING! Your daughter is one lucky girl to have such an incredibly talented mama. Great job on one amazing knock off, you ROCK!
Oh my gosh I ADORE this bed! I’ve been drooling like Homer Simpson over donuts since your sneak peek. 😀
Girl, you rocked it!
I was going to start drawing up a plan for a king size of this exact bed for a friend… Your timing is impeccable. I wasn’t entirely sure where to begin, so thank you!
Hey Jen, this is super gorgeous, as always! Quick question – how did determine the dimensions of the overall headboard to ensure that the 1×3 would fit snuggly? I am hoping to build in a different size, and I am just having trouble calculating/visualizing because of the angles. Am I overthinking it? Do you just have to choose a number divisible by 2.5? Thanks!!
Jackie, I just kept the dimensions from the West Elm bed (those published on their site) in mind when drawing up the plans and things just worked out. Lucky for me, because I definitely would’ve overthought and made it more difficult than it needed to be.
Jen this bed is beautiful!!!
WOW, Jen! This is soooo inspiring. You’re so talented. I especially love that it’s not just a head board but you did the whole dang bed frame! You go girl <3
Stephanie @ Mommyzoid.ca
PS: Come share this over on the Ladies Collective Linkup! We'd love to have you 🙂
Thanks for the invite, Stephanie! Heading over to link up now!
This is GORGEOUS!! Wishing it was possible in a Cal King. ={
JEN!!!
What an amazing project this is! It’s huge, and I absolutely love it!!
Art. That’s what it is. Love and art.
Girl! Don’t you know I was thinking of you when I was attaching all those boards to the headboard?? 🙂
What a gorgeous bed! You are so talented, and I just love her room!
Thanks Alexis! And thank you for dropping by! <3
Girl! This was an amazing project. I am still dropping my jaw when I look at this monster DIY. Just Ah-mazing! I really loved having you on the team. Let’s repeat! XXOO
Thanks sweet lady! I had a blast – let’s do it again, for sure!
Hi! I would love to build this bed!!!! I don’t need it in queen but full size. Can you give me the guidance to the measurements? This is my first build and I want it to turn out as cute as yours did!
Thanks,
Kerry
Thanks Kerry! I would love for you to build this bed! A standard queen-sized mattress is 60″x80″ and a standard full is 54″x75″. I will try to draw up a plan for other bed sizes, but in the meantime, if you can’t wait to get started, I’d recommend decreasing the measurements of the head/footboard, slats, and side rails by 5″. Cut your pieces as you build, instead of cutting all the pieces beforehand. Hope that helps… good luck!
Wow, amazing project. Where did you get that awesome basket the toys are in? It’s a great accessory.
Thank you Jennifer. I can’t remember where I got that basket from (I’m kind of a basket addict), but most likely either Target, Michaels, or World Market – that’s usually where I go for all my basket needs! 🙂
Wondering how you managed to fit the plywood into the rails and leave exactly the right depth for the decorative stiles?
I’m not sure I understand your question…?
Do you happen to have plans for this for this bed in king size ?!
Do you think you’ll make plans for King size as well? 🙂 I love this bed!
Thanks! I will put a King version on the list!
I would love to see the plans in King size as well. I have wanted this bed for more than a year now and I’ve spent some time trying to find plans that would help me learn to make it. Yours looks gorgeous! As a sidenote, I love reading your blog and seeing what projects you have created. You make some beautiful pieces!
I think I’m going to attempt the queen size for my current mattress and wait on your plans for the king size. Pleeeeeease 🙂 !!!!!
We used your plans to build our son this queen sized bed (had to buy him a bigger mattress to fit it hahaha)…it’s looking stunning so far. Expect it to be complete by this weekend. THANK YOU!!!!!
Wow, that is so awesome to hear! Please tag me (@jenwoodhouse) on social media so I can see it! Happy building!
SImply Amazing!!!!!!!!
This is fantastic!
You are so talented! This bed is beautiful and one I’ve had my eye on for awhile. I’m hoping to try to tackle it if I can adjust the plans for King!
OMG! I registered for this bed on our wedding registry. We didn’t end up getting it but now that I’ve found this I think my husband and I can build it ourselves and save a ton of money! Thanks so much!!!! I’m hoping ours comes out as perfect as yours!
This is just stunning! Can I ask about the quilt on the bed? I love it 🙂
Thank you! The quilt is from Kohls.
Can I please get a king size spec sheet? I would love to do this!
It’s on my TO DO list Beau! Thanks!
Lovely! Can you please tell me how to scale this to build a full size bed, as a queen is too large and twin too small. Also, for the side and foot board, what sized did you cut the planks to make them stagger.
Hello,
I am going to home depot and can someone please respond if you know how to do this for a full sized bed. Thanks
Where would I need to change the dimensions if I wanted this to be a full size bed
Hi, is this comment section closed, I have a question, when the materials list calls for “2” plywood boards, what us the second one used for…since the first one is used to cut the headboard, footboard, etc….why is there second one needed…
Hi Barbra,
If you take a look at the plans, there is a plywood cut layout diagram on page 2. You cut part of the headboard out of 1 sheet of plywood and the rest (headboard, footboard, side panels) out of the other sheet. Hope that makes sense. Good luck!
Thanks Jen, that makes sense,and is a relief lol. I went to Home Depot yesterday to get the materials to build my bed, but I just didn’t feel I had a good grasp of my numbers. My mattress is 53 x 73, would you mind giving me some pointers on how to adjust the measurements in your Queen size plans to fit my mattress and box spring. I think you are so talented. I will await your comment and then I will tackle this project. Thanks again.
Great! I’ve gotten several requests to publish plans for a King and Full bed as well. I hope to get that done before the year is out. Thanks so much for visiting!
I know the plans for full size is in the makings, and this is so exciting, but if there is anyone on here that can quickly help me figure out the adjusted dimensions for making a full size bed for a 53×73 mattress, I would really appreciate it, I have out of town guests coming next week, and am in a crunch. I gave away my bed and now I need to make one. I have put it off because of being a little afraid I couldn’t do it and because of the math for adjusting, but now I have no choice but to dive in there, which is a good thing, I need that little push. so please help. The only difference is I am making my headboard just like the foot board with all horizontal planks, not the chevron pattern, which I’m thinking will be a little easier and again in a full size (53×73 mattress). Thanks in advance and happy building!!
That sounds like me – I’m always rushing at the last minute! I’ll try to work on the plans this weekend.
Barbra, you should be able to modify the plans for a full size bed by determining the difference between the sizes of a queen (60×80) and your mattress (53×73). The height of everything should remain the same, so you should be good on any height measurements. For width of the bed (width of the headboard and footboard), you should just subtract 7 inches from each full length measurement and then just cut the slats to fit. For length of the sides, you should also subtract 7 inches from each full length measurement. Does that make sense?
Thank you Jackie, I will see if I can figure it out, I am so excited Jen is going to do one for a full size bed. It seems most of the furniture stores display Queen size beds, maybe full sized are unpopular now.
Jackie, so I would subtract 7 inches off the actual headboard and foot board width, which would be 57 instead of 60.
Subtract 7 from the side rail lengths which would be 72 instead of 79….but with this since my mattress is 73 inches long, wouldn’t this not fit, especially after you add bedding?
I just took another look, so for the side, should I subtract 7 from the total of the side rails plus the legs, which would be 86 minus 7 = 79…but hmm, are the legs giving extra room inside the “rectangular box” that will contain the mattress?
This is fantastic! I am absolutely amazed! I actually own the West Elm version of this bed, so I can vouch for the fact that yours looks incredibly similar. This is DIY at it’s finest. Definitely pinning and sharing. Found you via DwellingGawker 🙂
Jen, I was wondering if you will be posting the full size bed plans this morning.
Thank you for your patience with me, Barbra! The full bed plans are now up! https://jenwoodhouse.com/plans/evelyn-full-bed.pdf Now I’m off to enjoy some family time for Christmas. Good luck and happy building!
Another quick question…can someone explain step 1, where it says to attach the “two” pieces of plywood, the large piece and the 9.5 piece, when I look at the rest of the plan, I am not understanding it’s purpose not do I quite understand how it’s to be attached…is it flush with the large piece?
I guess what I don’t get is why are there two pieces, instead of just one 61×57.5 (48 + 9.5)?
Oh please do King size plans!!!!! Pretty please! I am IN LOVE with this bed and I need to make it now! Such a beautiful bed!!
Anyway we can get plans for this in a King? This is absolutely beautiful and I would love this in my master bedroom.
Yes ma’am! I’ll be publishing the king size bed plans next week! 🙂
I looked through the all the questions and comments but I don’t think anyone has asked “how much does it cost to make a queen size bed roughly?” Just all the wood and hardware. I understand each store pieces are different. I’d just like to understand what I am into before I decide to take on this project. I’m IN LOVE with it! Thanks.
Hi Venus,
Thank you! It cost me about $200 in materials to build the bed. Good luck – can’t wait to see yours!
This bed is perfection! Is there a place where we can see others who made this bed from your plans? I love seeing how people put their own spin on things.
Thanks Stephanie! Yes, usually if people share it on social media, they’ll tag me (@jenwoodhouse #jenwoodhouse #houseofwood) and you can see it there. I love seeing people make it their own too!
Hey Jen! I was wondering how many 3/8s you think we should purchase if we are just building the full size headboard?
Hi Madison, The plans for the full size are here: https://jenwoodhouse.com/plans/evelyn-full-bed.pdf
Love, love, love this bed! I absolutely adore the patterns of the bedhead, and have added this project to my “Possible Projects” list for when we move into another rental. We’ve gone without a headboard for far too long, and this looks perfect! Of course, it’ll depend on the aesthetics of the place we move into.
Stephanie
The Thrifty Vegetarian
Hi Jen! This bed looks fantastic, I’ve already bought the materials to make it myself and can’t wait to get started! My question for you is what method of joinery did you use for the 2x4s for the headboard? Are they just attached to the plywood using the pocket screws and then the edges glued together, or are there nails or screws that I can’t see?
Thanks Joshua! I just used pocket hole joinery and wood glue. Good luck and happy building!
Great plans! We’re really looking forward to finishing our bed. It should be noted however that in order to use the brackets you must leave more than the clearance for just the depth of the boards that form the chevron. As noted in the directions “Attach the plywood at least 3⁄4” inset to allow space to attach chevron boards later.” Perhaps add a line noting that in order to effectively use the brackets you must attach the plywood at least 1″ or 1.25″ inset to allow space to attach chevron boards AND brackets at the end of the project. We are now unable to use the brackets because we didn’t leave enough space with the plywood but hope someone will see this and it will help them. Thanks again!
Hi Stephanie,
I’m not sure I understand your suggestion. The boards where the bed rail brackets are installed are all flush (see closeup photo of brackets). The inset is only on the outside, to allow the space for the 3/4″ thick “planked” boards. The brackets are installed on the interior side of the boards, so I’m not sure why you were unable to use them?
Love this look! Curious what the wall color is?
Hey Jen! What color stain did you use around the frame if you can remember. I’m obsessing and I can tell by looking at the stain on the store out of the ones you listen which one it is. Thanks ☺️
Hey Jen! What color stain did you use around the frame if you can remember. I’m obsessing and I can tell by looking at the stain on the store out of the ones you listen which one it is. Thanks ☺️
Sorry Jen I duplicated the comment because I put the wrong email address.
Hi Megan! I used Early American – it’s one of my favorites 🙂
I love this bed. It took me a lot longer to make than expected but I was doing it on my day off with a friend over a stretch of time. Thanks for posting this bed and the plans and design. I made it into a full size and love the way it fits into my small room.
Hi Jen. I’m working on a king size bed right now and have the headboard frame complete. Great instructions! Where did you find pine 1x3s for the chevron pattern? Home Depot doesn’t seem to carry them in pine, and all of the other 1×3 plank options are really expensive.
Thanks!
My HD stocks 1×3 boards – maybe you can check at Lowe’s?
Thank you for this design. My wife loved it so I built it myself. I didn’t it a little differently than you did, but the idea is the same since I just wanted the headboard not the sides.
http://i.imgur.com/gWkbU6a.jpg
http://i.imgur.com/uTVemsq.jpg
Am I missing the dimensions….?? In love with this bed. Was curious how tall the bed was ??
Hi Jen,
So I’ve been eyeing this for months, but I’d never built anything before and it seemed too ambitious. But now I’ve added shelves to my closet and made a coffee table so I’m an expert! (Really I just love the bed- and figure even if I have to buy twice as much material because of all my mistakes, it’s still worth it.)
But so, forgive the really basic question… is the headboard supposed to be flush with the back of the 2x4s? Or where is it supposed to be joined? It doesn’t look like there’s much of an overhang between the 1x3s and the 2x4s on the front. And the math’s not working for me. If it’s 4 inches and the plywood plus the 1x3s is only 1.75 inches… that’s a lot of overhang left. So are you supposed to join the plywood in the center of the 2x4s? If so, I’ll figure it out (though if you have a good tutorial at your fingertips, that’d be awesome, because I’m already wondering how I’ll keep such huge pieces flat and aligned….
Anyway, thank you again! Excited to work on this!
Hi Megan,
Place the plywood inset on the 2×4 frame – be sure to allow enough space for the 1×3 chevron planks to sit flush or slightly inset (your preference). The best way to do this, would be to place a scrap piece of wood underneath the plywood to support it while you join it to the 2×4 frame. I hope that made sense – good luck!
Hi Jen,
I just discovered this bed this morning, and my wife and I went off to our local home improvement mega-store to buy the materials. I have 2 questions regarding the brackets.
1) In connecting the sides to the headboard, did you just use 2 1X3’s laid horizontally and attached the brackets to those 1×3’s?
2) Did you connect the sides to the footboard with brackets also or pocket holes & screws?
Are these plans no longer free? Came here from Ana White and I understood that her site was for free plans…
Hi Elizabeth,
Yes, Ana and I both offer the majority of our plans for free, however the plans for this chevron bed were created by me and I do sell them here on my site. Hope that helps!
Thank you very much.
PLEASE TELL ME WHERE TO BUY THE PLANS. i HAVE LOOKED EVERYWHERE AND NOTHING WORKS.
THANK YOU
I am so excited to build this bed. One question: on the plans it says to use 1x3s. Did you buy 1x3s (actual dimensions .75×2.5″) or did you cut down 1x4s to exactly 3″ wide? Thanks so much!!
Hi Joanna! The off-the-shelf 1x3s are usually 3/4″x2.5″. I used those and didn’t make my own true 3″ wide boards. Hope that helps!
This may be a long shot since the last comments were several years ago….but is there any reason I couldn’t put the support beams for the mattress slats higher up? I don’t use a box spring with my mattress, so I want my mattress to sit directly on the slats at the same height as the mattress in your pics….TIA!
Hi!
I purchased your plans and started making the bed this weekend. Thanks for the plans!
We made the footboard and rails, but the headboard design is giving me the blues! How in the world did you cut those boards at a 45 degree angle? Did you use a miter saw? I am TERRIBLE at Geometry and just cannot wrap my head around that part. Please help!
Hi Krissy,
Yes, you can use a miter saw to cut the angles. Simply set your saw to 45º, make sure the board is flush up against the fence and cut. No need for geometry here! 🙂 Hope that helps. Good luck!
Your style is unique in comparison to other people I’ve read stuff from.
Many thanks for posting when you have the opportunity, Guess I will just
bookmark this site.
Hi there! I love this bed so much, and I’m excited to make it! I was wondering if you could add additional plans for California king?
Thanks Carrie! I’ll put it on the list!
Are Cal King plans available?
Love the bed, and I am almost done with mine! I have just one question. How/where did you attach the rail bracket hardware on the footboard/footlegs? The headboard has a plank that goes across the bottom, set back just slightly enough to accommodate the hardware that hooks into the side rail. But the footboard itself is set back a few inches from the joint where the legs meet the side rail. So I’m not quite sure how/where to attach the hardware to the footboard/legs. A picture would suffice! Thanks,
Bonnie
Hi there, first off, fantastic design! I do have one very important question though with regards to the stability of the headboard / frame. It appears to me that the only way the frame is attached to that giant headboard is the two metal brackets. If the headboard weren’t so tall/hefty I would not be concerned, but as it is, if that’s the only way it’s attached, I’d be very concerned about the head board really flopping back and forth if say someone flops onto the bed from the end (ie. jumps over the baseboard towards the headboard and lands on the bed, thereby moving the bed forwards.) Also, let’s call a spade a spade here… there are other activities which generate that type of motion much more strongly, and for an extended period of time. That’s really what I’m worried about here. I don’t want tons of creaking, a headboard slamming into my wall, the brackets warping / breaking, and/or anything of the sort.
Can anyone speak to this concern from experience? The one possible solution I was eliminating the bottom portion of the headboard, where it acts like part of the frame, and making the frame 4 sides instead of 3. You would essentially insert the frame into the headboard and then considering was widening the headboard about
Hi Kevin,
Thanks for writing. We haven’t had any issues with the stability of the headboard/frame. We usually place the bed against the wall and haven’t had any problems with it flopping back and forth. Hope that helps!
Hello! I’ve purchased the plans, made the headboard and now I’m looking over the remainder… on the support in the middle of the queen bed is the 2×4 flat to the floor? I’m thinking that it must be because 2×2 supports would be the same height as the 2 x 4 flat.
The plans are great, I could not have made it without them. Thank you so much for taking your time to make them!
Beautiful bed!! We are almost done building it! I have a question about the poly you used. Did you sand before applying the wipe on poly and how many coats did you apply? Also, where did you find the arm r seal? Our Home Depot sells minwax wipe on poly. Any experience with that product?
Thanks Anna! I didn’t sand before the first coat of poly, but I did sand in between coats (3 coats). I bought the Arm-R-Seal from here: http://amzn.to/2rQrhId I like the Minwax version okay; I prefer Arm-R-Seal. Hope that helps!
Love love love this bed! Just had a quick question. Did you put a box spring & mattress on top of the wood slats? Or if we have a box spring and mattress could / should that go right on the supports without the slats?
Thanks!
Thanks Heather! Yes, we did use a box spring with this bed.
Hi Jen! The hubs and I can’t wait to use your king size plans to make our own bed! Quick question for you- can this be done without using a box spring? Could we just raise the slats higher and not run into any issues?
Hi Emily,
Yes, the slats should be plenty of support – if you feel like it’s not, putting a sheet of plywood down will work too! Good luck!
Hi
I don’t mind spending the 13 bucks – esp from a military wife. However. I would like to know if you have any reviews for the king size bed plans? -and more importantly any finished products of the king size bed plans? A lot of woodworking plans from the internet have errors – have the king size plans been built or just sketched?
THANK YOU ?
Hi Emily,
Yes, I’ve seen many people build the king size bed from my plans and I’ve had nothing but great feedback thus far! Good luck – let me know if you have any questions along the way. Happy building!
Hey Jen!
I love love love this bed!! I am unable to find the plans for the Evelyn in King. Could you send me info on how to get them? Also do you have plans for any dressers that would go with it?
Thank you!
Connie
Thank you Connie. You’ll find the king bed here: https://gumroad.com/l/BDsJ
I just purchased the King plans for this bed before realizing that I need California King plans! Can you help me make the necessary adjustments??
Thank you!!!
What did you use to taper the legs?
Thanks!!
I’m curious as well. Thanks!
Hi Cara and Angelica,
You can use a circular saw, bandsaw, or jigsaw to cut the taper on the legs. Hope that helps!
Thanks! I have another question. I’m almost done with the bed and I’m at the point where you attach the metal brackets to the footboard and side rails but I can’t figure out where to place the brackets?! Can you help please?!
Hello – I am just building this bed – we are finished except for the seal/varnish. I really like the flat finish of the wood stained and am wanting to keep that. What kind of varnish or protecant would you recommend?
Hi Ashley,
I used General Finishes Arm-R-Seal and love it!
Hello! Love the post, but I can’t find where to get the free plans for this?
Thanks Erin! You can purchase the plans by clicking the gray “download plans” button.
Hi! I am getting ready to build this piece and I have one question for you! We love to use the underneath of our bed for storage. Do you think it would be okay to add a few inches to the leg height in order to make room for a bit of storage? Thanks!
Hi Maddie,
I don’t see a problem with that – good luck and happy building!
I know this post is like 3 years old, but WOW! I just found it an I’m so excited. I’ve wanted this bed for years
I know this is an older post but I just made the headboard in a king size, and I absolutely love it!! My question is about the brackets on the footboard. How do I attach the brackets without them being seen? I understand how they’re attached on the headboard but I’m confused about how they’re attached to the footboard.
I just built the headboard and I LOVE it! I’m working on the said rails and the footboard but I’m confused on how to attach the brackets on that end and can’t tell from the pictures. Can you please tell me how to attach the brackets to the footboard? Thank you!
Hi there! Attempting to build this and are having trouble getting started with the “small triangle”. We assumed it was was made of two 45 angles cuts, but when we do that the rest of the pieces don’t seem to line up in the middle of the headboard. Is there a trick to cutting this triangle so everything lines up? Thanks for the help!
Hi Katie,
All of the angles are cut at 45º – make sure your miter saw is set and doesn’t move in the course of your cuts, just a little variance can compound over repeated cuts. I’d actually recommend starting in the center and working your way outward. Hope that helps – good luck!
Thanks for the quick reply, Jen! We really appreciate the extra help! So start in the center, work our way out, and when we get to the triangle we’ll just make one to fit? Sounds like plan, thanks! 🙂
I love this design, and I haven’t found one person that doesn’t love it at first sight!
I bought the blueprints, and I’m done with all the cuts and 80% into the staining and I have one question that maybe Jen or someone else can help me with.
I took the advice and bought the side rail brackets, and connecting to the headboard makes perfect sense, and theres several pictures, but connecting to the footer is a mystery to me. I made my footer have the two legs permanently connected which structurally makes sense to me. I can’t figure out how to use the brackets there though because where the sideboard hits the leg, there’s 3+ inches until you reach the footer. Do I need to attach a small piece of 2×4 there?
Hi Joe,
In the plans, the feet are attached to the side boards. Here’s a photo of how the bed bracket attaches the footboard to the sides: https://jenwoodhouse.com/wp-content/uploads/2018/12/footboard-bracket.jpg
Hope that helps!
Hey there! Just bought the plans for the king bed and we were wondering, what color did you stain the majority of the bed? Couldn’t find that anywhere in the post and it looks like you used one stain mainly overall on most areas other than the chevrons. Thanks!
Hi Margaret! I stained the frame of the bed in Early American. Hope that helps and happy building!
Hey Jen. I like the looks of the bed and I’ve downloaded the plans and I have a question about the pocket holes at the seam where the larger and smaller pieces of plywood are joined for the headboard. Are the pocket holes there to attach the plywood to each other? I see in the next step that you install the 1X3’s over the seam and I can’t figure out what else those holes might be for. The screws that the plans recommend in that step are 11/4″ and I felt like they might go all the way through the plywood and come out the backside. Please share your insights with this inquiry so that I can get the bed built for my son and my daughter-in-law.
Thanks
Jim N
Hi Jim,
Thanks for writing! Yes, the plywood is joined together with pocket screws. The 1 1/4-inch pocket screws shouldn’t blow through.
Hi Jen! I love this plan and I will be purchasing for the King Size blueprints. My question however is this- can this be easily modified to JUST be the headboard? I need to use under the bed storage, so I would prefer to keep my current bed frame and just affix the beautiful headboard to the frame.Thank you!
Hi Margaret,
Thanks for your note! The bed is constructed in separate components, so yes, you can opt to build just the headboard. Hope that helps – happy building!
Hi Margaret,
I built just the headboard, and it came out great! You CAN do it! Enjoy!
Hi Jen,
Thanks for all of the wonderful material on your site (yes, I signed up for your newsletter)! Great projects, and practical tips for the DIYer. This bed was an inspiration – I built the headboard and put it on our Cal King bed. Looks really nice, and my wife is very happy. Of course, the just caused her to add to my Honey-do list, but I like building things, so it’s a good fit 🙂
Thanks again! I look forward to more inspiring projects and videos!
Beautiful bed! And I love that it can be taken apart for ease of moving.
*totally new to DIY question*
You mentioned nailing the boards as you create the pattern **where do you nail the board without it looking terrible**??
I have no skills and would love to take this on without my husband being roped into the project. Thank you so much!!
Hi Sara,
You can place the nails in the same place on the boards, so it’s all uniform, but after some wood putty, you barely see the nail holes! I actually didn’t both filling the nail holes because I think it adds to the whole ‘rustic reclaimed’ look of it all. You can totally do this – it’s a great beginner project. Good luck on your build!
Hi there! I’m curious to know what kind of mattress you have on this since the bed frame seems to sit low.
my wife and I love the bed and were wondering what size Kreg clamp did you use for the pocket hole jig? We are getting tools ready to purchase and just want to confirm we are getting the correct ones.
Lovely colors..
Hello Jen;
Absolutely gorgeous bed, I love it.
I would like to try to build a king size. So am I correct that it would be 80x 76”?
Could you please send me building plans for this bed?
Thank you so very much for your artistic talents, you are amazing,
Catherine
Oh my goodness, this bed looks incredible, you are so talented! Thanks so much for sharing how you did it.
And there are definitely not too many pillows on that bed 😉
I own a homestay somewhere in Himalayan region , a perfect place and close to nature . For homestay I actually was searching for wooden natural looking bedding stuff, thanks for sharing this craft with us.
I love this Chevron Reclaimed Wood Bed craft , seems amazing. Thanks for sharing with us.
I really like this design, I find it pleasing. Just wondering why the images link back to the same page? Good way to get more hits on your web site 😉
This looks amazing! I’ve been dreaming of this headboard for years, but have never wanted to spend that much on it. It’s gotten to the point that I was going to try to build it myself, so I’m so glad I found your post. I love how you used various stains in order to create the reclaimed wood look. It really turned out perfect! Thanks so much for sharing!