Easy to follow free plans to build a Simple Workbench.
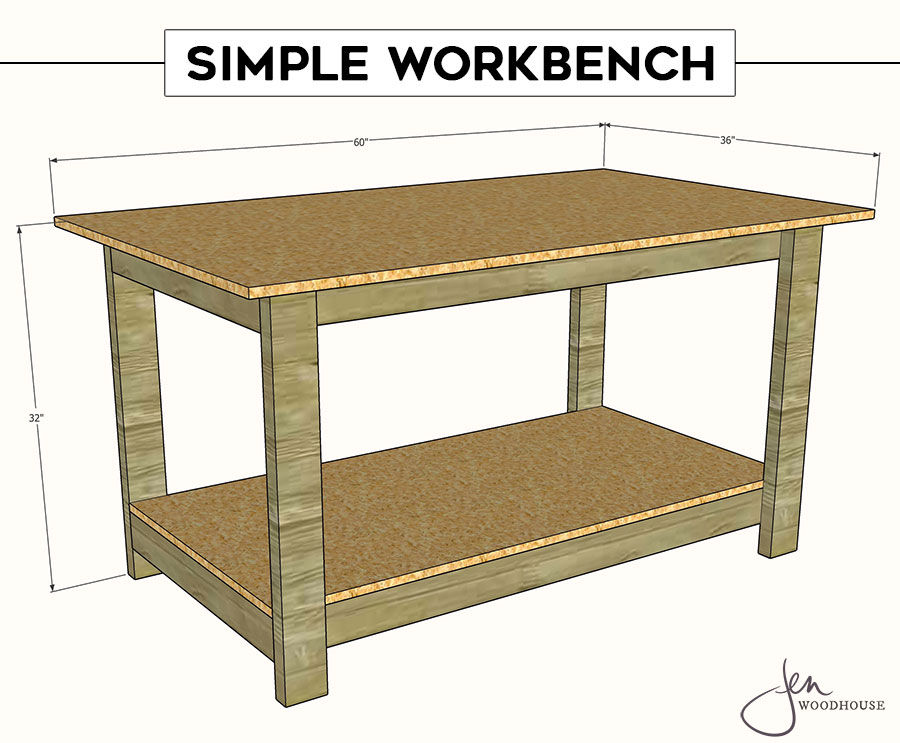
How To Build A Simple DIY Workbench
Materials:
- (7) 2 x 4 x 8 Ft. Boards
- (2) 4 Ft. x 8 Ft. Sheets of 3/4-inch Plywood
- 2 1/2-inch Self-Tapping Wood Screws
- 1 1/4-inch Wood Screws
Tools:
- Tape Measure
- Pencil
- Carpenter’s Square
- Cordless Impact Driver
- Circular Saw
- Safety Glasses
- Hearing Protection
- Dust Mask
Cut List:
- (4) 2×4 @ 51 inches (long stretchers)
- (4) 2×4 @ 27 inches (short stretchers)
- (4) 2×4 @ 24 inches (supports)
- (4) 2×4 @ 31 1/4 inches (legs)
- (1) 3/4-inch plywood @ 54 inches x 27 inches (bottom shelf)
- (1) 3/4-inch plywood @ 60 inches x 36 inches (top)
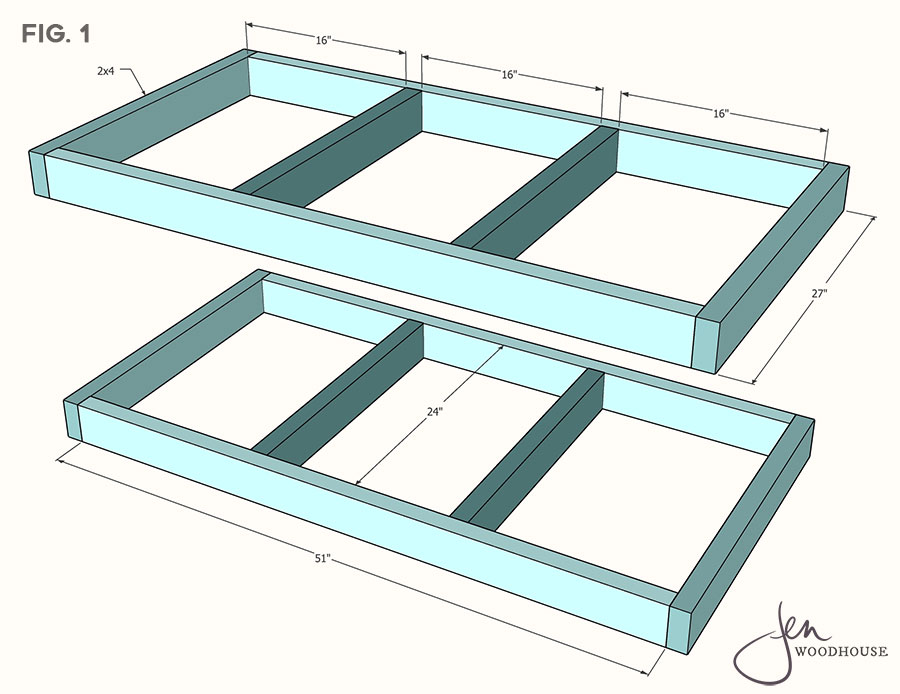
Step 1 – Build the top and bottom frames.
Measure, mark, and cut 2x4s to length. Construct as shown with 2 1/2-inch self-tapping wood screws.
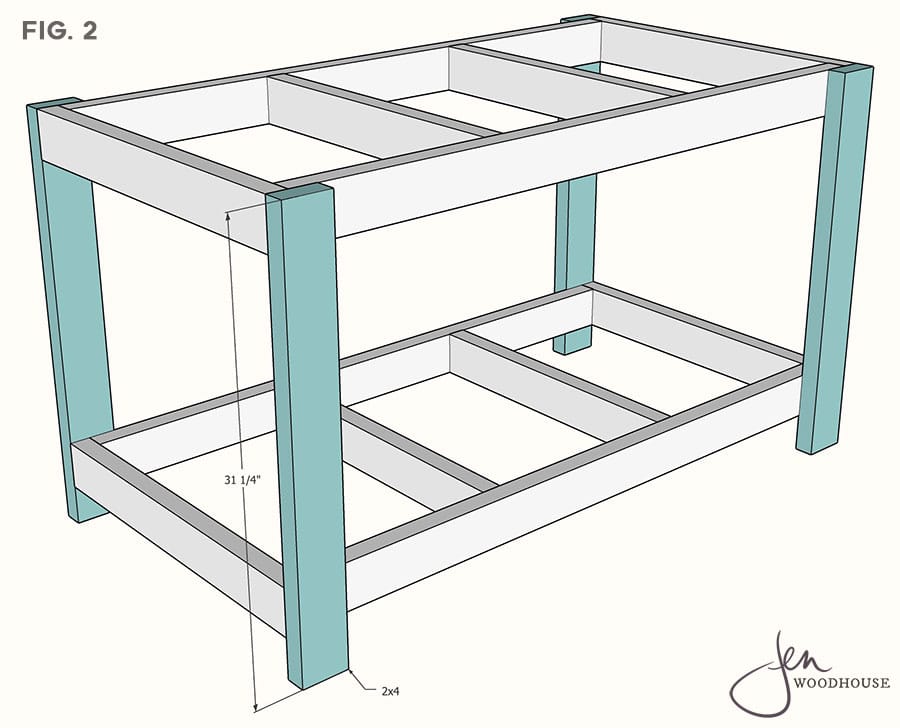
Step 2 – Attach the legs.
Measure, mark, and cut 2×4 legs to length. Attach legs as shown with 2 1/2-inch self-tapping wood screws. Place the bottom shelf at the height you prefer. This plan shows the bottom shelf about 3 inches from the ground.
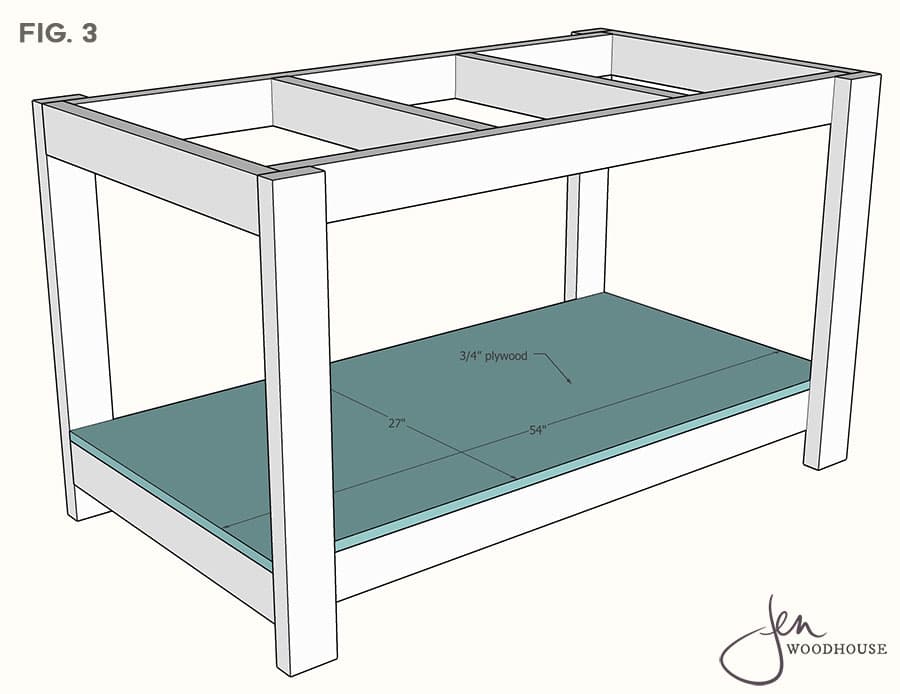
Step 3 – Add the bottom shelf.
Measure, mark, and cut 3/4-inch plywood bottom shelf to size. Slide into place and attach with 1 1/4-inch wood screws.
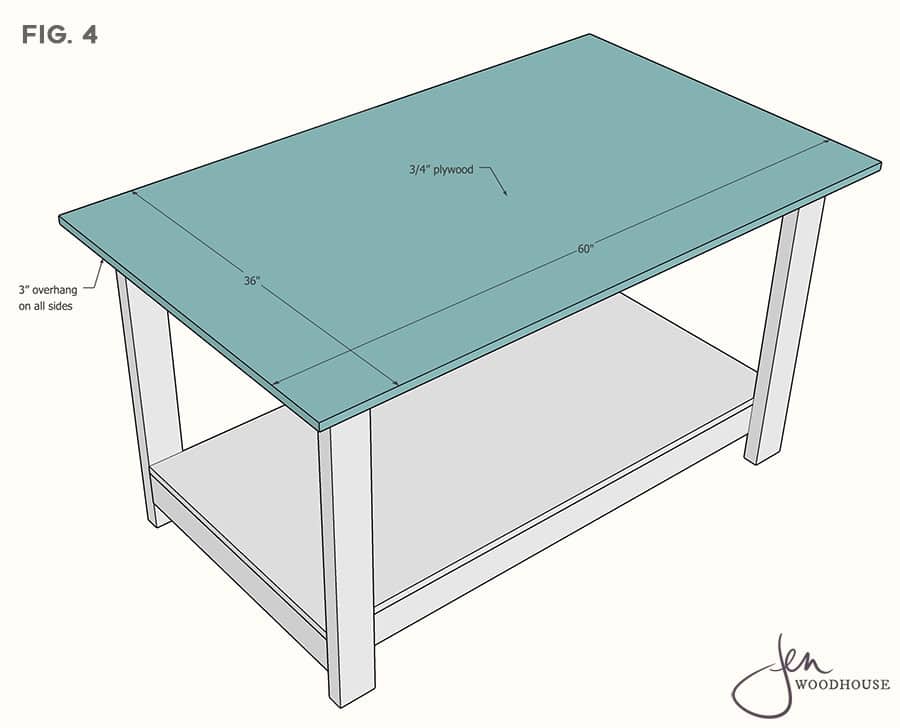
Step 4 – Add the top shelf.
Measure, mark, and cut 3/4-inch plywood top to size. Position on top of the workbench allowing for a 3-inch overhang on all sides. Attach to the workbench with 1 1/4-inch wood screws.
I LOVE this workbench plan but…when I click on “Plans Download” at the top of the webpage just below the title, the next page says “No content available”
How do I get a printable copy of the plans?
Thanks!!!
Hi Donna,
Just print the page!
Thank you!
Building a version of this now my only issue is trying to attach the legs since I’m doing it by myself. Walking away today to finish tomorrow.
What software do you use to build your plans?
Great Workbench! I made mine a little bigger and taller to fit me plus added casters to the legs. Great for my tiny woodshop and a straightforward plan!
Pretty neat ideas. However, you might consider getting the PDF functionality of your plans fixed or at the very least don’t make the website template so graphics intense so the images load when simply printing the page.
just select the areas you want to print.
wow.
Hi Jen. I adapted your design to fit my space. Used disassembled pallets for the structure and an old sheet of plywood for the top and shelf. Total cost for the project…$0.00.
Thank you so much for sharing your plan. I can’t wait to build this bench for my workshop. 🙂
Jen
In my retirement I picked up woodworking and was thrilled to find a person like you who is also hopefully, going to be a self taught carpenter like you. Thank you very much for your blog. Hopefully I will learn from you. Looking forward to check your blog and postings and see if there is anything I can find which will help me. I am currently working of creating plantations shutters for my house in sunny AZ. I will let you know how it goes.
Best Regards
-Stan
Hello, Jen.
Thank you for the plans.
I can easily modify them to go over my existing 36″H shelf system.
Very helpful in seeing how to assemble them!
I think I’m missing something when I’m trying to understand these plans. The plans call out a 3-inch overhang on all sides, meaning the 36-inch deep top piece should be supported by a 30″ deep base. The plans show a 27″ deep base.
Friend, though the frame is 27″ deep, once you add the legs (1.5″ on each side) you get 30″. At least, that’s how I have understood it while adapting this plan for my own needs.
Nice concept, but I will be adjusting a few dimensions to minimize waste (scrap) and try to do this with a little less wood. Example, making the table width 24 instead of 27 will allow me to use a single 8′ 2X4 on the top or bottom.
can someone help me adapt the build plans to make the tabletop 4 feet by 4 feet? I’d like to have an overhang on at least one side and every time I think I have the cut list correct, I realize it may not be right. I’m not a math person at all, but I can follow directions! =) Thanks in advance if anyone is willing to give me some guidance!
Hi Jen:
This is the most useful work table design I have found. I have been thinking about building one customized to my peculiar desires and needs (and thus could never buy from a store) and this gave me the right template for building it to my specs.
A key value is validating the materials to use and some practical features (3/4″ top , not thinner; 3″ overhang, etc.) assuring that it would be sturdy enough ant “fir for purpose” as they say. Building stuff is always like cooking with me, I use recipes for inspiration but rarely follow them exactly. Another that is the inexpensive material and simple joining approach that lend itself to making the build modular and easy to modify later.
One peculiarity of my situation is that this has to remain outside under a deck overhand, so not completely exposed, not completely protected (mild sunbelt climate also).. I will finish all exposed surfaces with marine UV inhibited epoxy resin which should make it impervious to the elements it will encounter.
Jen,
Thanks for sharing these plans. I built this bench for my wife’s sewing room. I left the lower shelf and one of the lower long stretcher boards off so she could use it as a desk if she wanted to. Thanks again!
Would love to see a project that takes a jobsite table saw and makes it a workshop one, like building it into table.
Looks Easy
I would like to build something like this, but I don’t own a cordless impact driver and I don’t see where it is being used in the building of this. Heck, I don’t even know what an impact driver does! Also, could this support a weight of about 150 pounds? I’m trying to make an inexpensive workbench to hold some equipment that is about that weight. I’m just concerned about the joints and such.