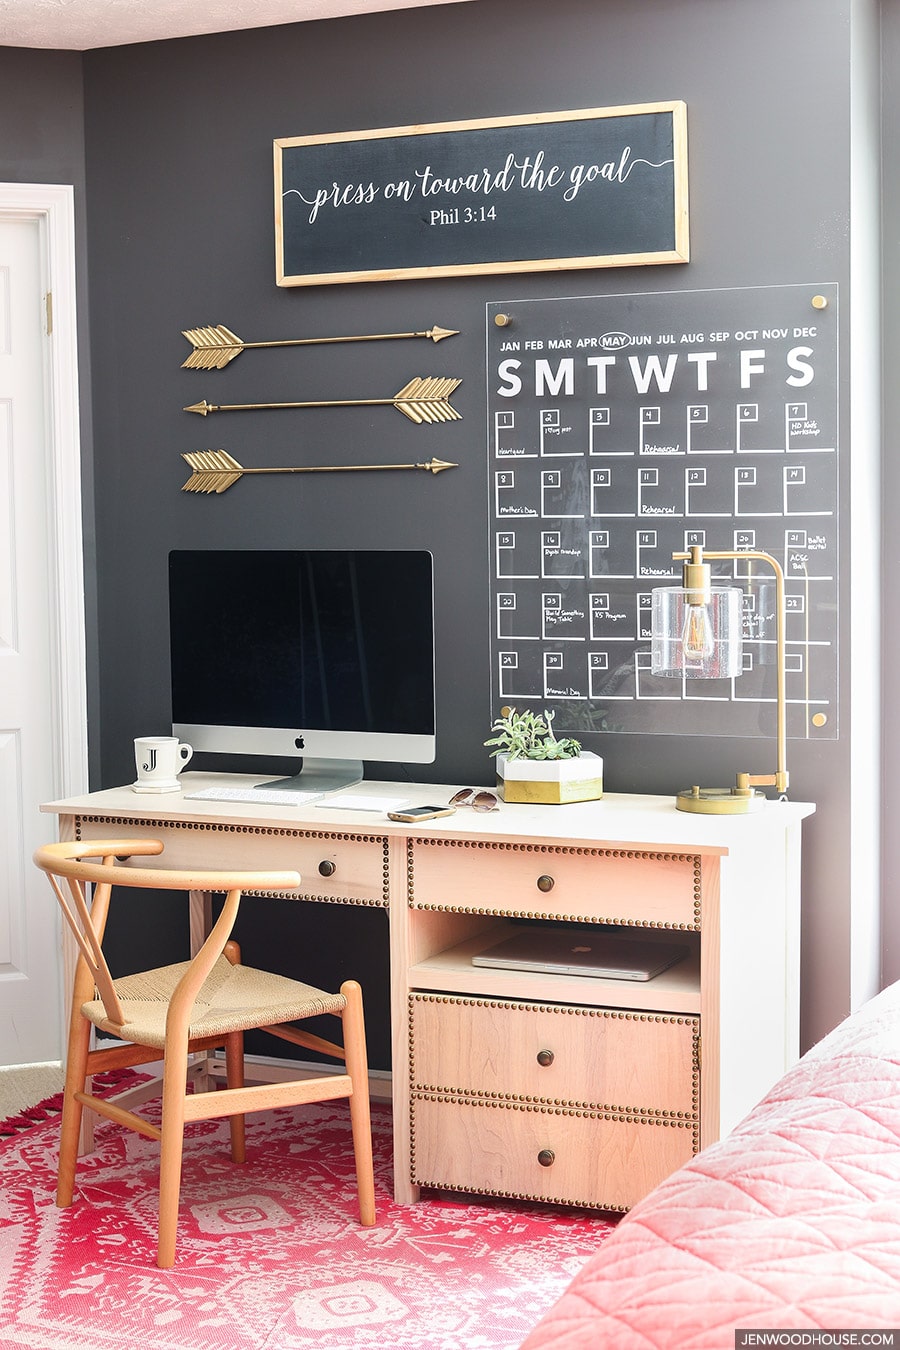
You guys! Hiiiii! Thank y’all so much for all of your kind words and comments on Instagram and Facebook about my home office! I really love this space and it’s been getting a ton of use. You guys have been asking for a tutorial on my DIY acrylic calendar, so I’m thrilled to share it with you today!
*This post contains affiliate links. To read my full disclosure policy, click here.
When I first spotted this amazing acrylic calendar on Apartment Therapy, I was absolutely smitten. Because I’m a DIYer to the core, I knew I could create my own version. I used my Silhouette Cameo (electronic cutting machine) to do most of the heavy lifting for this project.
Side note: I designed and built the desk with hidden printer storage. Here’s the tutorial.
Alright, so let’s get started. To make this DIY acrylic calendar, you will need:
Materials:
- 30″ x 36″ Acrylic Sheet
- Oracal 631 or 651 Adhesive Vinyl
- Silhouette Transfer Paper
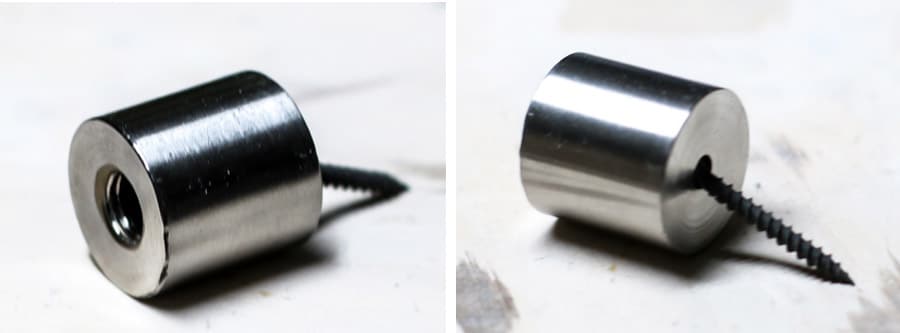
- 4 – 1″ x 1.2″ Stainless Steel Sign Standoffs
- Chalk Marker
- Metallic Gold Spray Paint
- Painter’s Tape
- 1-1/4″ Drywall Screws and Anchors or 2″ Wood Screws
Tools:
- Cordless Drill
- 5/16″ Drill Bit
- Phillips Head Bit
- Silhouette Cameo
- Clamps
- Safety Glasses
The acrylic sheet will come with a protective film on it. Don’t peel this film off until you’re ready to apply the vinyl decals. Measure and mark where you’re going to drill the holes in each corner. I measured about an inch and a half from the edge and covered the area with some painter’s tape on both sides.
Next, clamp the acrylic sheet to a flat surface (I used my workbench). By supporting the underside of the sheet, you’re not only stabilizing your project, but you’re minimizing the risk of tear-out.
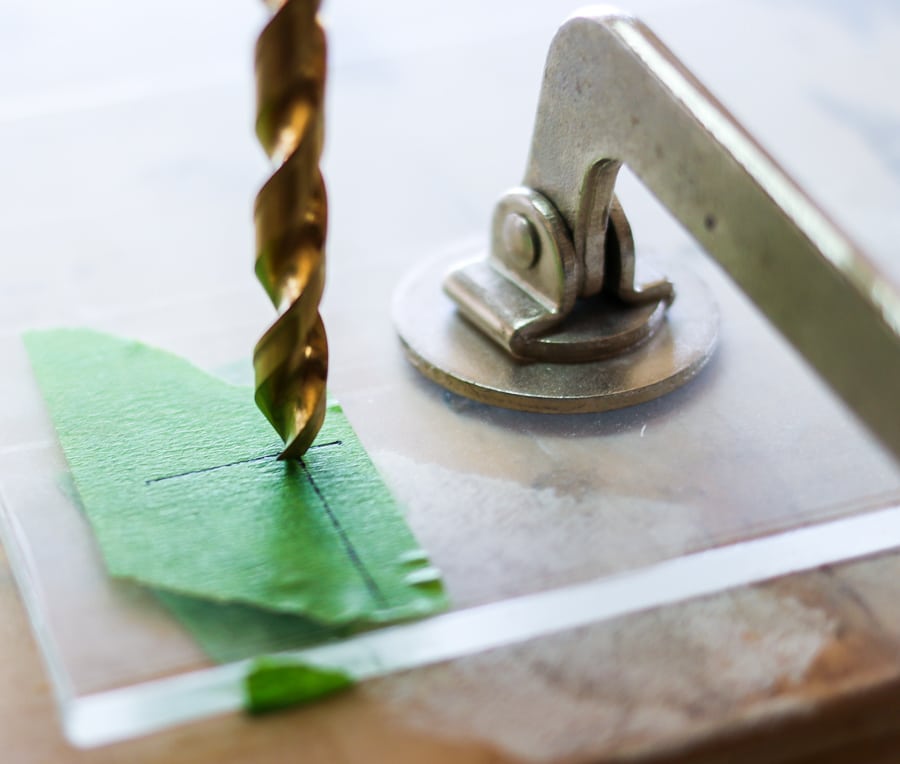
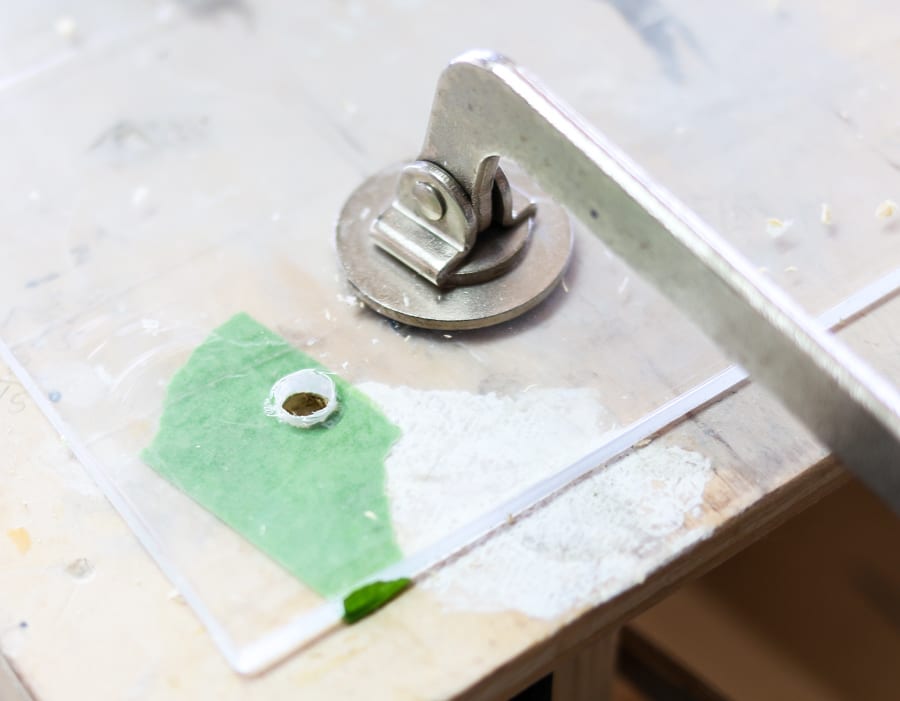
With a cordless drill fitted with a 5/16″ drill bit, drill a hole all the way through, peel the tape off, and clean up any ragged edges by scraping off the excess plastic that was removed (it’s easy to do with your fingernail or a butter knife). Do this for all four corners.
Check to see if your screws will go through the holes easily. If not, widen the hole slightly with the drill. The holes can be bigger than the screws – this will allow you some wiggle room and will make it easier when hanging the calendar on the wall later.
Now it’s time to prepare your vinyl decals. I used my Silhouette Design program to design the months, days, and calendar boxes. I wanted to apply the decal to the backside of the calendar so that when I wiped the calendar down every month, the decals wouldn’t get in the way. Because of this, I had to mirror my design. It’s a little tricky to re-wire your brain to think backwards and read from right to left and I probably made it much harder than it needed to be. I’m sure the decals would have been fine on the front, but I tend to overthink things. Hindsight is 20/20, right?
As the machine is cutting the decals out, prepare your calendar. I used painter’s tape and taped out a grid on the acrylic sheet so that it would be easier to line the decals up. You can also use the chalk marker to draw out a grid. It was challenging enough thinking backwards – I didn’t need to worry about alignment and spacing as well. My lady brain just can’t handle that amount of multi-tasking.
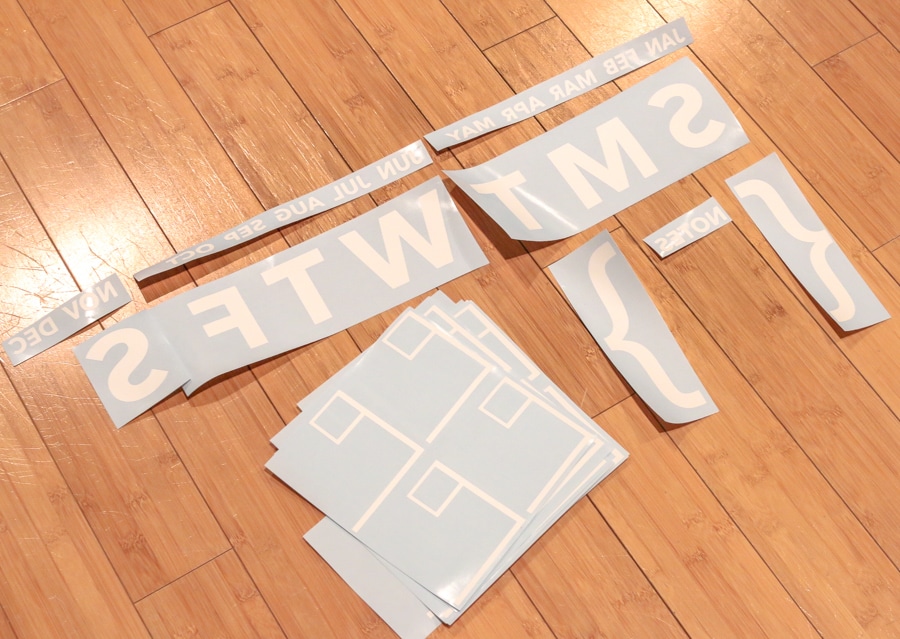
Then I used the transfer paper to transfer the vinyl decal to the acrylic sheet. There are countless tutorials online explaining how to cut and apply adhesive vinyl, but here’s a helpful video.
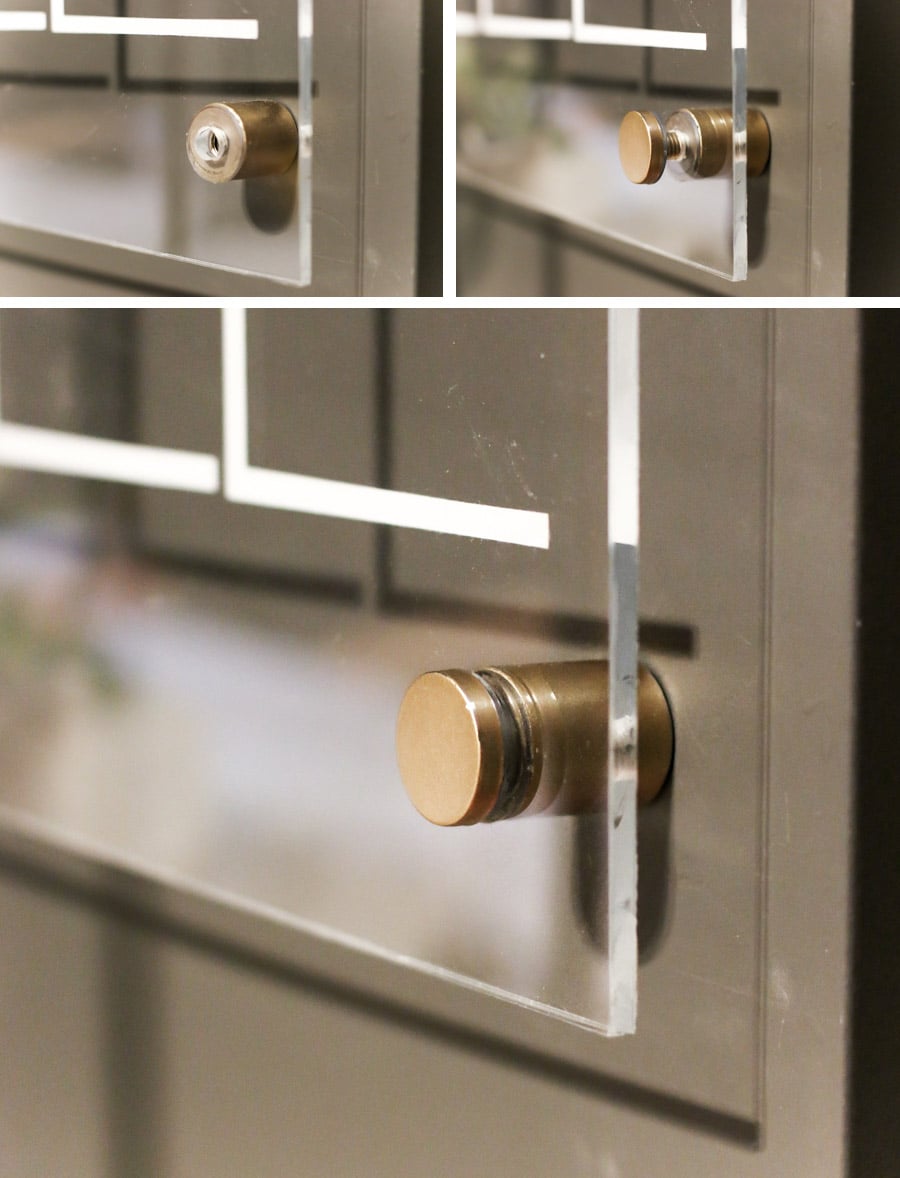
The standoffs came in stainless steel, so I spray-painted them gold. Finally, it was time to hang the calendar up on the wall. I held up the calendar in place on the wall, then marked where I would drill the holes in the wall. You can either use a stud finder to locate the wall studs and use 2″ wood screws to secure the calendar to the wall or you can use drywall anchors and drywall screws if you’re drilling into drywall alone.
I chose to use anchors and drywall screws because the studs didn’t align with the placement of my calendar. First, I drilled a hole in the wall and inserted the plastic anchor. Then I inserted the drywall screw through the barrel of the standoff and drove the screw through the barrel into the wall anchor.
Once the barrel is secured to the wall, hold your calendar in place and screw the caps in. Be sure not to over-tighten the cap because you may risk cracking the acrylic and then you’ll have to choke someone out because all of your hard work has been wasted.
If you follow me on Instagram or Facebook, you would have seen the photo below, with my calendar featuring pink vinyl decals. The most difficult part of this project is lining up the decals perfectly. Don’t look too closely, but I missed the mark on more than one occasion here, which drove the perfectionist in me c-c-c-crazy. I ended up peeling off all the pink decals and starting over with white (because I ran out of pink). I definitely prefer the pink, but I just couldn’t live with the wonky-ness.
I certainly want to set you up for success, but I must warn you – this DIY acrylic calendar project is incredibly tedious and time-consuming! #keepingitreal
SHOP MY WORKSPACE

- DIY Desk with Printer Cabinet
- DIY Scrap Wood Hexagon Planter
- DIY Acrylic Calendar
- Philippians 3:14 Sign
- Arrow Trio (spray-painted metallic gold)
- Desk Lamp
- Desk Chair
- Area Rug
Want to see how I made the easiest desk drawer organizers ever? Check out the tutorial here.
What do you think? Do you think you’ll tackle this DIY acrylic calendar?
Thanks for reading friends! Be sure to PIN IT so you don’t forget it!



Your home office came out great and the calendar is such a cool project. I’ve been looking for a DIY white board/calendar project to try and this is best one I’ve seen.
Thanks for the kind words, Anthony!
Jen, where did you find those cute gold arrows???
Hi Dawn, I got the arrow trio from here (affiliate link): https://paintedfoxhome.com/product/arrow-trio/?ref=101 They came in a rustic bronze color and I spray-painted them gold.
You know this is what I was waiting for! Thank you for sharing it and thank you for being honest about the time involved. My client really wants to re-create this in her home so it’s good to know that!
xo,
Sam
Jen would you ever be able to send me the cut files for your calendar? I love it but would like to cut out the step of designing the file? You could email them to me. Thanks so much!
same here! I don’t have a printer :/
Tiny lady brain?! What the heck? Do you realize how degrading that is? You may think I’m overreacting, but it’s an attitude like this that supports sexism.
Hi Caroline, I am sorry you are offended but it’s a reference from a TV show. Please skip to the 1:00 minute mark if you’d like to see the reference: https://youtu.be/vp5cbgeRQ6g. Thank you so much for taking the time to offer your opinion but if you spend any amount of time on my site, you’ll notice that gender roles have very little place here. If that were the case, my husband would be the one building things while I bake him brownies. Have a lovely day.
Hi! Love the tutorial! I don;t have an electronic cutter so I’m going to see what my other options are.
I have to say, I had the same reaction Caroline did when I first read “tiny lady brain”. This is the first time I’ve come across your blog (via Pinterest) and I was tempted to switch off as soon as I read it. I’m a second wave feminist and comments like that were common (and not meant as humour or sarcasm) when I was in my early thirties.
I’m glad I scrolled through to the comments. I’m also a big fan of Orange is the New Black so I should have remembered it. Thanks for responding and clearing that up, Jen. I’ve subscribed to your blog now and I’m looking forward to seeing more of your outstanding work!
Thanks for taking the time to comment, Sophia! Glad you’re here!
Love you Jen! You go girl!
It’s called sarcasm! Lighten up… Great reply Jen! Have a lovely day…
What’s shocking to me is that some people didn’t use their critical thinking skills to realize that, obviously, in 2020, this must be a joke. No woman I know of would speak, seriously, of her ‘tiny lady brain.’
Come on, ladies. Seriously. You didn’t have to watch the TV show to know this.
That said, great job, Jen! Totally copying for my home office.
You make it look so easy!
I’m gonna try to do this, but instead of laying out a painter’s tape grid, I’m just gonna place the acrylic over a cutting mat. Automatic grid that I don’t have to worry about being accurate!! Just need to secure the sides of the acrylic to make sure it doesn’t shift while I’m working. I call that a win.
Great idea Theresa! Good luck!
Hi Jen! Love the calendar and am looking to recreate. What fonts did you use?
Try Dafont.com for great free fonts. Not an ad haha! GL!
This reminds me a lot of the the DIY Classy Clutter did for A Beautiful Mess.
That’s so cool that other people made it too! The original idea is from LA-based designer, Derrick Johnson – Dare To Be Domestic on Etsy. I spotted it when his work was featured on Apartment Therapy.
Hi, does the adhesive vinyl look ok from the back? Like can you tell it’s the sticker side showing? Hope that makes sense.
Hello! I love this calendar that you built and would like to know how much it cost you overall to make yourself. I looked up the original on Etsy and it is going for 350!
Thanks Ariana! It cost me about $70 for the acrylic sheet and sign standoffs. The rest of the materials I had on-hand.
I would pay you to make one of these for me! If you’re up to it email me at [email protected]
thanks!!!
where did you get the “press on toward the goal” sign? i love it
Thanks Sydney! I had it made by this Etsy seller – here’s the link: http://rstyle.me/n/bvuy4nbjmyf
Hi there, I’m wanting to make your DIY Acrylic Calendar, but I don’t have a stencil machine to make the decals. I’ve found all the other materials. Is it possible to order the calendar decals from you & pay to have them shipped to me?
Could I use a thinner acrylic sheet? .93 vs the .22? Thanks!
I was just wondering what the design was you used for the Calendar… I have a circuit so I’m just trying to figure out how to do this as I absolutely love this.. If you have any other pointers especially with the printing of the calendar portion, they would be greatly appreciated.
Taylor
This is BEAUTIFUL Jen! Would you be willing to post a templet for the vinyals you made or be able to post the sizing of the letters/ boxes? I am trying to make this for my daughter but I don’t want to mess it up too badly!
This is one of the most beautiful command center designs I have ever seen! Love it. And as a new Silhouette Cameo user – this is such an awesome inspiration! Thanks for sharing!
Thank you for the lovely comment, Ruth!
This is neat! I’ve been needing something like this but instead of a calendar I need a client management chart with all the steps I need to do along the way! I don’t have access to the Silhouette Cameo so do you think I could paint it on the back or use a chalk pen on the back side?
Absolutely! Great idea Emily!
OMG, I have never heard of a chalk marker!! Do you like it better than dry erase for this use? Is it messy? I love how the colors are so much more vibrant than dry erase! I’m seriously freaking out about this… where have I been? I’m fairly crafty and a graphic designer to boot. Sigh…
Also, where does one purchase the sheet acrylic? Lowes?
Hi Christa,
Thanks for your note! A chalk marker is a lot like a dry erase – except it doesn’t wipe off as easily. Not messy at all! I purchased my acrylic sheet from Home Depot.
Hi Jen love this area especially the paint color on the wall. It makes everything pop. Do you mind telling me what paint color you used? Thank you.
Thank you Crystal! The paint color is Benjamin Moore’s Iron Mountain.
Can I purchase this calendar decal from you? I would love to make this but I do not have access to a silouette machine. Thank you.
Hi Grace,
No, sorry I don’t sell the calendar decals.
Perfect for this space! Such a great (and easy!) idea!
I LOVE the calendar. Sooo cute! Do you happen to have the measurements of the decals posted anywhere? Like the size of the boxes? I would love to attempt this project & wasn’t sure what size I would need to make those. Thanks so much!!
Thanks Kristin! The boxes measure about 3.75″ each. Hope that helps!
Is there a place i can buy the vynal letters?
HI Jen! I absolutely love this idea! I’m wondering if you sell the file for the calendar– I’m willing to pay the big bucks for this cut file so I could make one of these for my office!
Hi Raleigh,
Unfortunately, the file was lost when my laptop crashed! I’m so sorry!
Hi Jen! I was wondering if you remember what size you got for the Philippians sign – on Esty, there is 2 options: 26×14 inches and 36×14 inches. The size you have seems perfect!
Thank you!
Thanks Amanda, my sign measures 37.5″ x 12.75″
Do you have to peel off those white/pink day markers every month off your acrylic board and replace them?
It looks like she just needs to erase the dates and rewrite them to match the month were in.
This is stunning! Great job.
Anything acrylic and I am there, love how massive it is on the wall to making it a piece of wall decor.
Fab blog you have here.
can I find this somwhere ready and buy it? sorry if it insults you but I am not good at diy’s..
Hi Jen,
I know it’s been a couple of years since you made this calendar, I just wanted to know what type of machine you used to make the decal. This is exactly what I’m looking for.
Is there a link to the design of the blocks and letters? I want to make this for my dorm, but can’t find the file.
Hi! Loved your idea, just one question. What type of marker do you use? And how do you erase? The acrylic works fine? Please youc omments.
Tks!
Hi Catalina,
I used this chalk marker: https://amzn.to/2KrqM07. A dry erase marker should work too! Hope that helps.
Was wondering where you got the desk! I love it!
Thanks Caitlin! I designed and built it! There’s a link to the tutorial and plans in the post. Hope that helps!
Quite nice!
It’s always pleasant when the things around you have been in your own hands 🙂
Hi Jen , I have an etsy shop where I sale DIY decals. I had a customer ask me to create a calendar for her. She was using your tutorial for the acrylic calendar, but wanted a different style. I love how it turned out. When I have customers ask me about creating the calendar, I use the link to this tutorial. Your office space is great. I have created decals that look like your calendar. I am wondering if your calendar is where they got their inspiration. Love it.
https://www.etsy.com/vinylexpress/listing/680734738/custom-calendar-decal-for-18-x-24?utm_source=Copy&utm_medium=ListingManager&utm_campaign=Share&utm_term=so.lmsm&share_time=1558098330663
Cool! I often get questions about my acrylic calendar and if I sell the decals (I don’t), so I’m glad to know which direction to point them to now! Thanks!
I would love to have the svg of what you used for your calendar.
What thickness was your acrylic sheet?
Would you be willing to share the font and font size of your calendar decals? I have a cricut and would love to make this!
Hi Chelsey,
I’m sorry, I no longer have those files.
I absolutely love this!! Definitely want to try it myself. Like you, I way over analyze lol! That said, do you think it would work to do the decals on the front of a piece of acrylic; then sandwich another blank piece overtop of it? So then it would be two pieces thick. But easier than needing to figure out how to mirror it all. Thoughts? I’ve never worked with acrylic or vinyl so appreciate any tips!
Thank you for this creative DIY acrylic wall calendar tutorial! I love the sleek and modern look of it. I’m curious about the markers you use to write on the acrylic – do you have any recommendations for markers that wipe off easily and don’t leave any residue or staining over time