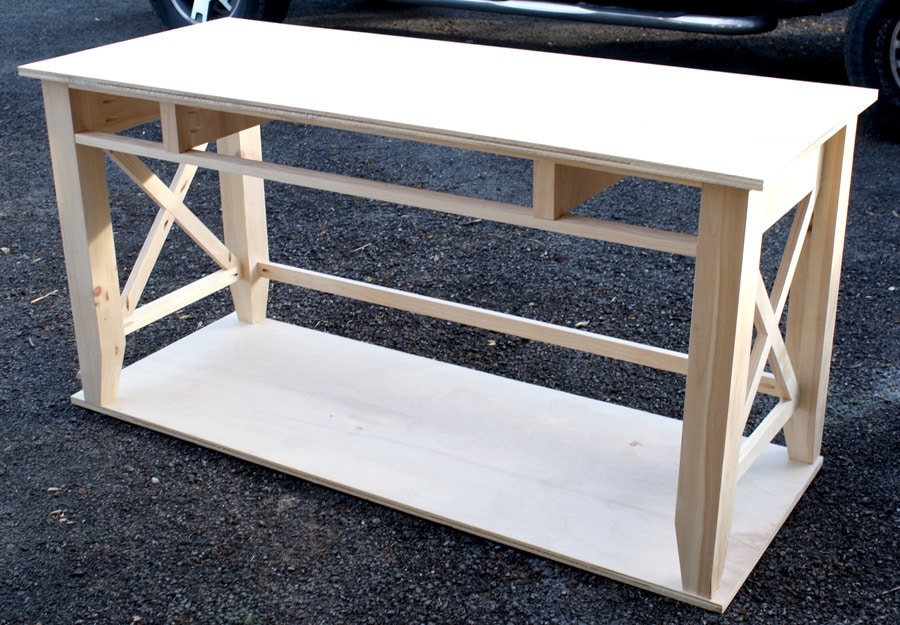
The majority of my DIY projects are borne out of necessity and my latest build is no exception. My newlywed friends Josh and Marie needed a desk for their apartment. Josh is in seminary and is having to do his homework on their bed or on the floor.
Most recently, he set up this ingenious solution:
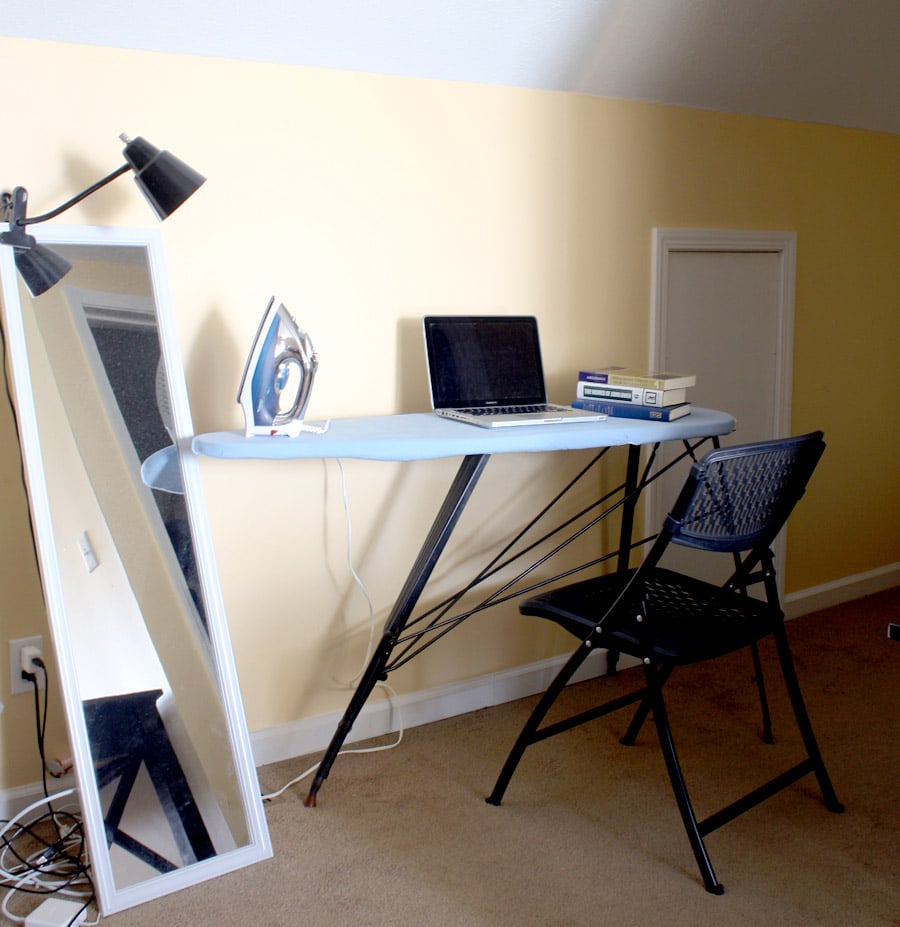 Pretty sweet, right?
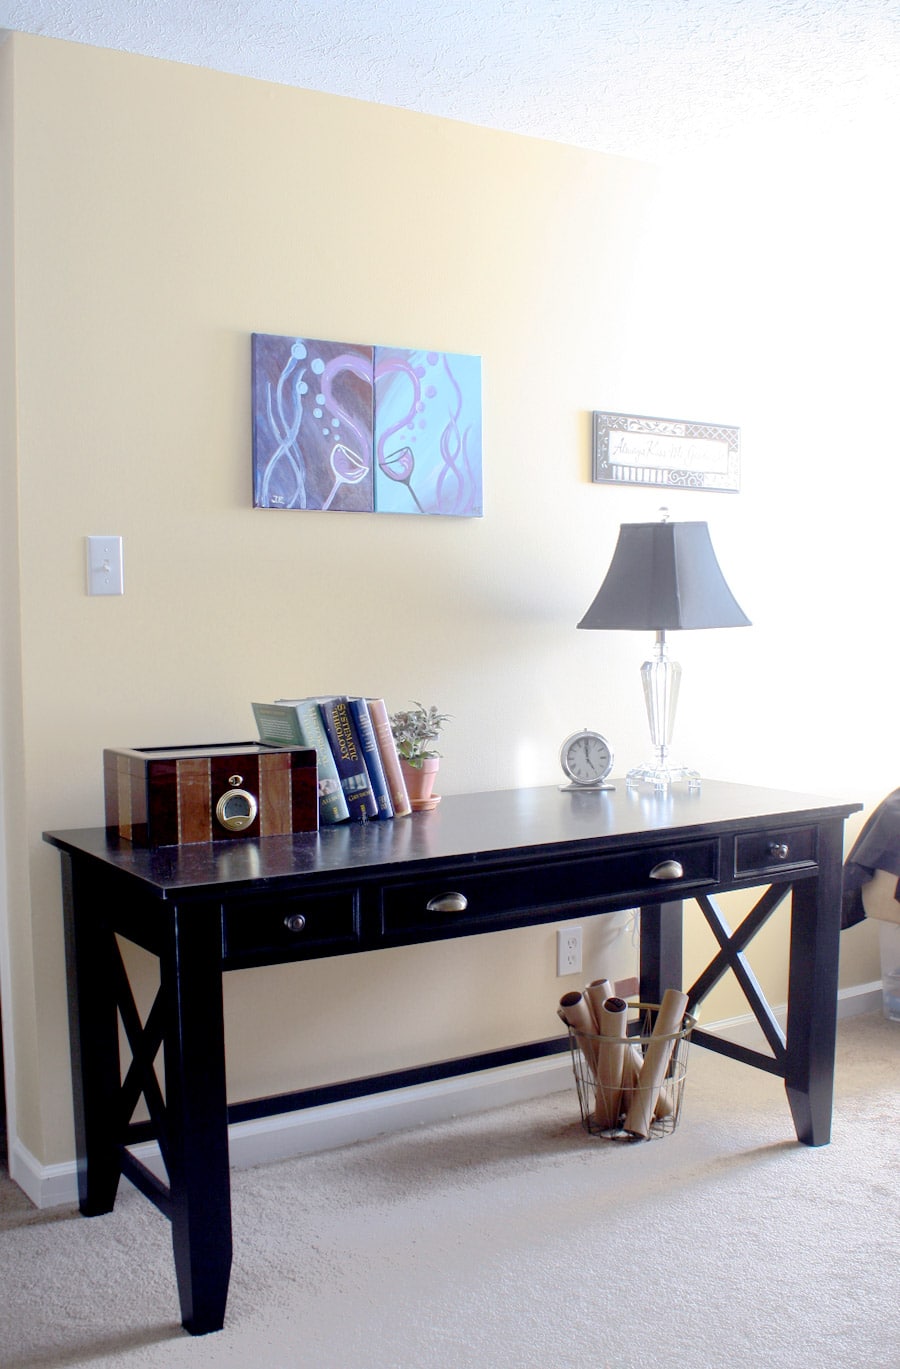
Sadly, this ironing-board-turned-desk was not going to work as a permanent solution so they came to me and asked if I would build them a simple writer’s desk. Of course I said yes! I jump at any chance to build something new and making this desk for them was a blessing to me. After brainstorming some ideas based on their needs and wants, we came up with this design:
 Several weeks later, Josh has happily relegated his ironing board back to its original, intended use.
 *This post contains affiliate links. To read my full disclosure policy, click here.
I’m excited to share the plans and tutorial with you today so you can build your own DIY Writing Desk!
Click here to download the Ehlers Writing Desk PDF Plans.
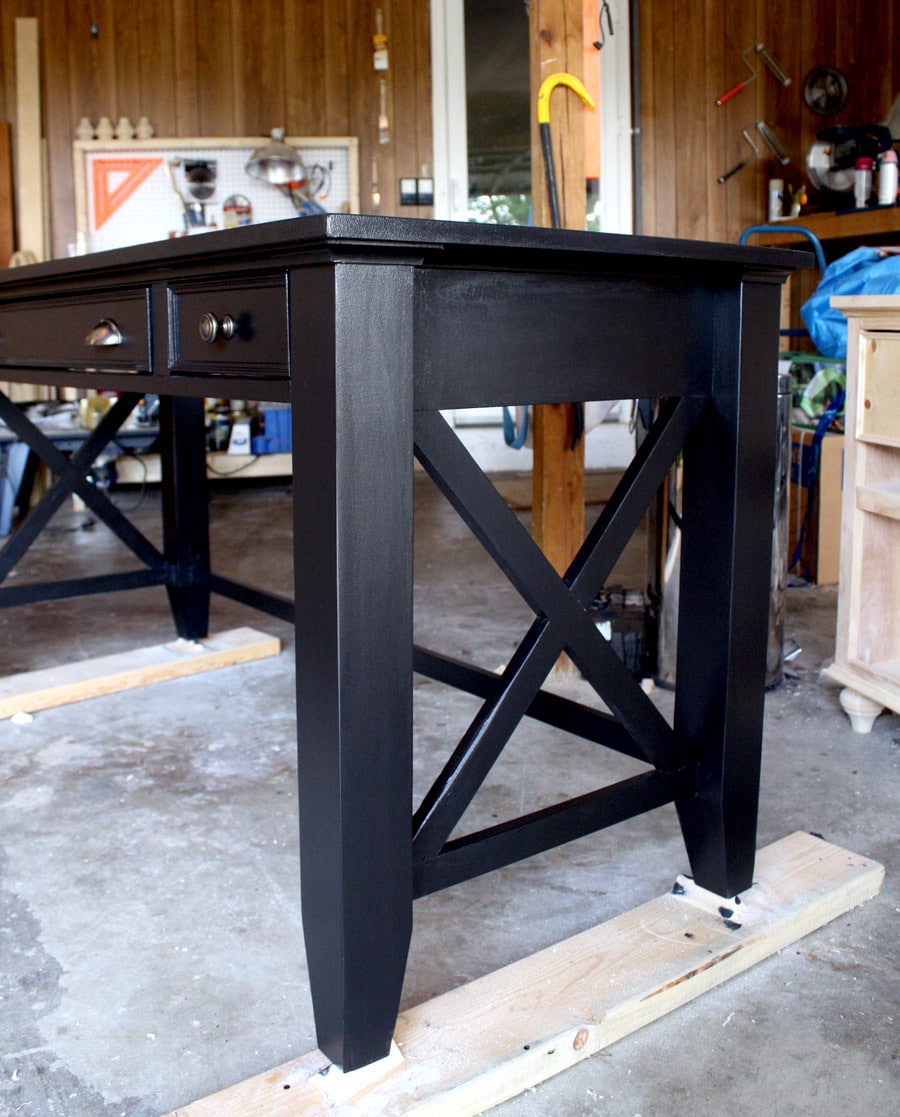
I teamed up with my friends at Osborne Wood to design and create these pretty tapered legs. The legs were custom, but are now available for sale here. I chose the knotty pine species, at about $20/leg.
Once again, I chose to build with my favorite plywood ever, Purebond Plywood. I bought mine from The Home Depot. It’s the prettiest plywood I’ve seen on the market and it’s formaldehyde-free. Read about why Purebond is the healthier alternative here.

Okay, so let’s get started, shall we?
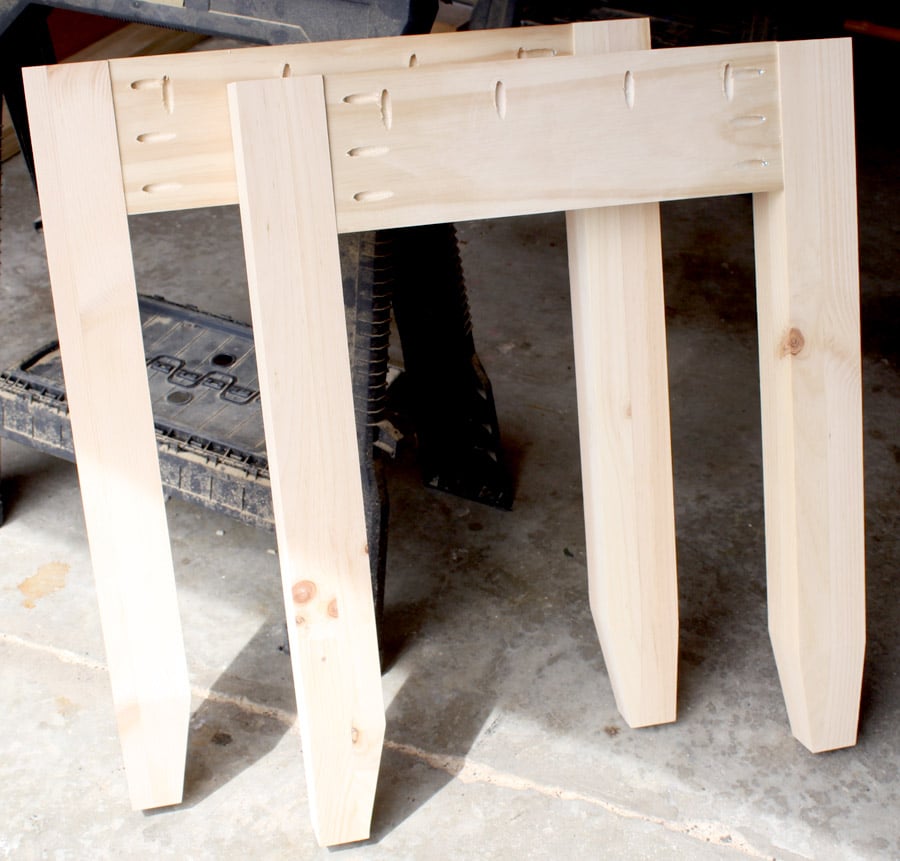
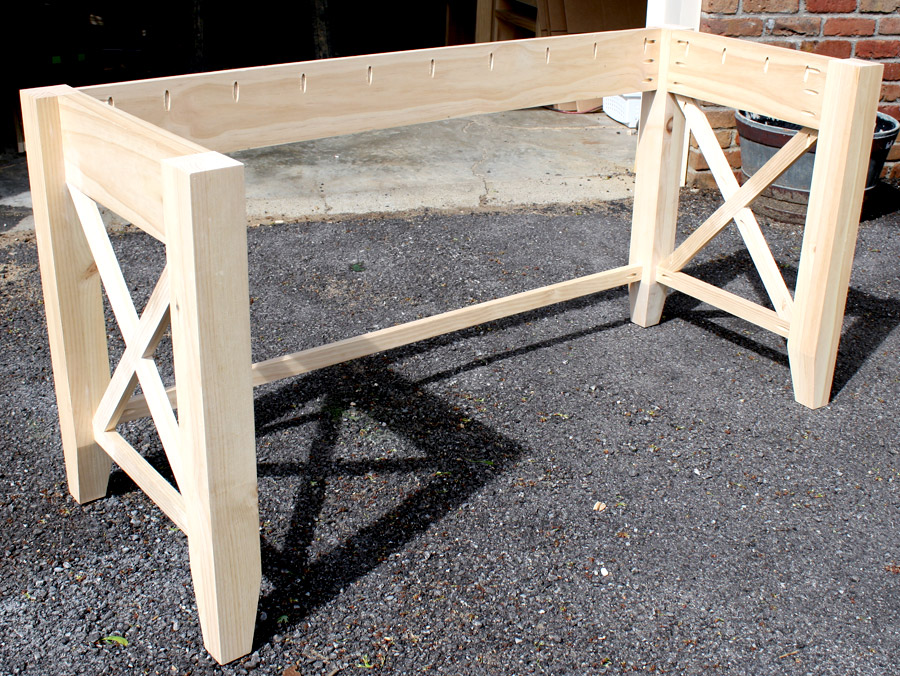
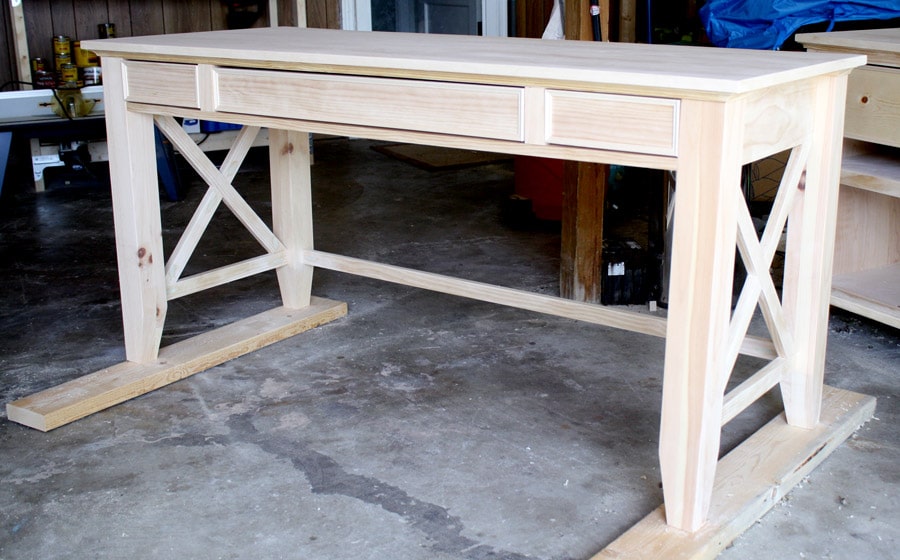
First I built the sides and legs. I drilled 3/4″ pocket holes like so and attached the sides to the legs with 1-1/4″ pocket hole screws.
If you’re not familiar with pocket hole joinery, I use the Kreg Jig K4 Pocket Hole System![]() to drill these holes. In a nutshell, this jig allows you to drill pocket holes at just the correct angle to create a strong joint. I prefer using pocket hole joinery whenever possible because it makes joining wood super easy. No need to bother with fancy woodworking joinery methods like mortise and tenons, biscuits, dovetails, and the like. And you can drill the holes on the insides of the boards, so they’re hidden.
to drill these holes. In a nutshell, this jig allows you to drill pocket holes at just the correct angle to create a strong joint. I prefer using pocket hole joinery whenever possible because it makes joining wood super easy. No need to bother with fancy woodworking joinery methods like mortise and tenons, biscuits, dovetails, and the like. And you can drill the holes on the insides of the boards, so they’re hidden.
Don’t forget to drill pocket holes facing up to attach the top in later steps.
 Then I added the cross pieces. There are measurements in the plan, but I recommend cutting it to fit your specific build to ensure precision. I don’t use a tape measure here, I just hold the 1×2 board up and mark it in place, then cut it to fit.
Here’s an inside and outside view of the sides:
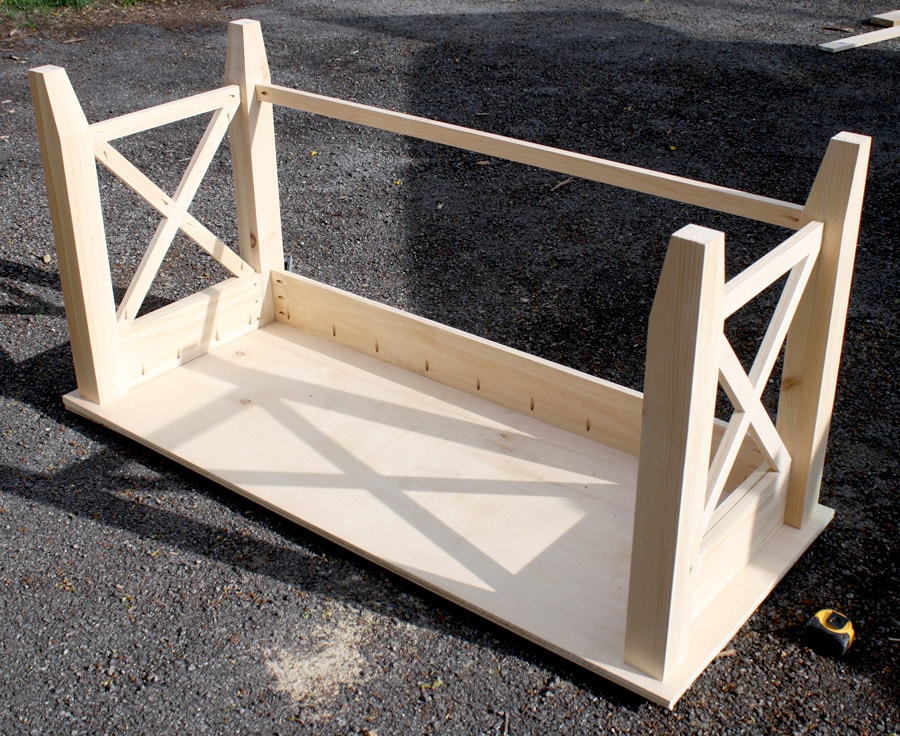
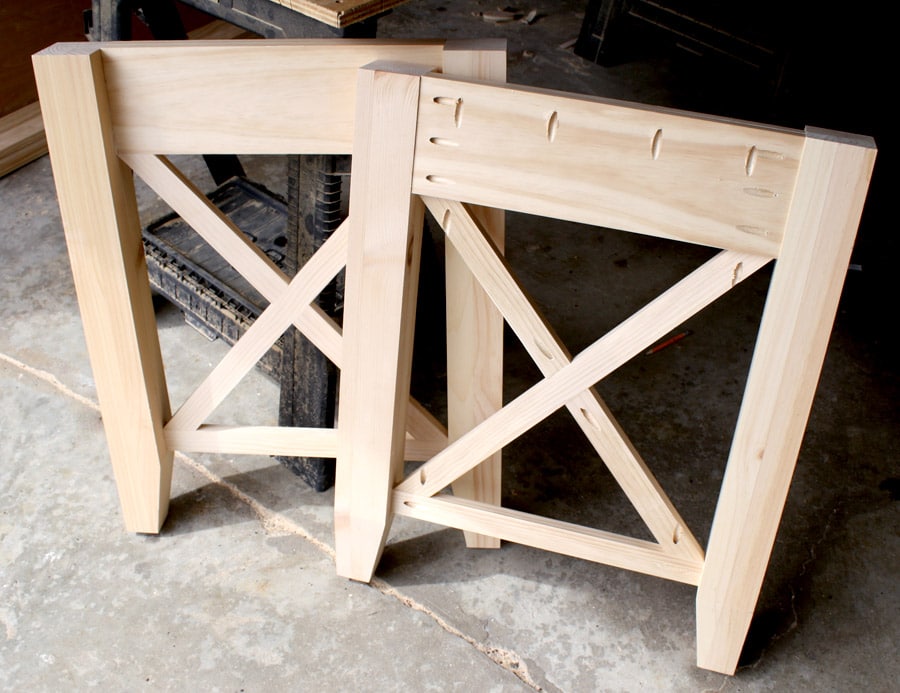 Next, I constructed the carcass.
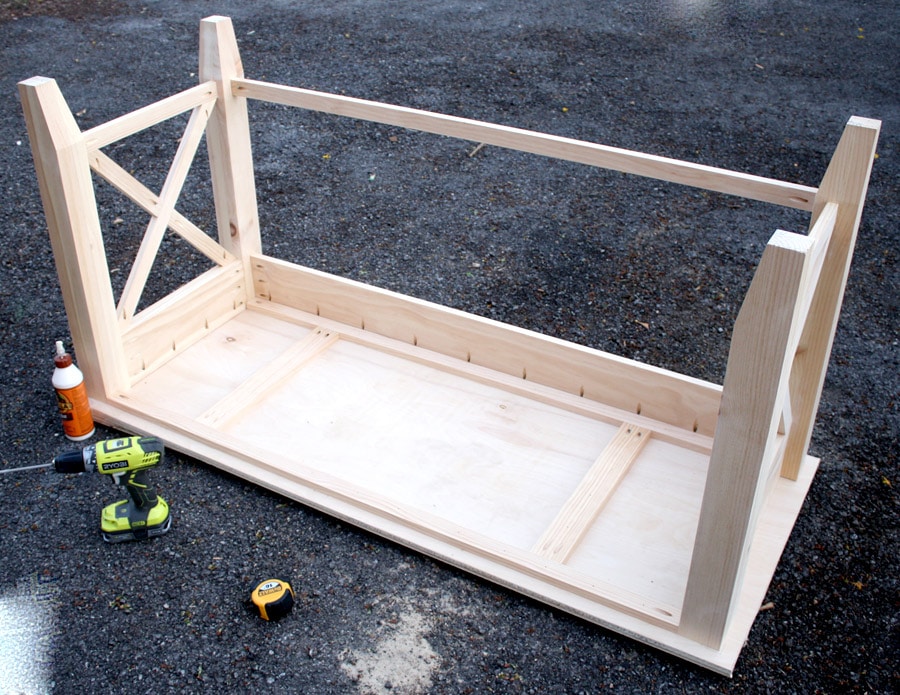
 Then I attached the top. Remember how I drilled pocket holes facing up? This is why.
I like to flip the desk upside down so that I’m using gravity to my advantage when drilling those pocket hole screws in. Work smarter, not harder. I laid a piece of scrap plywood down to protect the top from being marred by the gravel.
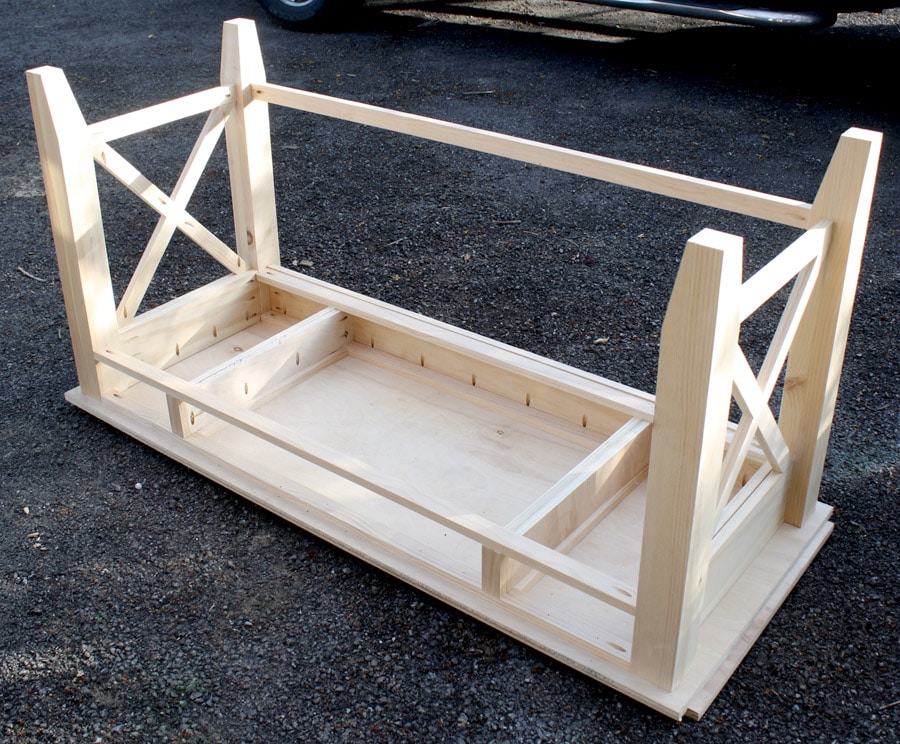
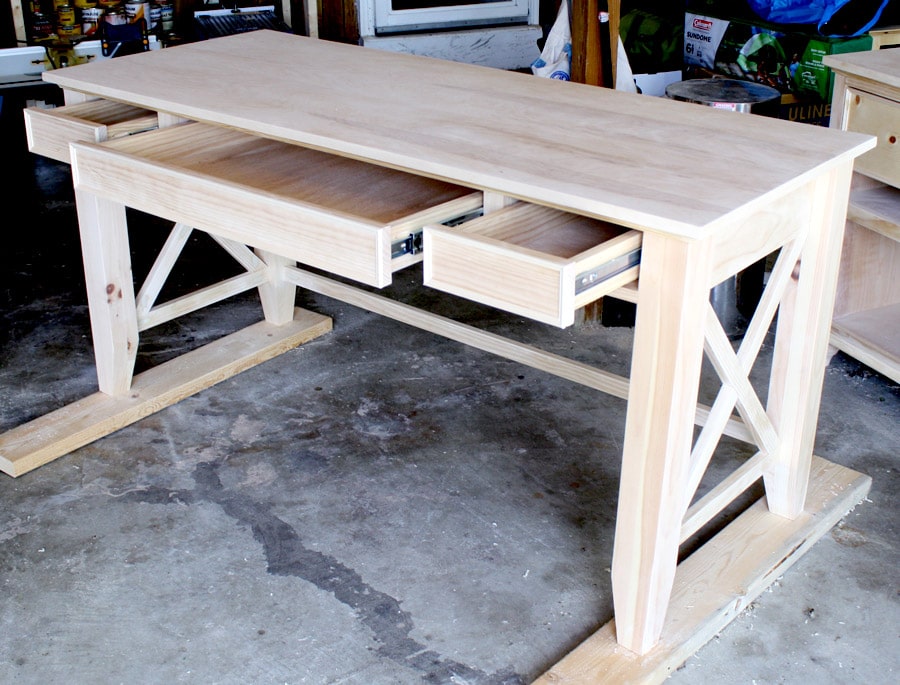
 Now it’s time to start constructing the components for the drawers.
 I chose to rip some plywood scrap pieces down to make the dividers where the drawer slides will be attached because it’s what I had on-hand. You can use solid wood boards if you’d like, you’ll just have to rip a 1×5 board down to 3-3/4″ width since a standard 1×4 board usually only measures 3-1/2″ wide.
 Now it’s time to build the drawers.
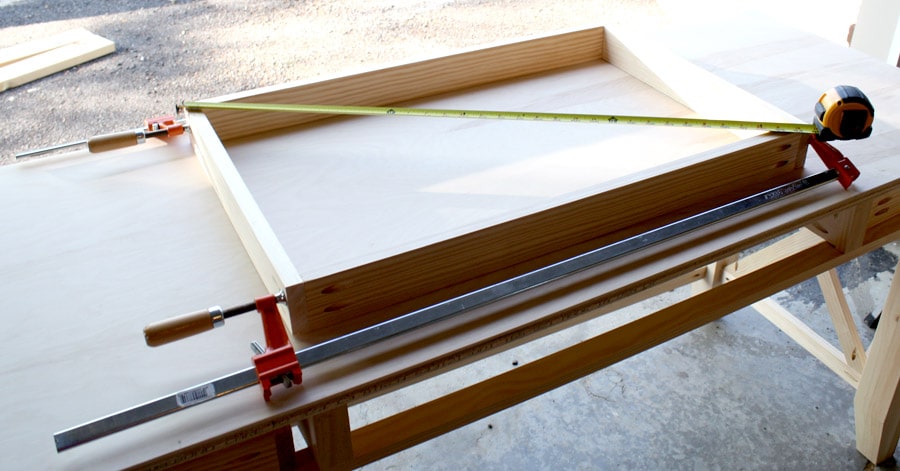
 Build the drawer box by drilling 3/4″ pocket holes on the outsides of the boards (they’ll be hidden by the drawer face in later steps) and attaching with 1-1/4″ pocket hole screws. Remember to check the drawer box for square. To check for square, measure the two diagonals. These measurements should match. If they don’t, you can adjust the box by taking the longer measurement and squeezing them together until the measurements match. You can also clamp a speed square to the inside of the box before fastening the boards together.
 I built one of the side drawers a hair too wide, so instead of disassembling it and building it smaller, I called on my neighbor Josh to help me out (don’t get confused here – not Seminary Josh, this is a different Josh, he builds houses – no big deal. We’ll call him Builder Josh). Builder Josh came over with his hand planer and planed about 1/8″ off the sides so that the drawer would fit. Thank God for builder neighbor friends with very common first names.
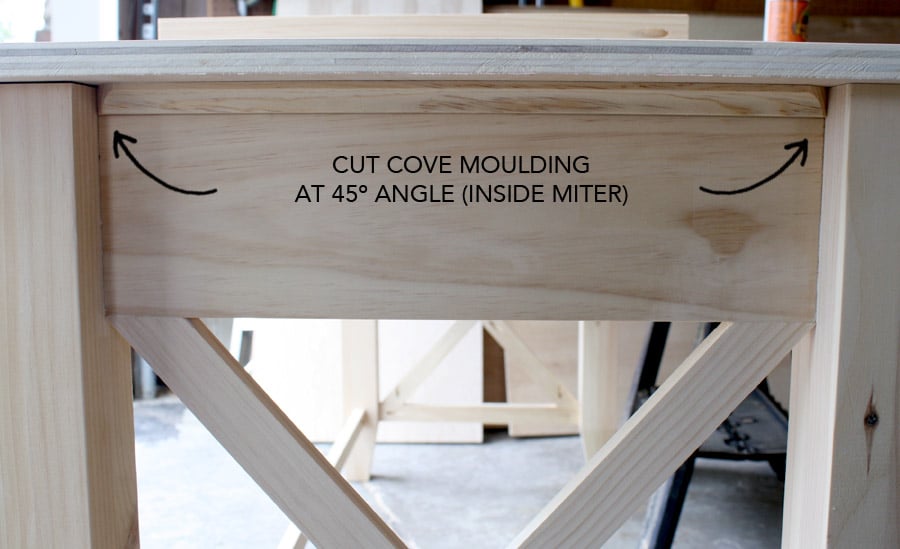
Builder Josh also helped me figure out this moulding business because cutting moulding can be so tricky! You guys. I could not, for the life of me, figure out how to wrap the cove moulding around the legs and sides. Once again, Builder Josh to the rescue. He does quite a bit of moulding work when he’s building houses, so I knew he’d be the perfect person to ask.
If you’re like me and you either 1) don’t want to bother with coping the moulding or 2) don’t own a coping saw, you can cut this piece of moulding on an inside miter, 45º angle like so:
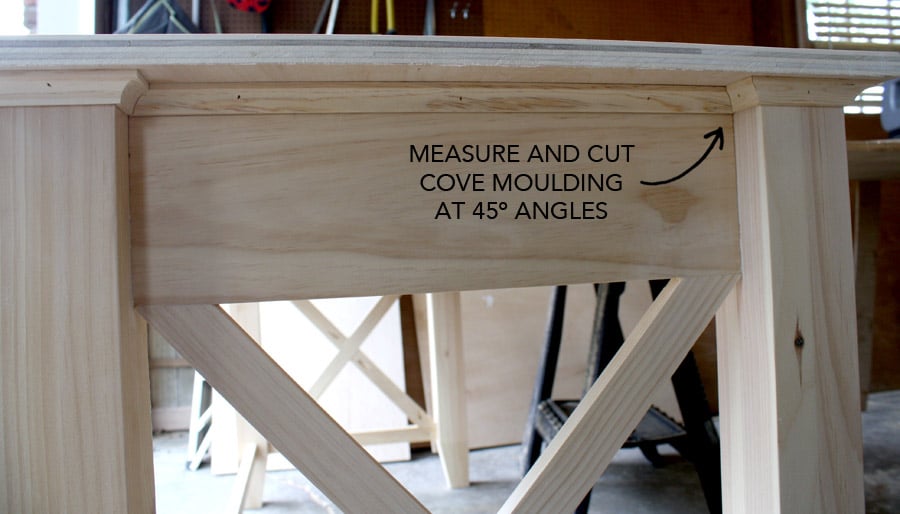
 Then attach the rest of the cove moulding so that it wraps around the legs. Again, I don’t use a tape measure here. Hold the trim in place, then mark it and cut it to fit.
You may need to cut it long and keep trimming it down until it fits perfectly. Or in my case, it goes like this: “too long, too long, too long… too short. Dangit!” And then you go back to store to buy more trim. It happens.
 Then I attached the drawer faces and trimmed them out with some tiny trim, mitering the ends at a 45º angle.
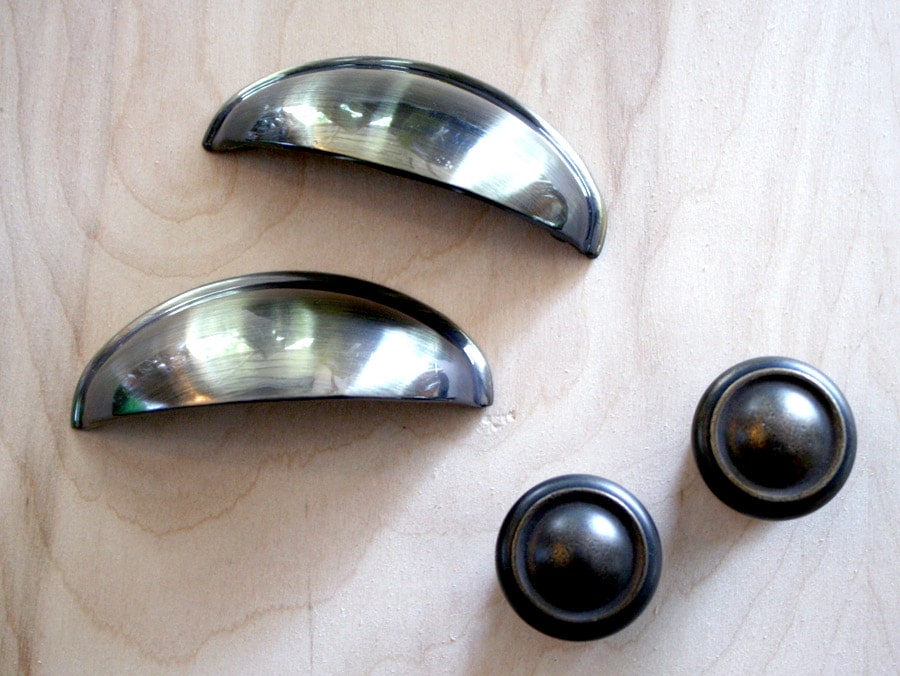
 I got all the hardware from DLawless Hardware. Not only do they have a massive selection of knobs and pulls, but they sell metal drawer slides too!
 Aren’t these cup pulls beautiful? But don’t be fooled, they are a bear to install. Seriously, they were the most difficult part of this whole project. I wish I was kidding.
My husband had to install the cup pulls because he found me sitting under the desk, with a wild look in my eyes, a can of gasoline in one hand and a match in the other.
“Step away from the desk, Jen. Step away from the desk.”
Sometimes you just reach a point of diminishing returns, right? Thank God for husbands.
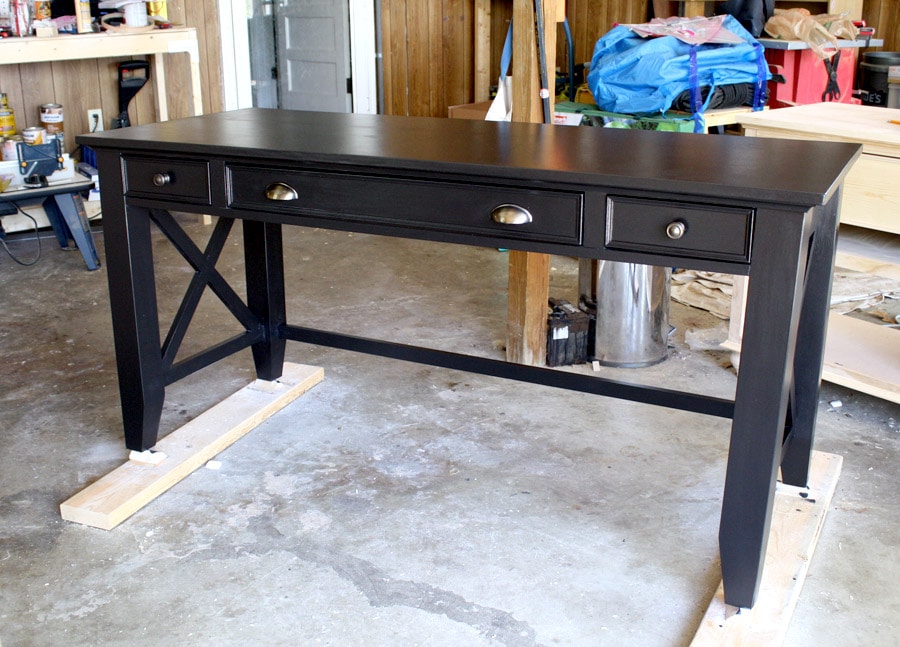
 And a few finishing steps later, the desk is done!
Here’s the finishing tutorial.
 I’d love for you to pin and share this post by clicking the “pin it” button on the image below:

Disclosure: Osborne Wood created and provided the furniture legs and D. Lawless Hardware provided the hardware for this project. I was not told what to write or what project to complete; all efforts, happy dances, professions of undying love, and opinions are my own.
Pin for later!


Love the design of this and its simplicity… however coming to this plan late…. Already decided to make it wider and double sided so both of us can use it at the same time, but stuck on what to do with the beam across the bottom at the back…. Is this stable enough without it or could I add something nearer the top? Thoughts?
Hi Jen, love your work. Quick question, the sides of the legs… each one has two pieces of 1×6? Do you join with the pocket holes and then put the other 17′ piece over it? Does the angle of the pocket hole cause the screws to hit each other when you put one over the other? Thanks if you can answer my question. Take care.
This desk is perfect for what I am needing, what size are those legs?I see it says Osborn legs but I don’t know what that means. I am not familiar with them.
I love this desk, I am in the middle of making it and looking at the plans for the drawers, I am wondering how hard it is to attach the drawer slides? Is that a tight space? Do you usually attach the slide on the actual drawer first or second. I am learning so please don’t judge. Lol.
Hi Jackie,
I talk about how to build and install drawers in greater depth in these videos: https://youtu.be/uI75WOprOGk and https://youtu.be/CI_h6ggzZuc. Hope that helps! Good luck on your desk!
I absolutely love this DIY writing desk idea! The step-by-step instructions are super helpful, and I can’t wait to customize it with my own style. The tips on choosing materials were especially useful. Can’t wait to get started on my own! Thank you for sharing!