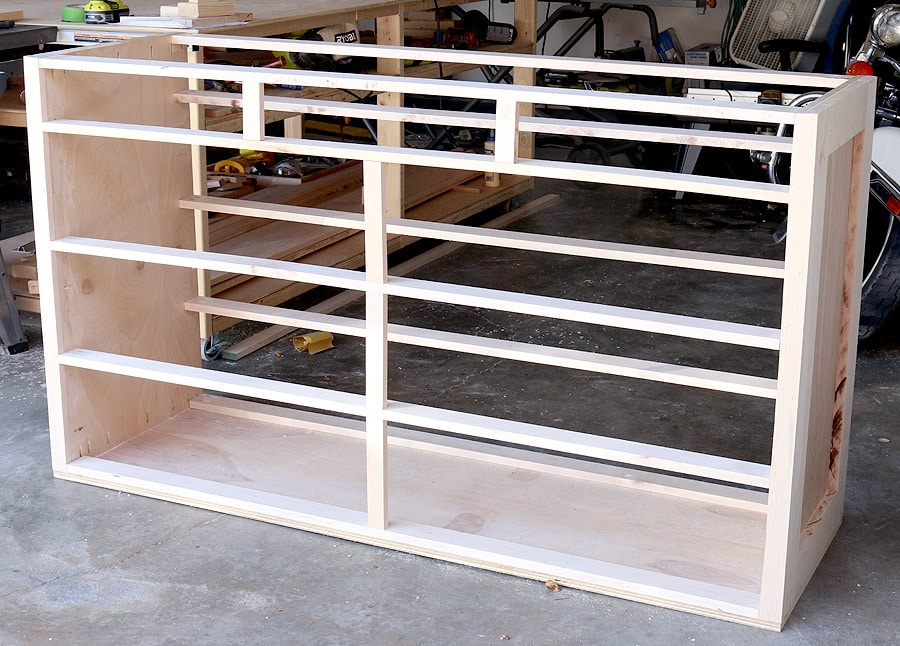
Welcome back, friends! So, this is where we left off:
 Read the complete tutorial:
- Part One: Building the Carcass
- Part Two: Building the Large Drawers (you’re here!)
- Part Three: Building the Small Drawers
- Part Four: The Final Details
*This post contains affiliate links. To read my full disclosure policy, click here.
Now that the carcass is built, we’ll need to build the large drawers.
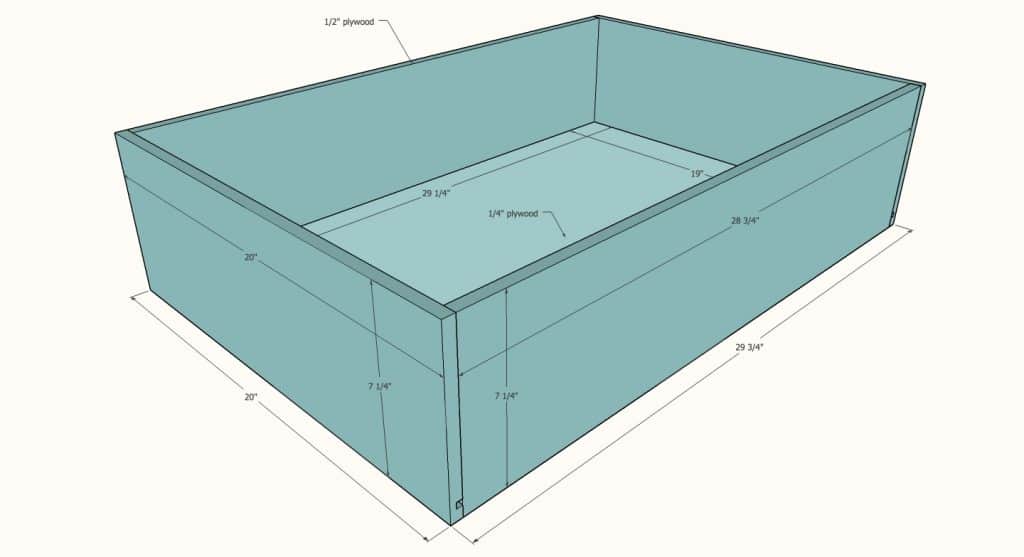
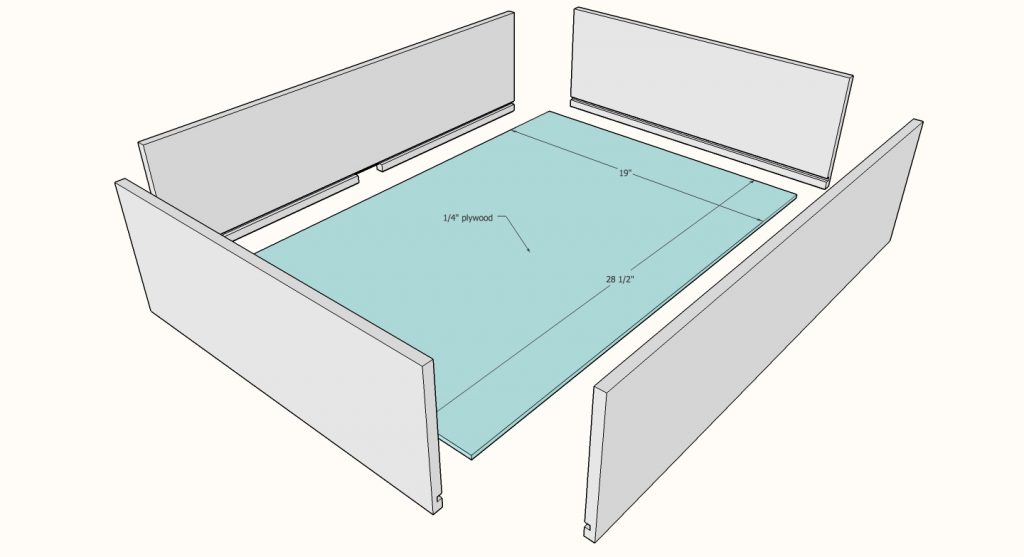
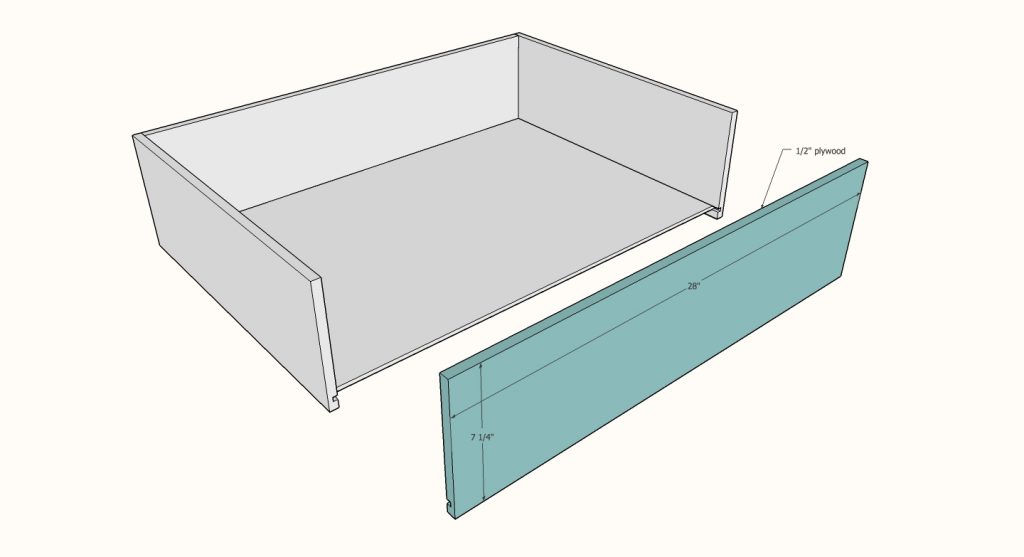
First thing’s first: measure the space where the drawer box will go and build your drawers to fit your space. I can’t stress this enough. Measure how wide the drawer space is and subtract about 1/2″ on each side (for clearance) and that’s how wide you’ll build your drawer box. This measurement doesn’t have to be super precise if you’re using center mount drawer slides. Just ensure that the box will fit in the space. Duh, right? Then, measure and cut the sides, front, and back for the drawer box. And cut the bottom panel to size while you’re at it.
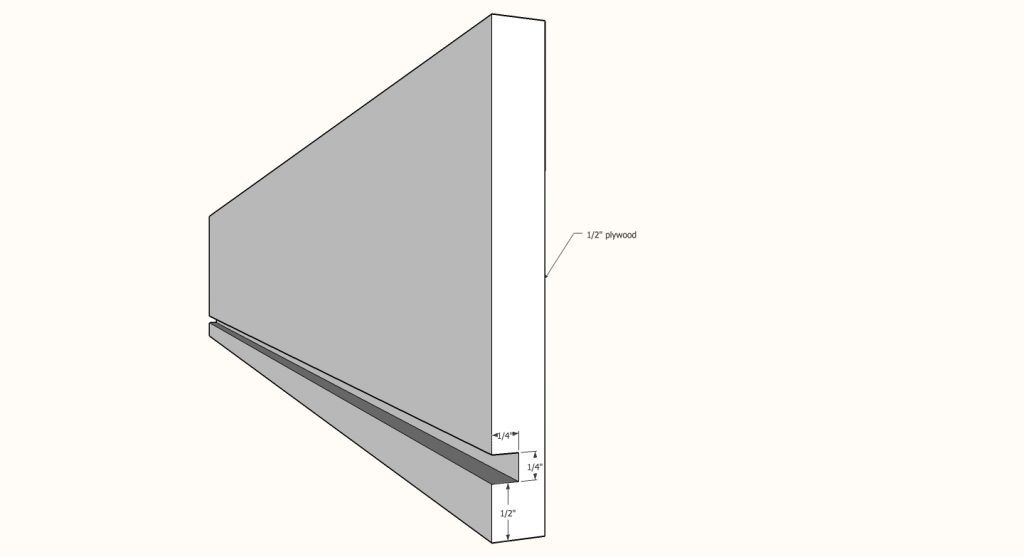 Because I wanted to have a floating bottom for these drawers, I used my router fitted with a 1/4″ straight router bit and routed a groove into the sides for the bottom panel to slide into. I recommend doing a test run (or five) on some scrap wood to get some practice with the router before you go in for the real deal.
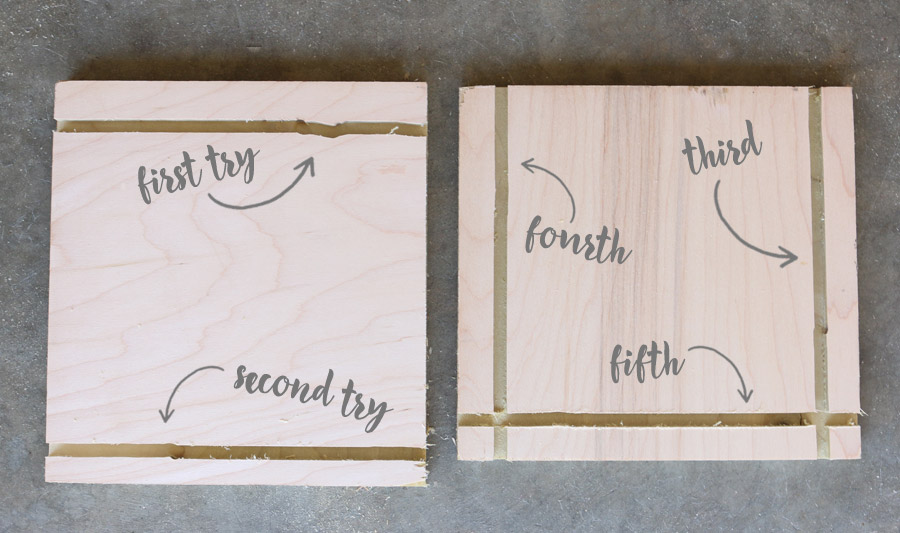
Here are my practice runs (embarrassing, I know):
 After I felt confident enough on the router, I routed a groove into the four sides of the drawer box:
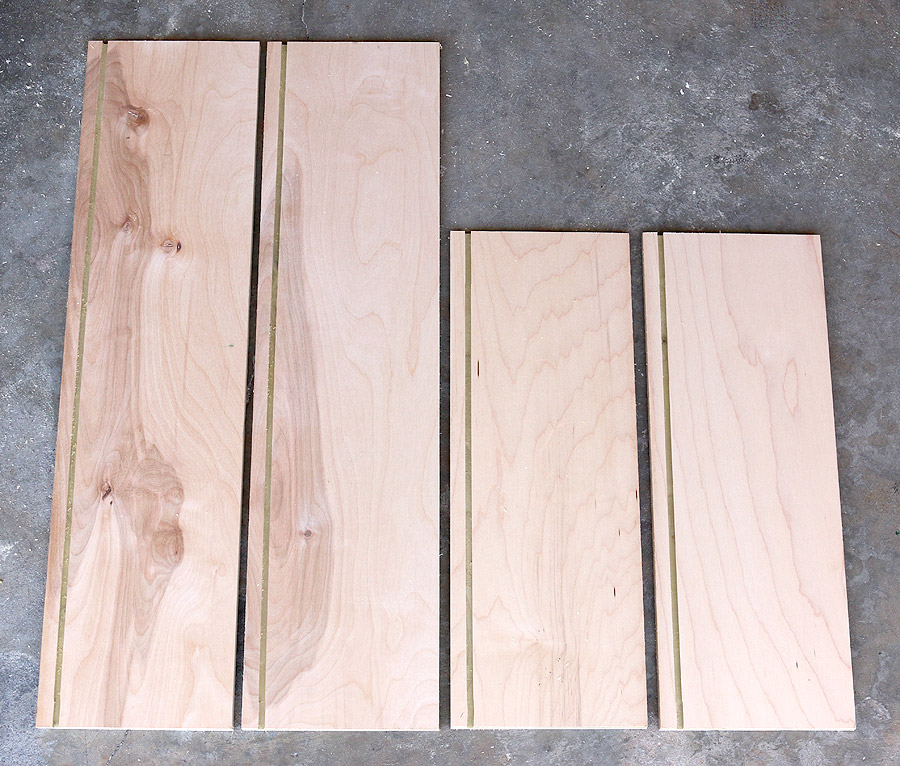 Please tell me I’m not the only one who gets giddy over pretty grooves.
In addition to routing the grooves on the boards, I put a 3/8″ roundover bit on my router and rounded the top edges just as a small, thoughtful detail. It’s the little things, right?
 If you’re following me on Instagram or Facebook, you’ll know that I’ve been hanging out in woodworking forums (I know, WHO AM I???) gleaning a ton of insight from the woodworkers and professional cabinet-makers there. I discovered that the consensus where drawer slides are concerned is this: for furniture, use wood slides; for cabinetry, use metal slides.
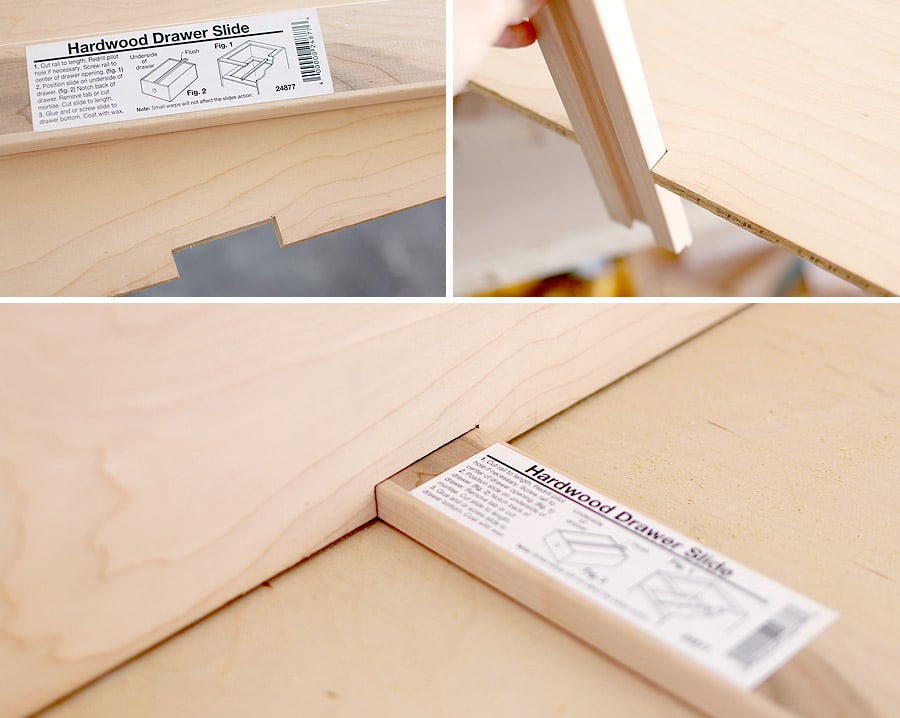
 So here I am, trying wooden drawer slides for the first time! Spoiler alert: I love working with wooden drawer slides! I bought these center-mount hardwood drawer slides and at about $10 a pop, I was pleased as punch because it’s about half the cost of those fancy, heavy-duty metal slides. You guys. They were SO easy to install; they’re virtually idiot-proof.
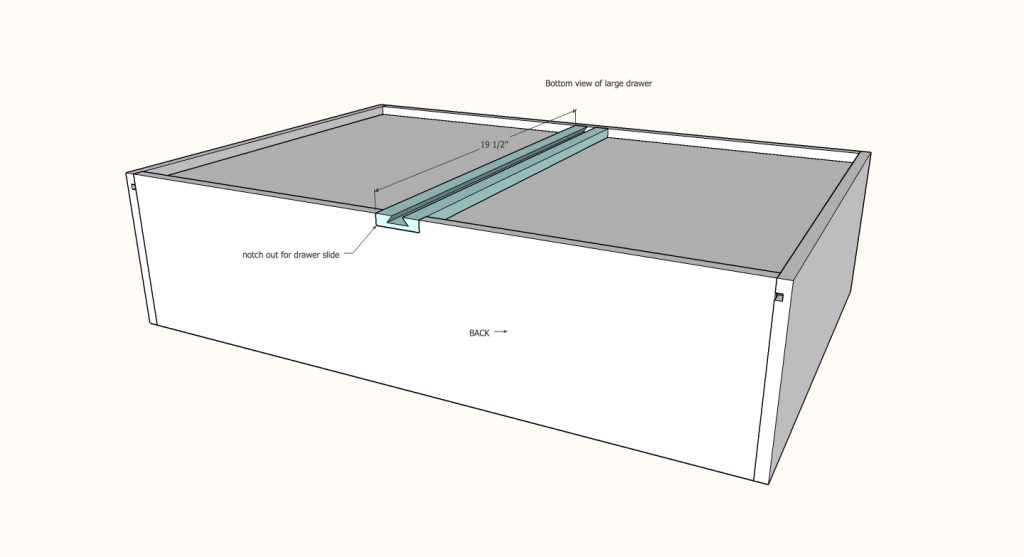
Per the instructions on the slide, I had to notch out a space for the slide to sit flush on the back side of the drawer box.
 I used 1/2″ hardwood plywood for the drawer boxes, and 1/4″ hardwood plywood for the bottom panel. Can you guess which brand of plywood I used? Yup. Purebond, of course. Duh.

Now just build the box. Attach 3 sides together, slide the bottom panel into the grooves, then attach the back.
Okay, so if you’re following along in this DIY dresser tutorial series, you may remember that I mentioned that it took blood, sweat, and tears to build this thing. I covered the blood and sweat in Part One, so brace yourselves. Here come the tears.
 When I say “just build the box,” one would assume that I was able to build the drawer boxes with one hand tied behind my back.
Nope. Tears, and lots of ’em. I’m talking full-on ugly crying. Tears of frustration. Anger. DESPAIR.
DESPAIR, you guys!!! Seriously?! I was all, “WHY! WON’T! THIS! THING! DO! WHAT! I! WANT?!?!?!” all while taking a scrap piece of wood and beating the boxes into submission. Not my finest hour.
 Argh. I can’t tell you how long to took me to attach all four sides while getting the bottom panel to sit into the groove properly. Even with the help of these corner clamps, constructing the boxes with a floating bottom was a pain in the ass. Oh, and by the way – multiply that times SIX.
Are you crying yet? I am. Again. Don’t look at me, I’m an ugly crier.
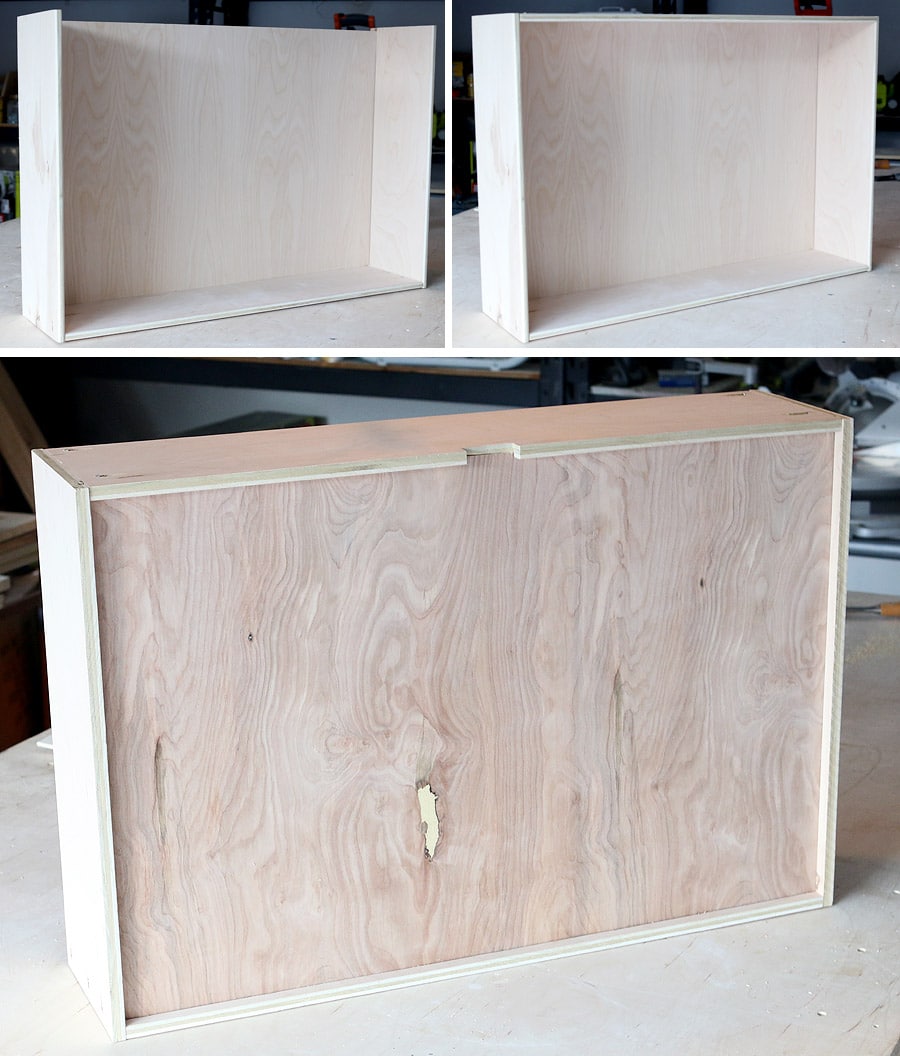 If you want to save yourself some heartache, then take the easy route and just nail and glue the bottom on, but if you want to challenge yourself (and question your existence, sanity, and decision-making abilities), then go for the floating bottom panel.
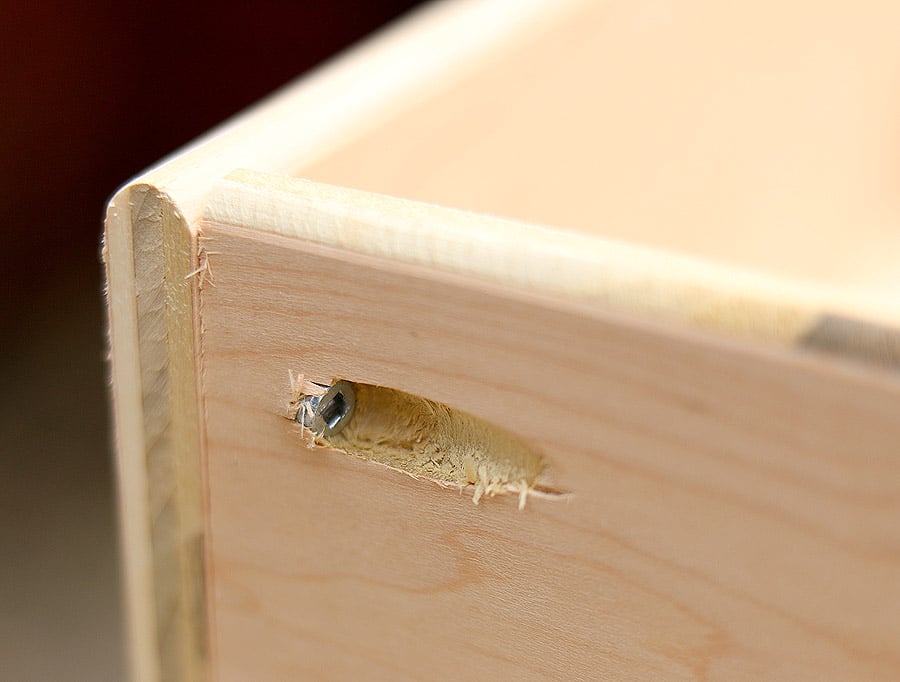
I used 1″ pocket hole screws to attach the sides, front, and back together. Also worth mentioning: the model K4 and K5 Kreg Jig will drill into material as thin as 1/2″, but for some reason, I couldn’t get my screws to sink in deep enough so that the screw head didn’t stick out. I even special-ordered these smaller pan-head screws and no dice.
I’ll stain and finish the drawer faces before attaching them to the boxes and I ended up taking my forstner bit and drilling a small ‘divit’ in the back of the face for the screw head to sit in, so that everything would sit flush. Surely there is a more efficient way of doing things. Anyone? Kreg? Bueller?
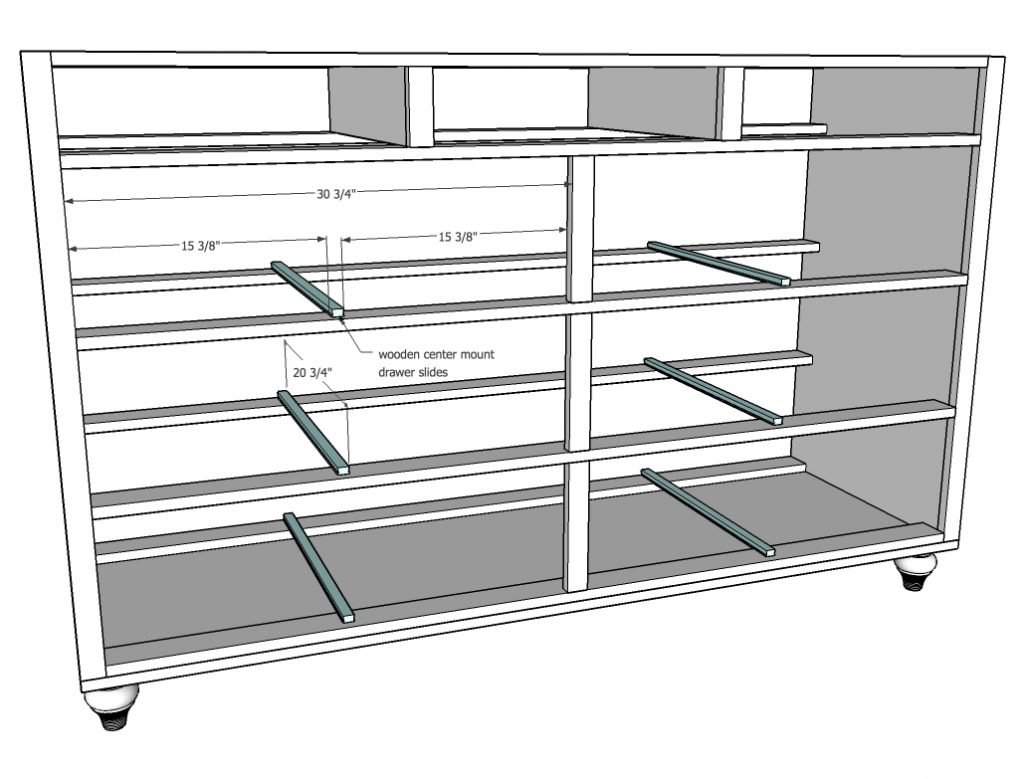 Next, it was time to install the rail on which the slides will run on. I had to use my right angle drill because my standard drill didn’t fit.
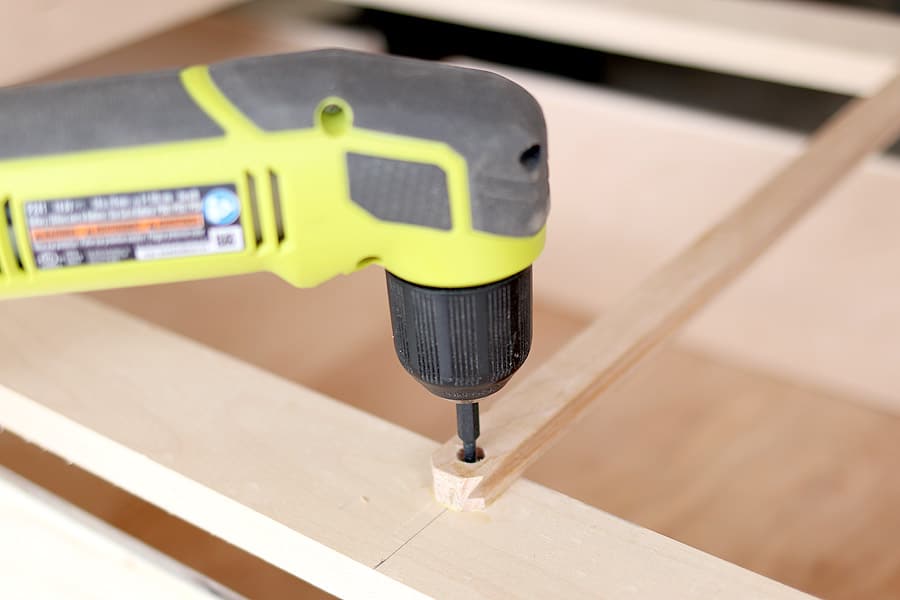 I used 3/4″ pocket hole screws to attach the rail to the carcass. Be sure to countersink the pilot holes so that the screw heads don’t protrude and interfere with the slides. It’ll also be helpful to wax the slides so that they move easily.
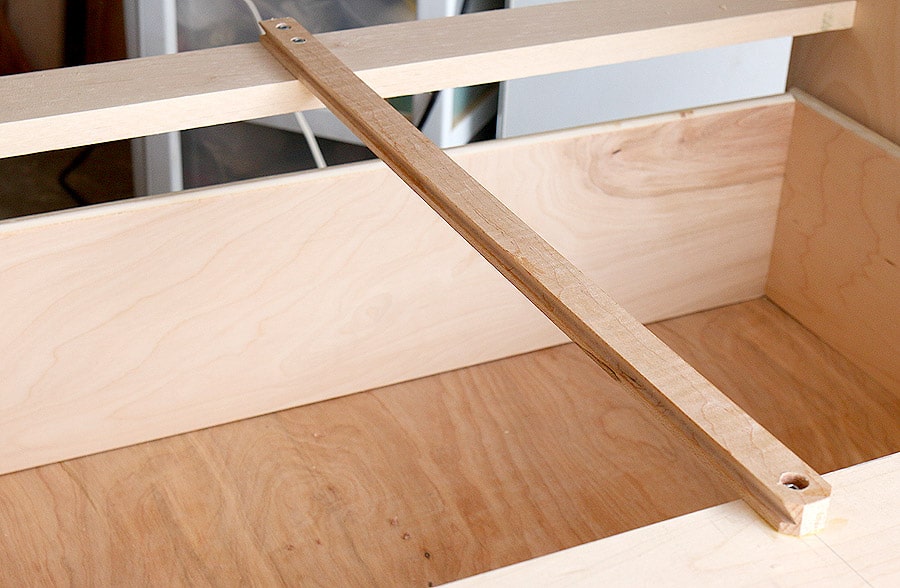 Once the rails are attached, I moved onto attaching the slide to the bottom of the drawer box. I used a square here to make sure the slide was straight. I used wood glue and 2″ brad nails that I shot through the ends of the slide.
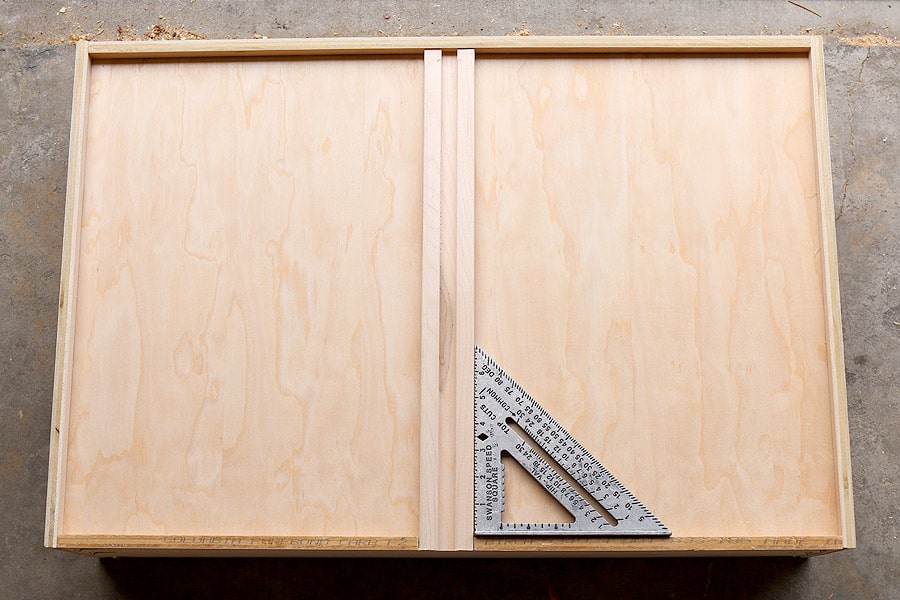 This is what the slides look like from the back. Pretty sweet, huh? And so easy! This ain’t rocket surgery. And good thing too, because my patience has just about run out on this project.
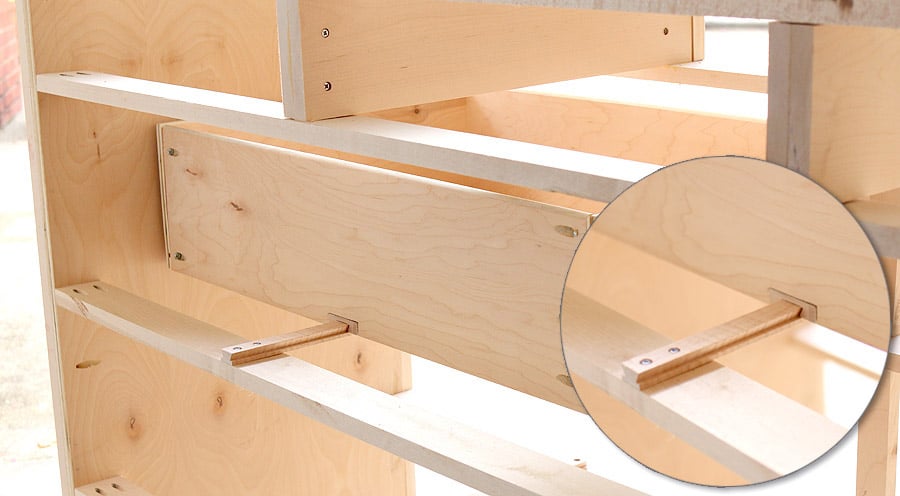 And there you have it! I’m off to do a happy dance now because the most challenging part is OVER.
Boom. Like a BOSS.
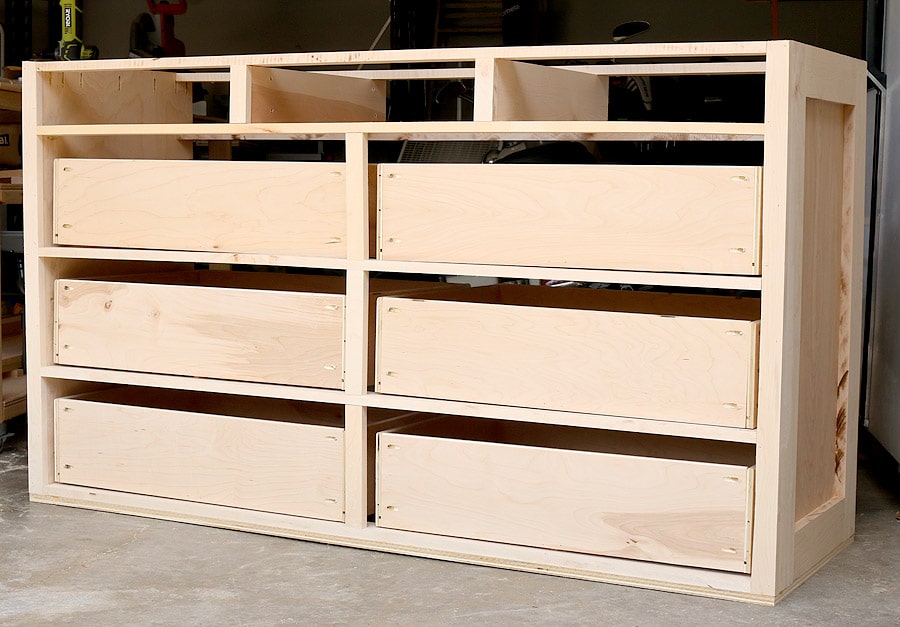 Stay tuned for Part Three of The DIY Dresser Saga. In the meantime, have a stinkin’ outstanding weekend. I’ll just be here celebrating.
Read the complete tutorial:
Regarding the pocket screws that didn’t sink in deep enough, I read this from a recent Kreg email “While all Kreg® Screw heads have a flat bottom (designed to mate with the flat pocket in a Kreg® pocket hole), you do have a choice in the style of head: pan-head or Maxi-loc™. They both work fine in most applications, but the pan-head is ideal for thin stock where the screwhead might protrude from the pocket hole. For example, building a drawer box from 1/2″-thick stock would be an ideal application for pan-head screws.”
Great job on the project!
Thanks Brett! I did buy the pan head screws, but they still stuck out. 🙁
I love this project. I love dressers like that (size & where the drawers don’t have to fill up the space.) I always like the drawer size because I think with the traditional drawer size people cram too much clothing & they get stuck.
BTW. Your writing is fantabulous & it keeps the reader interested. Can’t wait for pt 3.
Thank you Bre! I’m hoping to have Part 3 published next week! Wish me luck. The hard part is over, so it’s smooth sailing from here, right? Let’s hope so. Have a lovely weekend!
Did you use an edge guide or a router table to cut the grooves for your floating bottom panel? I’ve made these cuts with a circular saw, and a table saw would work as well — just adding that in case anyone reading wants to try this but doesn’t have a router.
Yes, I have a table for my router – there is NO way I could’ve kept the router straight, unless I clamped a straight edge as a guide or something. Thanks Brian!
Well done! and way to hang in there 🙂
I recently built my own kitchen cabinets from scratch and included a lot of drawers (none of which I had ever done before). A couple tips for drawers:
1. Unless you have a router table to keep the grooves really straight, try a dado blade in your table saw.
2. To solve some of the tear producing frustration with assembly, try ripping the back of the box thinner/shorter and assembling all the sides first. Then slide in the bottom and screw to secure. I did this with my cabinets and it worked great. I was just reading Fix this Build that blog this morning right after yours and there’s some good pictures of this method. Another advantage is you don’t have to notch out the back for the slides because it’s already shorter.
3. I feel you with the screw heads still sticking out. I tried the various head types and never got a great result. I ended up using 3/4 inch ply for the fronts and backs so the heads would not protrude. This worked great for cabinet drawers where I was using heavy duty 100 Lb extension slides but might be too heavy for furniture application. If you happen to find another solution, I’d love to hear it!
Keep up the great work! I love following your blog and woodworking adventures. It’s nice to hear from kindred spirits who get excited about tools and wood 🙂
Amy, getting a dado blade for my table saw is definitely on my list! And YES! I just read Brad’s post and seeing how he built his drawers was super helpful! So much easier than having to go through the extra steps of notching out the back and trying to line up all the grooves. So clever. Ahhh… next time. And thanks for the tip about using 3/4″ for the fronts!
I make my drawers the same way you did, fitting the bottom into the drawer-wall grooves just feels, I don’t know, more advanced to me? Anyway, I never thought to use a router, I use a table saw with the blade lowered to the depth of the groove I want and just run the boards through that way. I also try to do the groove before I cut the boards to their lengths, so the grooves will match up. Sometimes 1 blades-width isn’t enough so I’ll just knock the fence over a hair and run them through again. Works like a charm and no worries about keeping those darn router lines straight! 🙂 Either way, love this dresser!
Mehgan, yep – I would’ve loved to do the grooves on my table saw, maybe one day, when I get a dado blade for it. 🙂
Way to go girl!!!! Don’t worry, we’ve all done the ugly cry! The best thing is that you challenged yourself and now you have MAD skills!!!! I have a router that hasn’t seen the light of day yet–because I’m sort of afraid of it. Now you are making me want to give it a go…I’ll send you a picture of my ugly cry 😉 Just kidding…good going!
Thanks Janet! Get that router out – but hook it up to a table – SO much easier to get straight lines.
Awesome project, Jen! I gotta give those wooden slides a try, they look great and are nicely priced! Looking forward to your next post.
Hi Cristina! Yes, I am now a big fan of these wood slides and it has me going, “WHY didn’t I try them sooner?!” 🙂
Well written (and fun) post!
I am new to woodworking and have tons to learn. I am slowly building my confidence to building a long custom vanity system for our master bathroom. To get comfortable I just built a pair of nightstands and a simple cabinet to hide the DVD player and cable box in our bedroom.
Next up is a custom 32×20 by 56″ dresser. I think I will use walnut lumber and walnut plywood. I will be borrowing some of your design and those cool drawer slides.
Look forward to seeing part three of this tutorial…
Max
Thanks so much Max! Walnut is going to be so beautiful for your dresser! Good luck and thanks for stopping by!
I see a ton of web threads on building cool stuff for your house. There is something very satisfying about building it yourself.
But there is the calculus: how many items do you envision building? Is there is a decent number of projects on the build list? Then investing the money in the tools and the time it takes to become proficient with them makes sense. But you have to buy the tools, spend the time (and materials) getting comfortable. You also to have the shop/garage space to store and use them. Its quite easy to get seduced into buying way too many toys in this endeavor. If you watch videos with folks who have a ton of great tools you have to be careful: how many realistic projects will you undertake with the tools you have invested in?
Agreed, Max, but that’s the beauty of the way that I like to build and design furniture plans – most of my builds require just the basic tools, no fancy stuff! And yes, there are too many things on my TO BUILD list, I get overwhelmed just thinking about it! I want to BUILD ALL THE THINGS! I’d recommend investing in these tools to start: a good cordless drill, the best compound miter saw you can afford, and a pocket hole jig. I used these three basic tools to build the lion share of my pieces. Good luck!
If money is the main concern, thrifting and making over pieces is probably going to be cheaper. Of course, building your own can get you exactly what you want in the dimensions you want. If you have the basics Jen mentioned, you can build a whole lot. Then if you love building go ahead and invest in more tools. I caught the building bug and can’t imagine running out of projects to build!
Good stuff Jen…
I bought one of the Kreg pocket hole kits that comes with a clamp and other goodies. I also made a support jig that I mounted the Kreg gizmo to. This helps with stability and keeps longer boards straight while drilling the pocket holes.
I also made a support platform to help with driving the pocket hole screws. I cut a section of 2’x4′ 1″ plywood. I then glued and screwed on 1×2″ rales along one side and one corner length, forming one perfect L shape along the edges of the plywood sheet. I was very, very careful to make the L shape to be a perfect 90 degrees. This creates a steady brace that really helps with building cabinet boxes, etc. I also use shim wedges underneath the plywood as my garage floor is not perfectly level. This all helps create nice vertical and horizontal joinery just by using some pressure against the plywood platform rail. A quick cheap shop project that really helps.
There are a lot of brand names when it comes to power tools. I now have the Bosch table saw with the optional folding stand. I am currently building a support stand/cart (on wheels) for my fancy Bosch compound mitre saw with two fold down “ear” sections that helps create a nice wide support platform when cutting longer sections of lumber. This really helps with support, safety and mobility. Using the saw on the ground or with saw horses was not safe or comfortable.
I also have a Bosch router and a Bosch router table, plus a brand new Bosch jig saw to replace my old Skil brand jig saw that would no longer keep the saw blades in place. My little Bosch orbital sander work great as well. The other tool I love is the air powered brad nail gun. This is a great tool to use along with wood glue.
I am going to pick up a used wood planer that a contractor buddy purchased for me for $40. I have never used one but for that price I will give it a try.
The other thing I rely on is having four tape measures as I am always walking around the garage frantically looking for where I last placed one…
It’s looking awesome, Jen!
I have a question, how sturdy is it/will it be? The reason I ask is that I need storage in my bedroom and was mulling it over when I saw your post, and you inspired me! Would this be sturdy enough to add hanging storage above (think wardrobe/armoire-type thing)?
Looking forward to seeing it finished!
Does the drawer itself rock left and right using the hardwood center mount drawer slide you chose? In on of the photos it sorta looks that way. I dont ant the drawers to move left and right or rock when opening or closing.