Well that didn’t take long. It’s only our second move in this crazy Army life and it happened. We had a nightmarish moving experience. Among a laundry list of other things that went wrong, our movers broke our dining table. When putting it back together, they tightened one of the bolts so tight that they sent it straight through the top of the table! Is it bad that my first thought was, “meh. I could build a new one.” I mean, yeah, the easy solution would have been to just repair the damaged spot and refinish the table, but who wants easy? Pfffft. Besides, I was just waiting for the perfect excuse to start another DIY project, much to my husband’s chagrin.
Just kidding, Honey, you’re super supportive and I love you (just in case he reads this blog).
So I went window shopping for some dining table inspiration and ran across this beauty from ZGallerie:
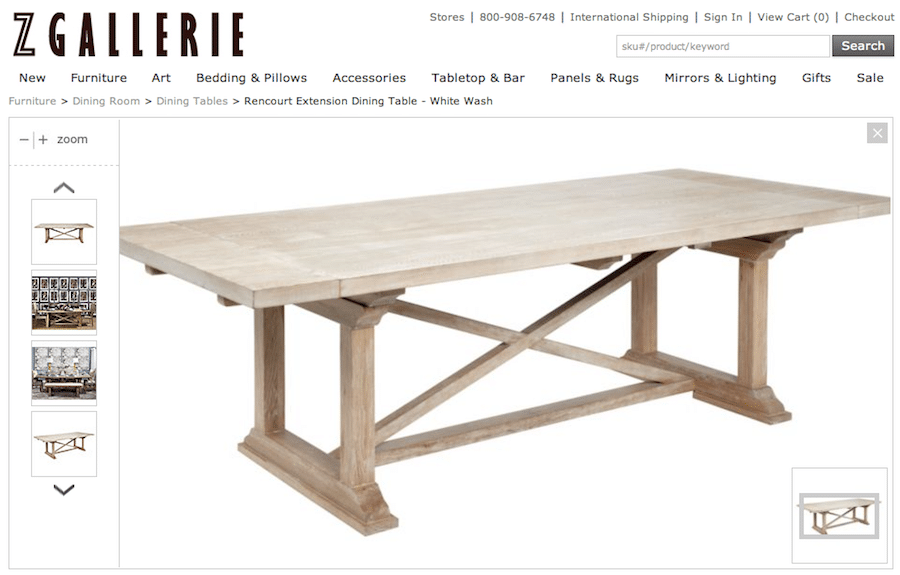
Yep. She’s pretty hefty, right? And she costs $1299. Womp womp. If I spent a thousand bucks on a table, my husband would kill me (we ain’t fancy peoples, y’all). I mean, I totally understand spending that kind of money on furniture, but not my husband. Nope. He’s the kind of guy who wonders why we need curtains when we have blinds.
Sadly, I can’t just look at a piece of furniture and figure out how to build it. That’s where my friend, Ana White, comes in. She’s a genius at doing just that. So we put our heads together and came up with a plan to make…
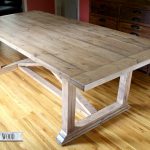
This! And guess how much the lumber was. Are you ready for this? $85. Yep. That’s eighty-five bucks. What the duck?!
DOWNLOAD THE FREE BUILDING PLANS HERE.
TOOLS:
- Tape Measure
- Speed Square
- Pencil
- Pocket Hole Jig
- Drill
- Miter Saw
- Table Saw
- Brad Nailer
- Sander
- Drill Bit Set
MATERIALS:
- (9) 2 x 6 x 8 Ft. Boards
- (9) 2 x 4 x 8 Ft. Boards
- (1) 1 x 4 x 8 Ft. Boards
- 2 1/2-inch Pocket Hole Screws
- 2 1/2-inch Wood Screws
- Wood Glue
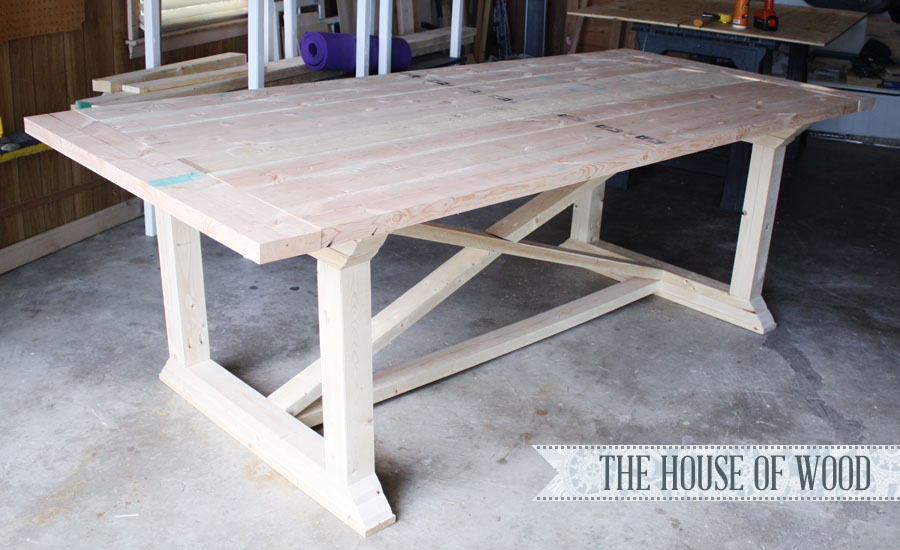
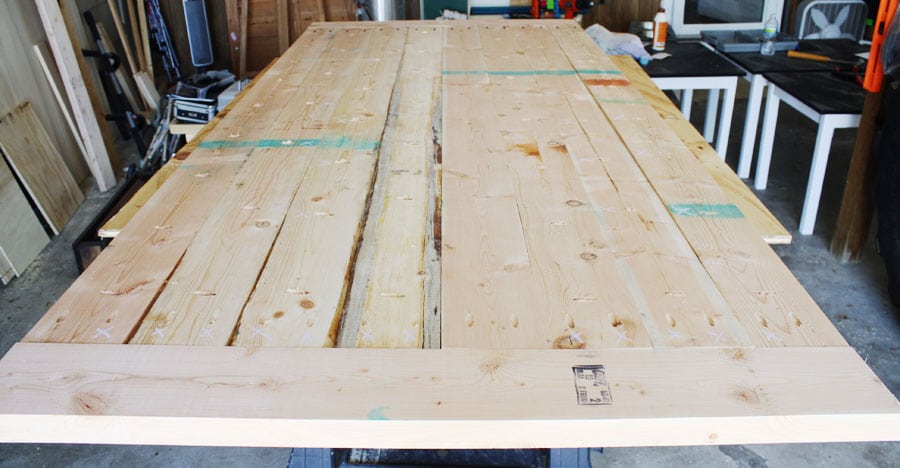
Building with 2x6s and 2x4s was definitely a workout. I needed my husband’s muscle on more than one occasion to help me manage this behemoth while building. First, Ana recommended running the boards through a table saw to square up the edges. The tabletop is planked, and while I do like ‘rustic,’ I still wanted ‘refined,’ so I shaved less than 1/4″ off each edge so that I could work with perfectly square, straight edges. Ana’s brilliant idea satisfied the perfectionist in me, being that each board sat flush to the next. I like it when wood plays nice. (Hey now! This is a family blog!)
Here’s the tabletop, all screwed and glued together. Those are 2×6 boards. Pretty stout!
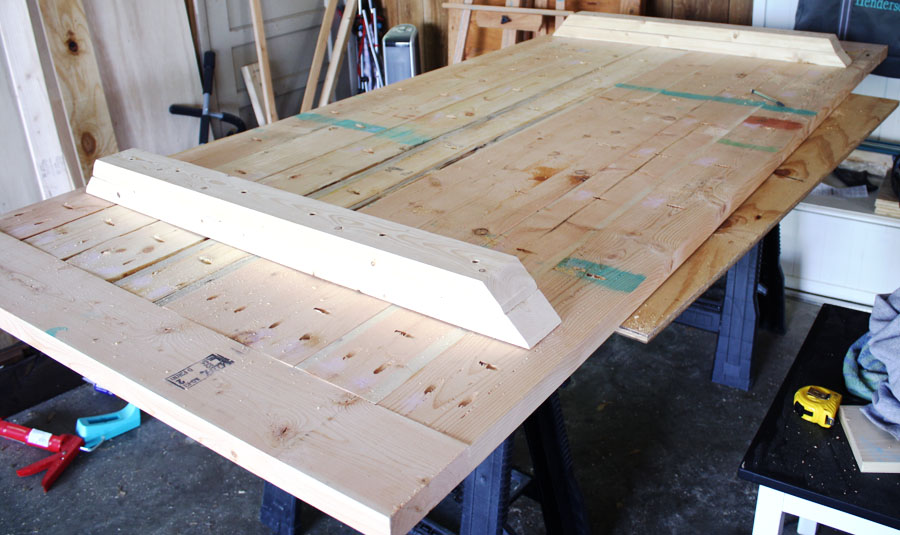
Then I cut two different angles on my 2×4 supports. The first angle is at 30 degrees, and the second one is at 45 degrees off square. It made for a pretty beveled detail, much like the ZGallerie table. Ana is so detail-oriented when it comes to sketching up plans; she amazes me.
Then I built the legs out of 2x4s. You know how 2x4s are slightly rounded on the edges? Because I shaved off the edges, they’re nice and square, giving it the illusion of a solid leg. I think this also helps make framing lumber look more like finish-grade lumber. Fake it till you make it, I guess?
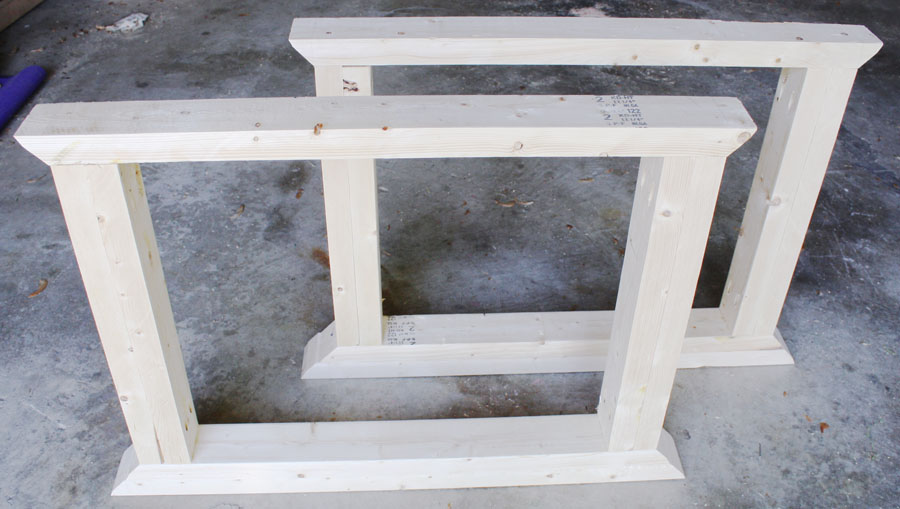
Then I added the stretcher bar. The base is flipped over so I could hide the pocket holes underneath when attaching the stretcher.
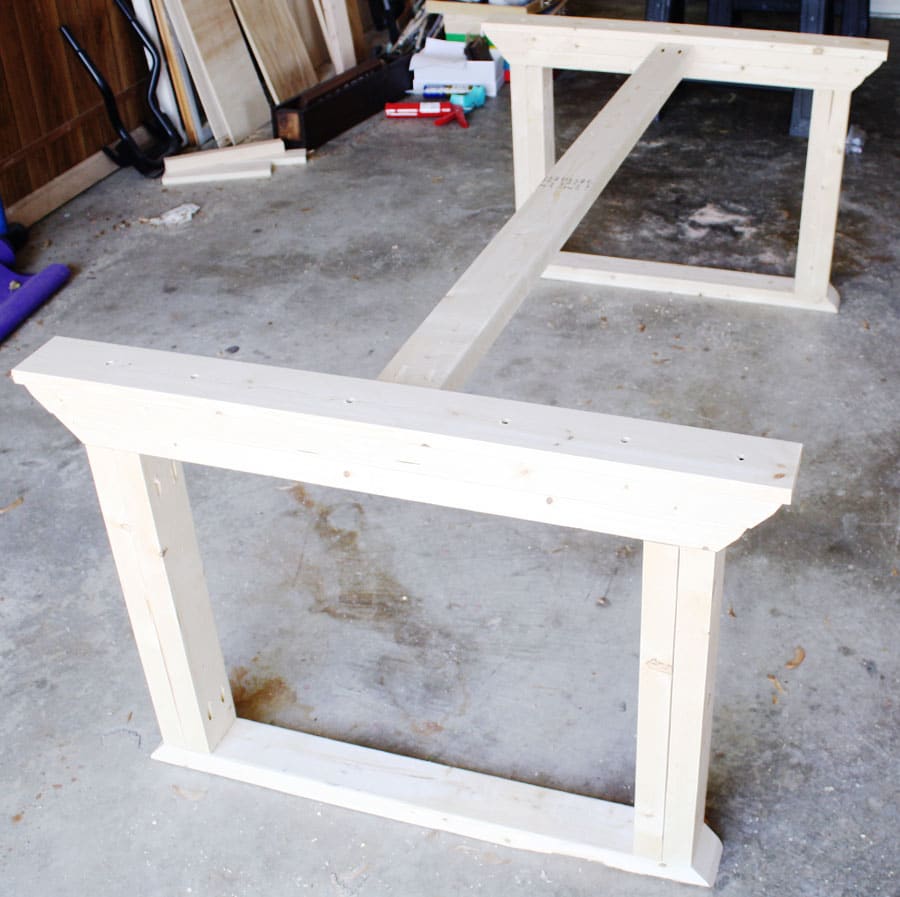
And here’s the tricky part: adding the X to the legs. The outside angles of the X are at 20 degrees off square and the middle of the X are 50 degrees off square (as noted in the plans). I made sure to measure and mark where the middle was so that everything looked balanced and even.
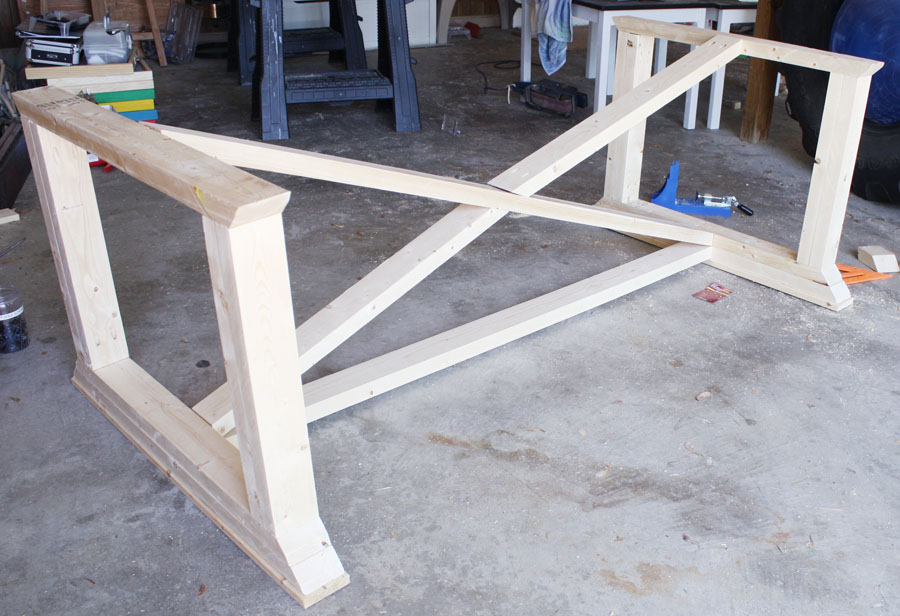
And we’re done!
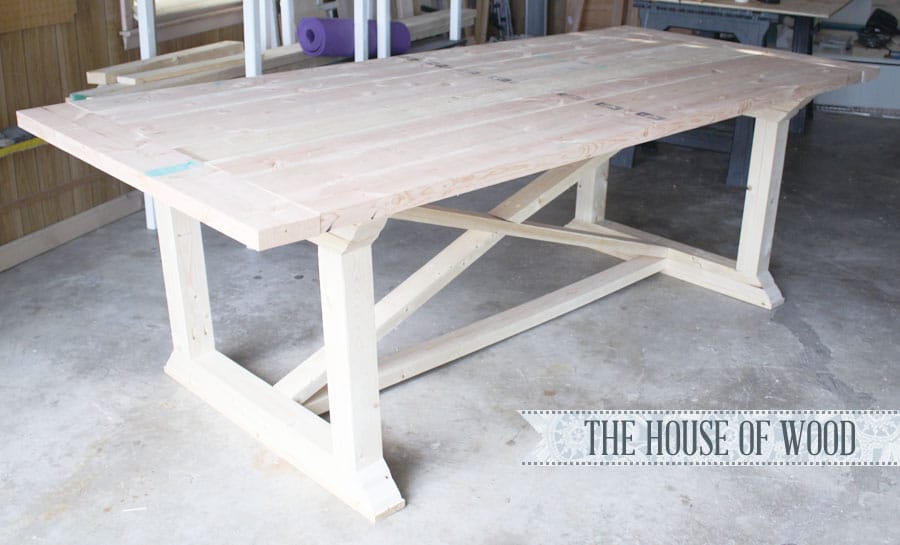
I didn’t attach the tabletop to the base just yet (I just laid it on top for the photo op) because I’m going to sand and stain the two parts separately. Then I’ll bring them into the house to assemble because the table won’t fit through the door fully built. Also, since we’ll be moving again in the next couple years, I’ll attach the top to the base with bolts (instead of screws and glue) so that it can easily be disassembled when moving day rolls around. Hopefully by then, we’ll have more careful movers (yeah, right).
I’ll be back with a finishing tutorial as soon as possible! In the meantime, you can build your own ZGallerie-inspired dining table with Ana’s plans! Thank you, Ana! It turned out beautifully!
How about you guys? Care to share any moving day misadventures? Does anyone else (who is not in the military) move around as much as we do? Thanks for reading, see y’all soon!
Update: Here’s the link for the Restoration Hardware-inspired finishing tutorial.
Jen, it’s beautiful! I’ve been running all of my table lumber through the table saw, too, to get rid of the rounded edges. It really helps, right? I came across a few 2x6s last week at Home Depot that still had square edges on one side. I grabbed them quick — I wish they were all like that! I sometimes wonder about working with framing lumber, though…like, how long until it all shrinks up and there are gaps in my tables? I guess I may never know, because I keep building one, living with it for a month, selling it and building another. Now I can add this one to my list!
Thanks, Hillary! We just moved to a place that’s a builder’s community, apparently. There are 3 different lumber stores within a 5 mile radius, and that’s not including Home Depot and Lowes! I’ve been getting my wood from these ‘mom & pop shops’ and not only is their lumber better (poplar, instead of pine), but they’re half the price! Unbelievable. I’m super excited. By the way, I am in love with your latest build, the Dawsen media console. Your finishing job is to die for.
This table is gorgeous! I ran across the picture when it was shared on the Knock Off Wood Facebook page. This helped me discover your blog, and I will be following you from now on! Thanks for sharing and I’m excited to see how you finish this beauty!
Thanks for dropping in! So glad you did. <3
WOW this table is fantastic! Love it! What a smart idea to shave off the edges. It makes all the difference. Love it!
I love the table!! The “X” looks a little tricky…like it would cost $105 dollars in my house for having to redo a couple of the cuts :-). Can’t wait to see the finished table!
Thanks! Though, I have to admit, I definitely used a couple pieces of scrap wood to make sure the angles were just right, before I went in for the real thing!
You are brilliant! Love it ^_^
Thanks, Kristle! And thank you for getting covered in sawdust with me when ripping the edges off the boards!
Hey jen ,
Do you have a video and more step by step instructions on this table ? We don’t know how to/when to glue or put the pocket hole screws ?
GAH! You amaze me! Can I hire you? I need this table!!!
THIS is my next project! My husband is in the field next two weeks, fingers crossed I can finish it while he’s gone!
Awesome! Come back and share photos with us!
I hear you about Army moving. Our first move from Hawaii to NC and about 2 big pieces of furniture were broken as well as my bike and other appliances. Grrrr! The worst part was that the military is so slow about paying you back for moving expenses that our only option was to either wait 6-8 months for decent on post housing (No thank you) or quickly move into the only available apartment we could find. So no wood-shop space for moi. No Matter! We are moving again to a rental house with a HUGE yard and a big garage.
I LOVE this table that you have made. Currently our new kitchen is too small for even a square cafe table, BUT with a little outdoor proofing your table will be perfect for our patio!
I totally understand! The movers definitely made it difficult for us to be compensated for the broken furniture. What a headache! Good luck in your new place!
I’m going to give this table a shot. I’m a newby and have only built a few things from Ana’s site. I would love to know how you attached the top with screws and bolts, basically where you drilled the holes. And I also love to know your tricks for staining. The building seems to be the easier part for me…. the staining seems like such and art form. I know it will just take practice but I’ll take any advice or tricks you may offer!
Thank you!!
Hi Shelley,
I’ll have a full finishing tutorial up on the blog next week! I pre-drilled 3 holes each (left, right, and center) under both supports on both legs (the horizontal pieces – aprons?) and attached the top to the base that way. Hope that helps! Good luck!
Hi jen, Im in the middle of building this table and I’m stuck. I want to make this table suitable for outdoor use. My concern is the table top. Ana’s plans uses pocket holes but I think I need to leave space for the water to drain. If I placed a spacer between the boards and then secured the breadboard ends using pocket holes what will keep the long 2×6 ‘s straight. Is that center support enough?
I can’t wait to see how you finish your table. I’m really interested in how you are going to secure the table top to the base using bolts. Since I will be storing this table indoors during the harsh Michigan winters.
Hi Ayisha,
Yay! Can’t wait to see your table once it’s done!
Whitney from Shanty-2-Chic recently made an outdoor table that had a planked tabletop. Ana’s got the plans for that too, which might be helpful. If I were building it with the spacers, I’d opt to put several supports underneath, like in this plan: http://ana-white.com/2013/04/plans/happier-homemaker-farmhouse-table
Alternately, perhaps some aprons would help stabilize everything. Ana includes aprons on this dining table plan as an optional route.
Hope that helps! Good luck!
This is absolutely stunning! You did a fabulous job! I have so many small furniture projects I’d like to tackle, I’m just such a scared-y cat! Thanks for the inspiration!
You just convinced me to spring for that table saw I’ve been lookin’ at! Do you have ideas how one could adapt this to a round ,table?
LOVE, love, love this table! Wish I were better with working with wood, saws, and angles. Alas, no hubby to help. :o) Any way to make this table with a hidden leaf? I have an oblong table where the leaf folds up under the table, and the table pushes together to make a smaller, round table. Not sure this would fit in my DR as is, but don’t want to make it smaller, just like to have a leaf for it, whether hidden or not. Ideas? Thanks!
Im so glad i found you blog… Im about to start on this table… was wondering what you went with for finish…i feel conflicted… im tempted to do like a white wash or a aging stain, then i go back to hum maybe a dark brown wax… would love to see what you picked! thanks!!!
Good luck, Camille! It’s such a great table. You’re going to love how hefty it is. I went with a Restoration Hardware-inspired finish and I love it! It was a 10-step process, so stay tuned for the full tutorial. I’ll be posting it soon!
Hello, I saw this was posted back in 2013. Did you ever post the 10 step tutorial about the finish? I couldn’t find it?
Thanks
Hi Kerry,
Here’s the link to the finishing tutorial: https://jenwoodhouse.com/dining-table-finish
Hope that helps!
What kind of wood did you use and how is it holding up to daily use for eating on and kids?
I used douglas fir and spruce. It’s holding up beautifully so far! I mostly credit that to the Minwax Helmsman Spar Urethane that I used to finish the table!
i’m a little confused, do you use the countersink bit with the kreg jig? or is that something else all together.
you also said you predrilled holes to attached the legs to the top? what did you use to attache them? lag bolts?
I used a countersink drill bit to countersink the holes. I used pocket hole screws to attach the legs to the top. Hope that helps!
love the table and the finish. I do woodworking and I’ve discovered the pre-conditioners and clear coats I love as well so I thought I’d share the stuff I learned from my friends at lumberjocks.com
Charles Neil has a bunch of tutorials online and developed this product:
http://shop.charlesneilwoodworking.com/Finishing-Products_c_11.html
My other favorite top coat is a wipe on oil based urethane from Rockler and General Finishes called Arm-r-Seal:
http://www.rockler.com/product.cfm?page=10928
You can used an old sock or tee shirt and get a practically foolproof finish with this stuff. It’s taken all the fear out of ruining a piece I’ve spent a lot of time and money on from becoming a “meh”
Yes! Arm-R-Seal is one of my favorites too, Russ! Thanks!
Hi, thanks so much for this awesome tutorial. I’ve made the table, and I can’t wait to try the finishing technique you posted about – stunning! I just have a question about the top. I want to be able to remove the top from the legs (it won’t fit through my small doors). Did you use a special kind of screw so that it can be removed and put back on without damaging it? Thanks again!
Yes, I used the bolts from my existing dining table and used threaded inserts so that the bolts are screwing metal into metal (so no worries that the wood will strip over time). Hope that helps!
Thanks!
We just started making this table and wondered if you had any tips for getting the table boards level/flush so that the top is smooth? Or did you have to sand it smooth?
You definitely want to work with the straightest boards possible. I’m really picky and will spend hours sorting through the lumber pile to find the best boards. Also, be sure to work on a flat surface. My garage floor isn’t flat or level, so I had to put a piece of thick plywood down as a base, so I could work from a flat, level surface. If you have a planer, I’d recommend running the boards through your planer so they’re all the same thickness. This will help get each of your tabletop planks flat and even. Use clamps and force the boards level/straight when you’re gluing and screwing them together. Hope that helps… good luck!
What kind of wood did you use to build the “x” table?
Douglas fir and pine
I’m not finding the finish tutorial. Can someone please direct me?
Thank you!!
Beth
Hi Beth!
The link is here: https://jenwoodhouse.com/2013/08/07/diy-dining-table-achieving-rh-finish/
Thank you!!!
How many 2×4 and 2×6 at what length did you use
I can’t remember off-hand, but it’s all in the plans!
Hi, I have a very basic question about the top of the table. I see you used pocket hole screws to attach the shorter end pieces to the longer boards. How did you attach the longer boards to each other? Just wood glue or some sort of screw as well? Thanks!
-Matt
Hi Matt!
I used pocket hole/pocket hole screws to attach the boards together, side by side.
This turned out *so* beautifully! I’m trying your finish on a console table (the first thing I’ve made – I’m brand new to this), and I’m wondering about the whitewashing step. Can you be more specific about the white paint that worked for you and the waiting time after that step and before the mixed-stain step? And then after that last stain before the urethane step, did you let it dry overnight? And finally, how long did you wait between the urethane coats? Thanks!
I love this table! You inspired me to make our own.
Yay! Happy building!
Is putting the X on the table required? Or would I be able to skip that step? Thank you!!
Using pocket screws to install the breadboard…
Do you not have to worry about seasonal shrinkage with 2x members? Seems like you wouldn’t want to constrain your table top in such a way… but perhaps splitting is only a problem with 1x members.
You’ve had your table almost 2 years now… any splitting or other issues ??
Thanks
We haven’t had any issues thus far, but adding extra supports underneath the breadboard to support them (in case rambunctious children want to climb up and sit on the breadboards) would be wise.
Hi Jen! I see this post is over two years now, but I have a couple questions. Have you had any support issues with the breadboard ends and them being attached with pocket holes? I was about to build this table and I showed some experienced furniture builders and they told me pocket holes are a definite no-no for the breadboards. One argued biscuits and the other said nothing but mortise & tenon. I feel biscuits are like pocket screws and I’m not good enough for mortise & tenon, but I love pocket screws, so I wondered if after two years, you had any issues with people leaning on the ends. Also, I can’t stop finding all this stuff about tabletop movement. You have any issues with that or warping? I want to build this so bad. Thanks so much!
Hi Joe! I haven’t had any issues with the breadboards, but you’re right. It may be an issue in years to come. I can just see my kids sitting on the ends and the breadboards snapping right off. I was planning to attach a couple of support boards underneath, just to give the breadboards more support. Like I said, it hasn’t been an issue thus far, but I do plan on attaching those supports, just in case.
Has it lasted two years even with “elbow leaners” sitting at the ends? That’s really all I care about. All these sites talking about wood movement and not using pocket screws annoys me because I was so excited to follow your plans and get ‘er done. You’re saying, you’ve had no issues. Looks like a green light for me to continue on building it.
We never had any issues, but to be honest, we only used the dining table on special occasions. We eat in the eat-in-kitchen on the daily. I’d still recommend adding those supports, if you can. Happy building!
Update 1/12/2016: Here’s a helpful video on how to attach breadboard ends: https://www.youtube.com/watch?v=EnghqwOrsbw. Hope that helps – good luck!
Hi Joe,
I am thinking of building this table and had similar questions, as i have seen similar posts about warping and breadboard ends. Did you ever build it and if so how has it been for you. I have no woodworking experience and am just getting into it!
Thanks!
Hi Jen –
After you ragged on the white paint, you mentioned you mixed another Special Walnut with Weathered Oak. Did you actually mix the two or did you apply them on top of each other as you did for coats 1 and 2? If it’s the former, what ratio did you mix the two stains together?
John, I applied the two stains separately, one on top of the other. I did not mix them.
Hey Jen! I hope you see this SOON lol..My husband and father in law are literally right beside me in our garage beginning to build the table!! We were wondering how far back from the edge of the plank did you place your Kreg Jig?? I hope this question makes sense…as you can see- we are new at this…Pray for us LOL
Yay for building! If I’m understanding your question correctly, I put my boards flush to one side of the Kreg Jig and drill in the “B” hole, so the pocket hole is just a few inches from the edge of the board. Good luck!
Hey Jen, I love the table and restoration hardware finish! I was wondering if the stain was allowed to dry before adding the white wash?
Thanks so much! Yes, the stain fully cured before I applied the white wash.
What did you use as chairs were they a DIY project as well? If so o you have a post about them?
Has anyone ever built this or something similar and added leaves to it? I’m thinking ones that would just slide in somehow to the ends?
Hello! We also are military and I built Ana’s farmhouse table and it’s a fight to get in and out of our homes. I see that you mentioned using bolts to attach your table top. Old I see pics or get an explanation on what worked for you? Thank you Jennifer
Hi Jennifer! Thanks for writing! Yes, for the dining table, I used the existing bolts from my old dining table (the one the movers ruined), but I go into more detail on how to use these metal threaded inserts (which are very similar to my dining table hardware) in this post: https://jenwoodhouse.com/diy-cabin-bed. Hope that helps!
Jen, Thanks for the plans. I have built three from your plans. One for my granddaughter in college, one for me and one for my boss’s son. We love them all. I was inspired to build a round table for a client. A big one 75 inches, seats 10. The base was the key structure for this table. You might want to check the tutorial on my web site for cutting curved legs. Thanks again ! I love doing tables. Grandy
Hi there! I’m an Army wife too! Can you tell me or post a picture of how you attach the table top to the legs with bolts for movability? I’ve got to know before our next PCS!! Thx!
Hi Martha, I used metal threaded inserts. Basically, you drill a pilot hole for the insert, then insert it into the pilot hole so that the bolts are going into metal, and not wood. You can see more detail in my DIY cabin bed post here: https://jenwoodhouse.com/diy-cabin-bed. Hope that helps!
Was just wondering if you took off the 1/4 inch or less off of all the 2x sides of every piece?
Hi Joe,
It’s been awhile, but I believe I ripped 1/8″ off each side of the 2x boards, to square them up.
did you use the key pocket holes like Ana White? If not, how did you bolt the pieces together. We move often, so this is a better idea
Great job. This looks so beautiful.
Wow, the table is really nice. Thanks for sharing!
Insanely gorgeous, And I have no saw or building skills. I’ll have to show this to my relatives with working garages. Someday maybe I can do something like this. My taste in furniture is so much higher than my Ikea budget.
I know this is an old post, but how many does your table seat?
Looks beautiful and I want to try and make it!
Thanks!
Hi Amy,
Our table seats 6-8 people. Good luck!
On the cross beams under the table. Can I suggest a couple ideas that will help you a lot or if you want to change on your project.
1) You make two and not cut in the middle? Place them both side by side like an X and then score where the two pieces meet in the middle and cut into those spots 1 1/2″ deep. Then slide them back together. You will create an illusion of no cuts. It will look like you had them cut by some factory.
2) As for the Bottom of the Legs where you had 3 pieces of wood. You can use 2×8 then 2×6 then 2×4 stacked with one edge straight down on the inside. The outside excess of the 2x material makes the outside seem like steps. Creating a sight appeal.
Just a couple of thought here. I always loved building and always researched how to improve on many projects. I would have to say its like an upgrade on your project to make it look like an Expensive Piece.
Always a Project Builder and Friend.
phil
$85 compared to $1299, that’s x10 times cheaper! What a brilliant mind!!!
Hi,
When you say “shave off the edges…” did you use the table saw or did you sand it?
Regards,
Amie
Hi Amie,
I ran the boards through a table saw to get rid of the bullnose edge. Hope that helps!
Were the movers able to better handle this table? We are new to Army life and about to build this table before our first move and I’m concerned about how the movers will handle the bottom half (knowing we will take your advice on bolting the top!). Any updates or suggestions would be so helpful!
Hi Megan,
Yes, having the table disassemble makes it easier for the movers to move it without issue. Good luck on your build!
Thank you Jen, i can already picture me and my friends, having a nice dinner on this table 🙂
Hey Jen
What wood would you recommend for this project?
Hi Joel,
We used doug fir for this table and it worked out great!
thank you ill send you some pictures when its done, thank you very much!!
Hi Jen! I’ve been admiring this gorgeous table of yours for years and my husband and I are going to give it a try! Question for you – I see the legs are made from two 2×4’s put together. Could we use 4×4’s for this instead or is there a reason the two 2×4’s are preferred for this project? (We’re wood newbies). Thank you, Jen!
Hi Dusty,
So good to hear from you! We used 2x4s simply because they’re easier to find than untreated 4x4s. You can certainly use 4x4s instead – it’ll look great! You may need to get the Kreg HD pocket hole jig though because I believe the standard jig only drills holes into 2 1/2 inch material at the most. The HD should be able to handle the 4×4 thickness. Good luck and let me know if you have any more questions!
xo
Jen
Hey Jen!
beautiful table, I am in the middle of building it right now. One question though, would you happen to have plans for the bench in the attached picture? Obviously my wife wants the one that matches the table. Thanks!!
Hi Cody,
Glad to hear you’re building this table! What bench are you referring to?
Hi Jen. Beautiful table. It’s been 4 years since your build. 8m curious, how has your table held up? Some people on woodworking forums say that tables made from construction type lumber will warp once theyre inside and the moisture content of the wood continues to drop. How does yours look now?
Hi Jeff,
I’ve since sold this table, but it worked beautifully for us for the two and a half years we had it. I didn’t notice any warp at all, but I’ve heard that pine and Douglas fir are both very forgiving woods.
Do you have the plans for the benches that go with the table.
Are there any plans for a bench to go with this table. I love your post and made this table using poplar and staining it espresso. It was a gift to our son and daughter in law and they loved it. Now they want a beach to match the table.
How wonderful, Lisa! So glad to hear the plans worked out well for you. No, we don’t have plans for a matching bench, but I bet Ana has a ton of dining bench plans on her site that may work for you. Hope you find what you’re looking for! Thanks so much for stopping by!
Hi Jen! I’ve started making this table and I can’t figure out what you used the brad nailer for. Please help!
Hi Sarah,
It’s been so long, I don’t remember… but looking at the plans, I don’t see where you’d use a brad nailer either! As far as I know, everything is joined with screws.
Hiya Jen,
We are going to give this table a try. Did you use any type of finish on it?
Charlie
Awesome! The finishing tutorial is here: https://jenwoodhouse.com/dining-table-finish/
Do you have the link to how you secured the tabletop? We are Navy and move a lot as well so it will be useful to be able to disassemble the table when it comes time to move. Thank you!
Ok , so I understand what parallel and non parallel cut means… but I cant figure out how to do it with the angle cut? Are there are step by step photos? This step in part 2 is confusing me. The parallel, non parallel, and inward cut. Thank you!!! <3
What are the measurements for all of the legs? We’re building this table and have no idea
Hi Brittany,
All of the measurements are in the plans, which are linked in the blog post. Hope that helps!
I love the table! How many does it seat?
What stain and finish did you end up using on the table, and how has it held up to everyday use over time?