• Skip to primary navigation
  • Skip to content
  • Skip to primary sidebar
  • Skip to footer
  • Home
  • Blog
  • About
    • Meet Jen
    • Testimony
    • Meet the Team
  • Project Gallery
    • Furniture >>
      • Beds
      • Benches & Ottomans
      • Bookshelves
      • Desks
      • Dressers
      • Tables
    • Recipes
    • Crafts
    • Decorating
    • Kids
    • Lighting
    • Organization
    • Outdoor
    • Seasonal
  • Tools 101
    • Tool Reviews
    • Favorite Tools
  • Shop
    • Free Resources
    • Building Plans
    • T-Shirts
    • Home Decor
    • Custom Furniture
  • Contact
    • Email Jen
    • Sponsor/Advertise
    • Disclosure

The House of Wood

The DIY Life of a Military Wife

April 24, 2018

Wooden Wall Art

Basket weaving 101. That’s what’s going down here at The House of Wood today. We’re going to take veneer edge banding and make wooden wall art out of it! Yerp. Are you stoked? I’m totally stoked.

Oh, dream weaver, I believe you can get me through the night.
Oh, dream weaver, I believe we can reach the morning light.

How to make statement artwork out of wood and veneer
Oh, and as if today’s DIY project isn’t exciting enough for you…

STOP.
(Hammer Time.)

I’m joining a handful of my blogging buddies and we’re throwing down a Wood Art Challenge!

SHUT UP.
I knowwww, we’re gonna Party Like It’s 1999.

Side note: how many hit pop songs can Jen fit into one blog post?
Challenge accepted.

#WoodArtChallenge

Check out these Beautiful People – we’ve Come Together to bring you all kinds of amazing wooden wall art:


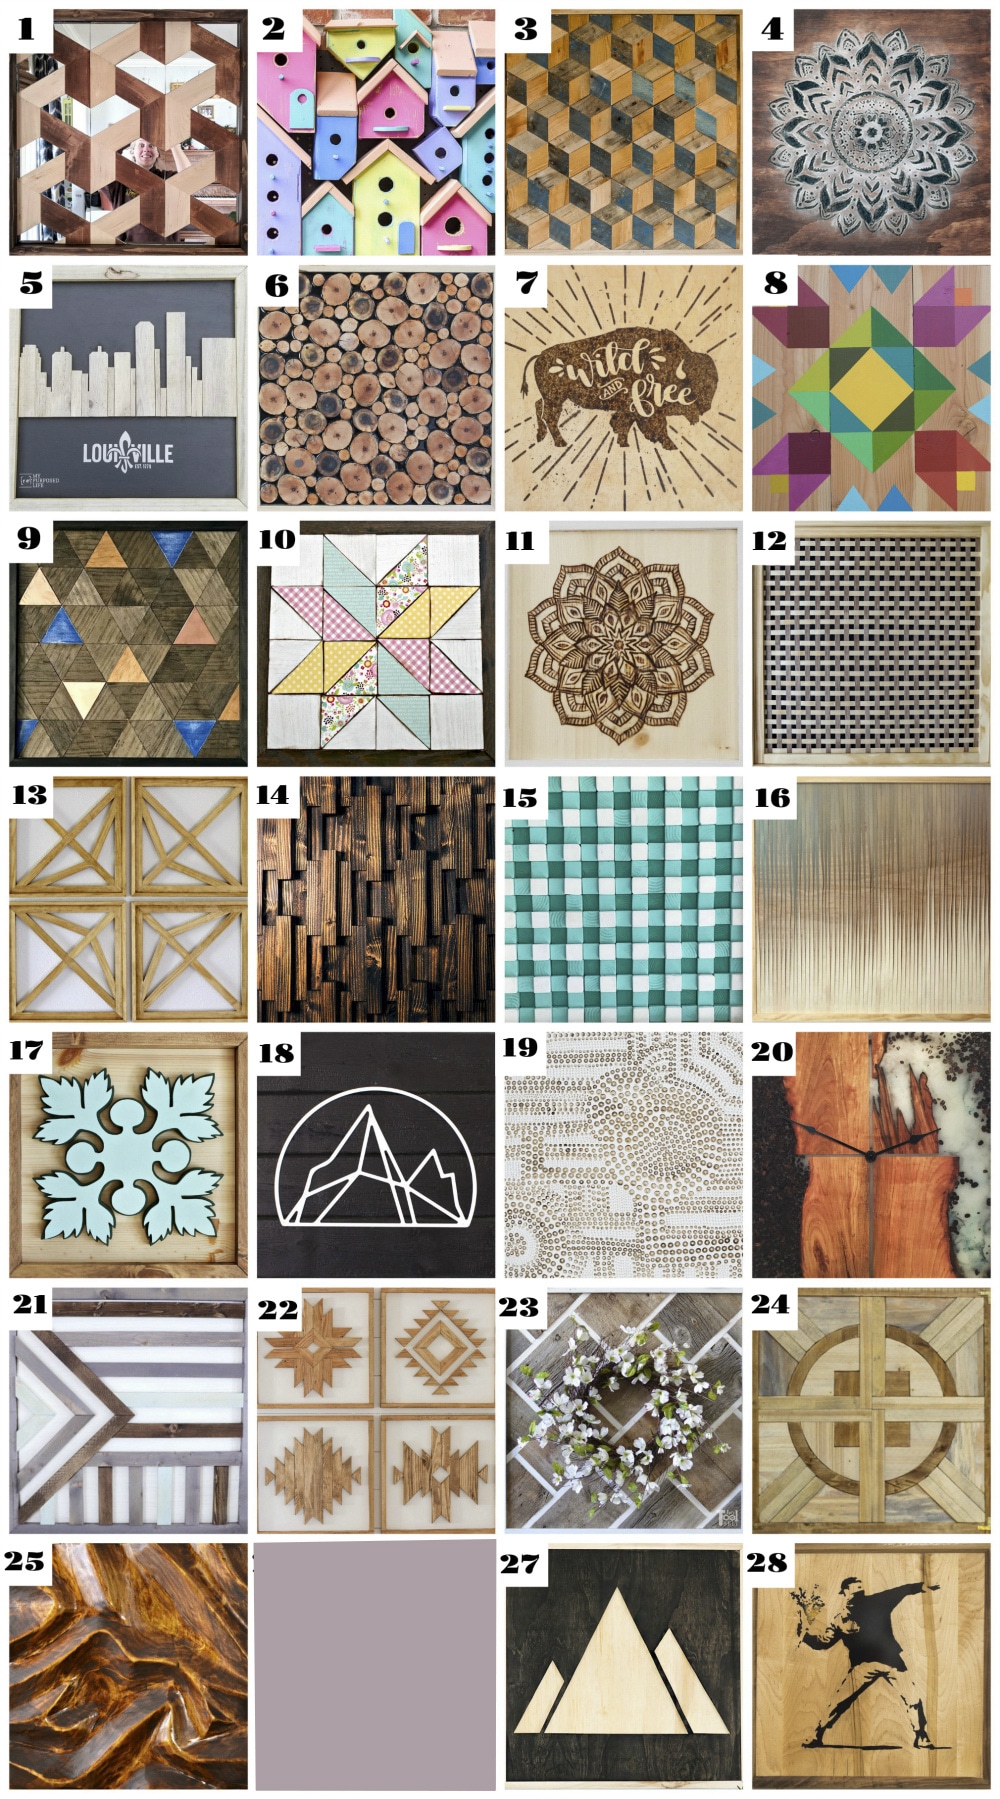
1) Reality Daydream 2) 100 Things 2 Do 3) House Becoming Home 4) Anika’s DIY Life
5) My Repurposed Life 6) 3×3 Custom 7) One Project Closer 8) Merrypad
9) Chatfield Court 10) Create & Babble 11) Hazel & Gold Designs 12) Jen Woodhouse
13) Sawdust 2 Stitches 14) Wood Work Life 15) Remodelaholic 16) Evan and Katelyn
17) Jaime Costiglio 18) Pneumatic Addict 19) Bower Power 20) Lazy Guy DIY
21) My Love 2 Create 22) Addicted 2 DIY 23) Her Toolbelt 24) Shades of Blue Interiors
25) Ugly Duckling House 27) DIY Huntress 28) Mr. Fix It DIY

How to make a DIY wood art wall decor - stunning statement piece
Wanna join in on the Good Clean Fun? You know you do. Make your own wooden wall art, post it on social media and hashtag it #WoodArtChallenge so we can see your beautiful creations. It’s gonna be Fun, Fun, Fun under the Black Hole Sun.

Okay. Are you ready for this? Let’s Get It On.

Boom.
Girl Is On Fire!

How to make a stunning statement piece wooden wall art
Wooden Wall Art Supplies

  • walnut wood veneer edge banding
  • birch wood veneer edge banding
  • 1 x 2 x 8 ft. boards
  • 1 x 3 x 8 ft. boards
  • 1/2-inch narrow crown staples
  • 1 1/4-inch brad nails
  • wood glue
  • wood putty

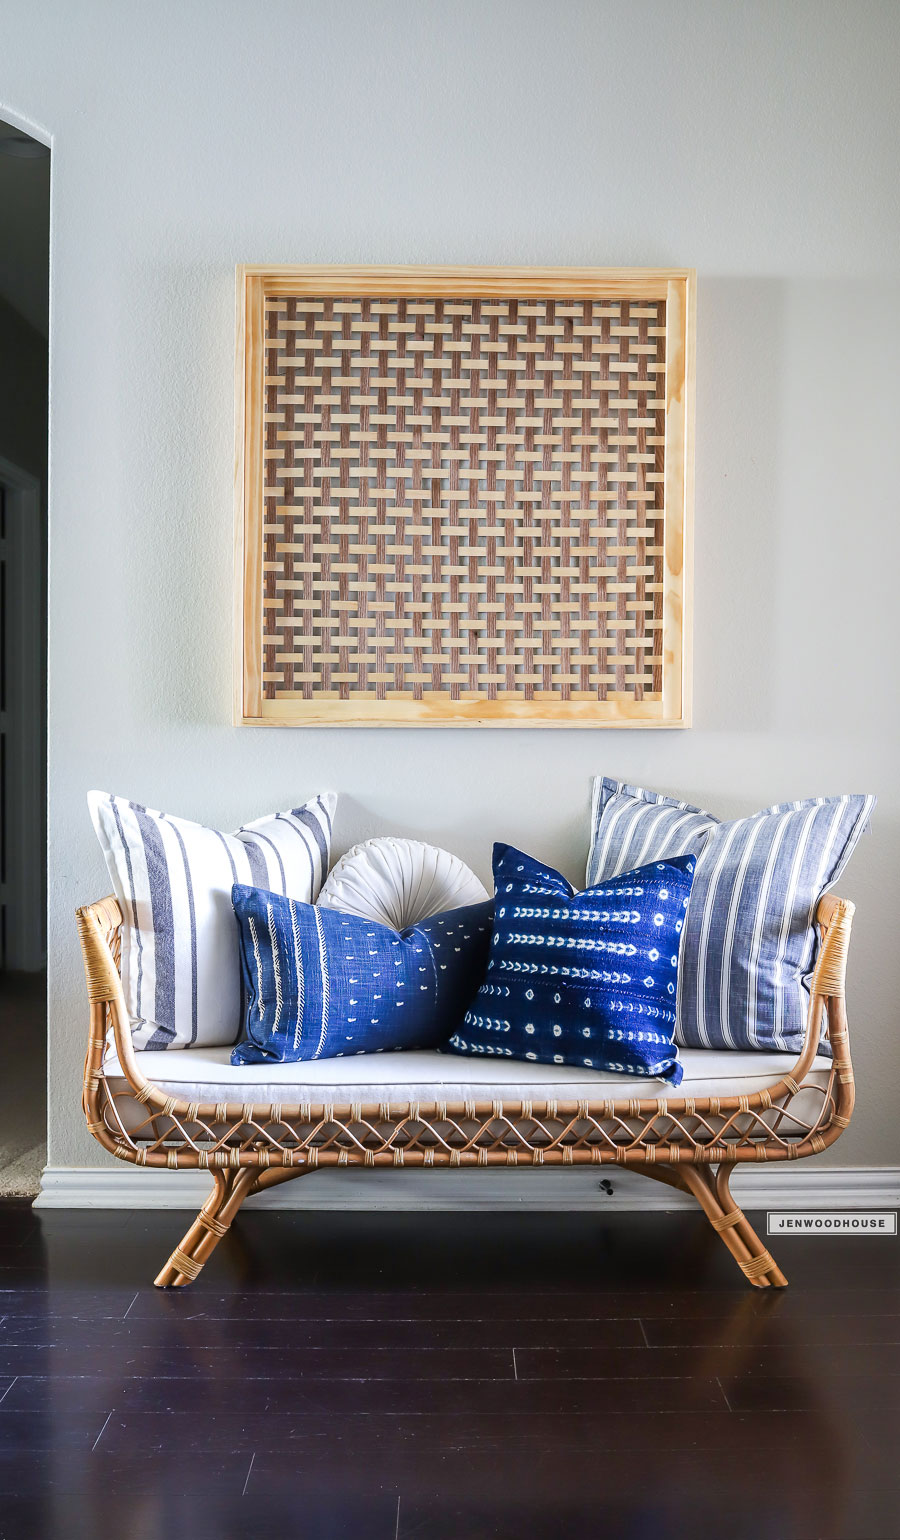
This is a super easy beginner-level project that can be done in one Afternoon Delight. Materials will run about $60, more or less, depending on how large you make your wooden wall art. Mine is 36 inches square, so I used about 140 feet of edge banding total (70 feet of walnut and 70 feet of birch).
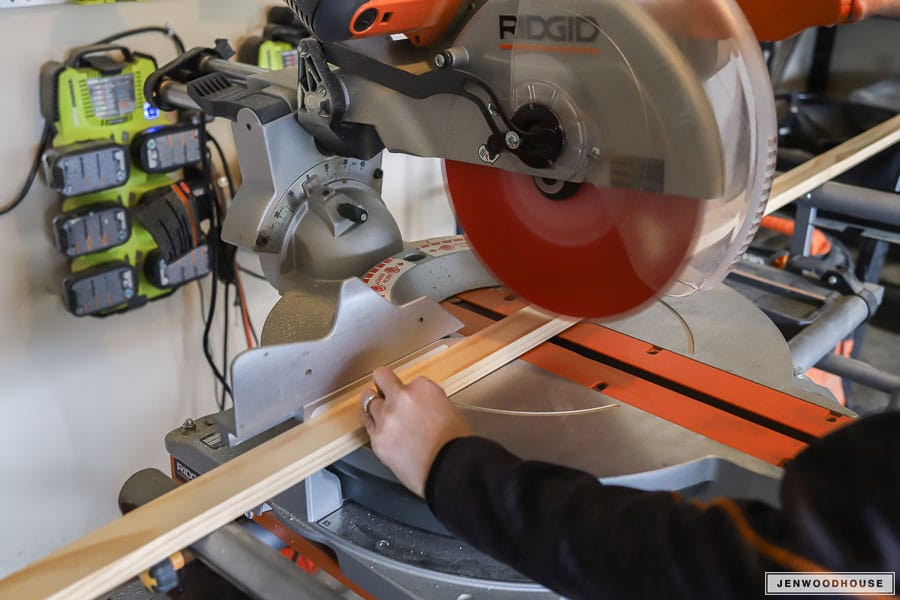
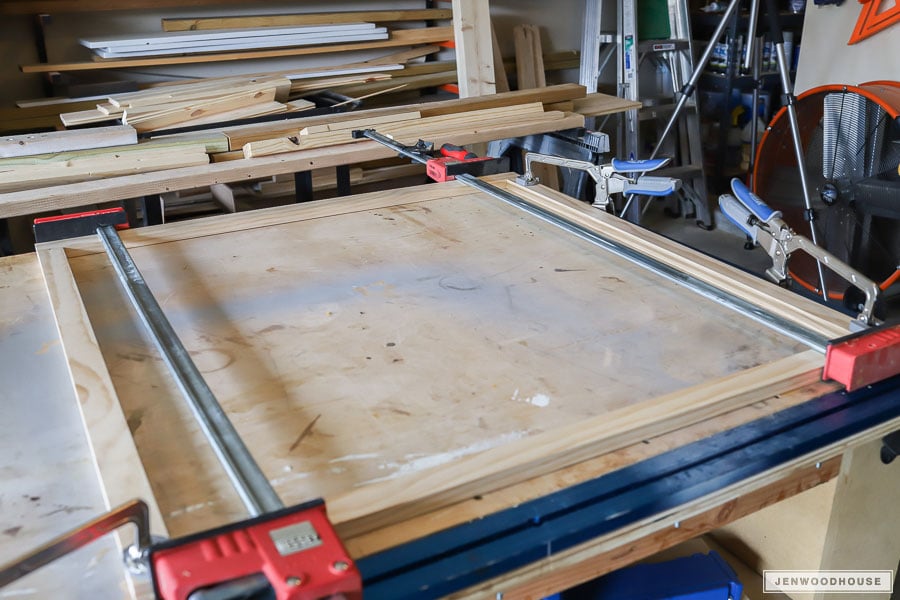
How to make a wooden frame using mortise and tenon joinery
Step 1

Construct the frame out of 1x2s. You can use any kind of joinery here: pocket hole, biscuit, mortise and tenon, dowels, staples… you do Whatever Your Heart Desires. I decided to get fancy in the shop and use my Festool Domino. I’ve had this tool for about a year and a half now and I rarely use it. I know, it’s Criminal! I forget what an awesome tool it is! I’ve only used the Domino when making floating tenons for attaching breadboard ends to tabletops, but it’s capable of so much more – I really should use it More Often Than Not.

Build the frame, check for square, and adjust as necessary. Glue, clamp, and let the glue dry for at least a Midnight Hour.

BTW. These are my favorite clamps.

How to make wooden wall art - clamp and glue the frame
Step 2

Now that the frame is built, Let’s Get This Party Started. It’s time to start Weaving On A Jet Plane (Okay, that one was a stretch). Cut the birch edge banding a little longer than the width of the frame (you’ll be able to trim it later) and staple one side down. Don’t staple the other side yet. Once one side is stapled down, start weaving the walnut edge banding.

Because the edge banding is a little stiff, don’t staple the walnut strips down at all, until you weave it completely through the birch. You’ll see in the photo below, that I did staple the walnut, but the strips kept coming loose as I was weaving them in and out of the birch veneer.

Don’t Cry.
Do as I say, not what I do.
It’s Tricky.
But you know, You Can Go Your Own Way, if you want.

How to make a stunning wood wall art statement piece
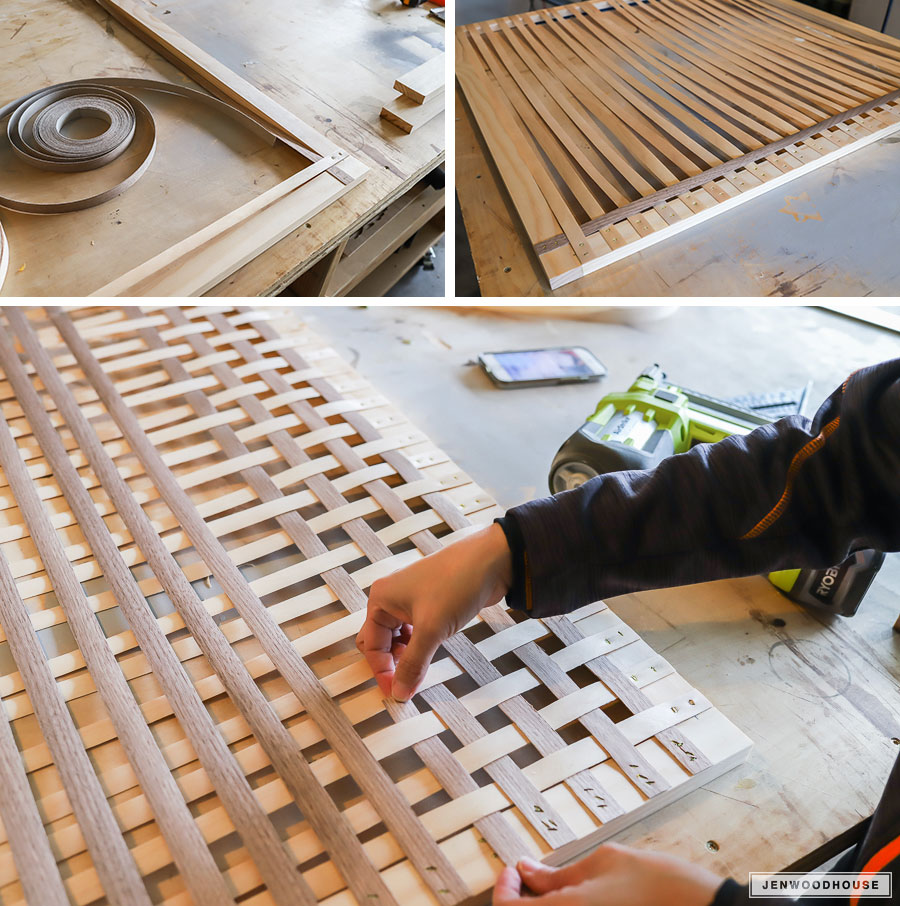
Once the walnut is completely woven through the birch from end to end, staple it in place. Trim off the excess with a pair of scissors.

Lather, rinse, repeat eleventy million times.
Congratulations.
I’m a hundred years old now.

All you need is a little Patience.
If only I could Turn Back Time After Time.
(Oh snap, that was a two-fer!)
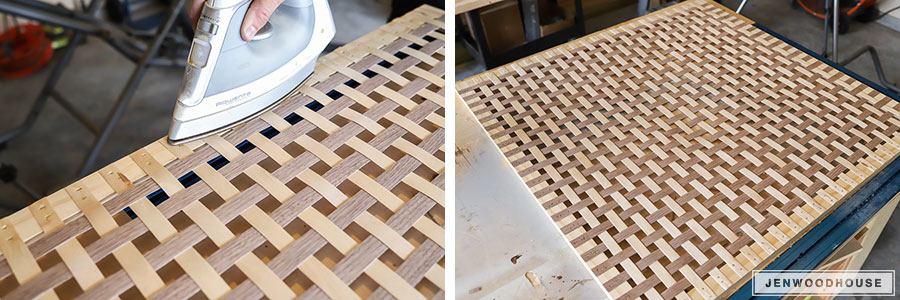
Step 3

Once both the birch and walnut edgebanding is completely woven, Hallelujah! It’s Smooth Sailin’ from here on out. Go back and staple the other side of the birch. Then, run a hot iron along the perimeter. The edge banding has a heat-activated adhesive on the back, so it’ll further secure the veneer to the frame. Is it getting Hot In Herre?

How to make wooden wall art using edge band veneer
Step 4

Attach an identical frame made out of 1x2s to the front of the piece to hide the staples. The weaving should now be ‘sandwiched’ in between the two frames. Finally, Turn! Turn! Turn! the 1×3 boards on edge and attach them to the frame with glue and nails.

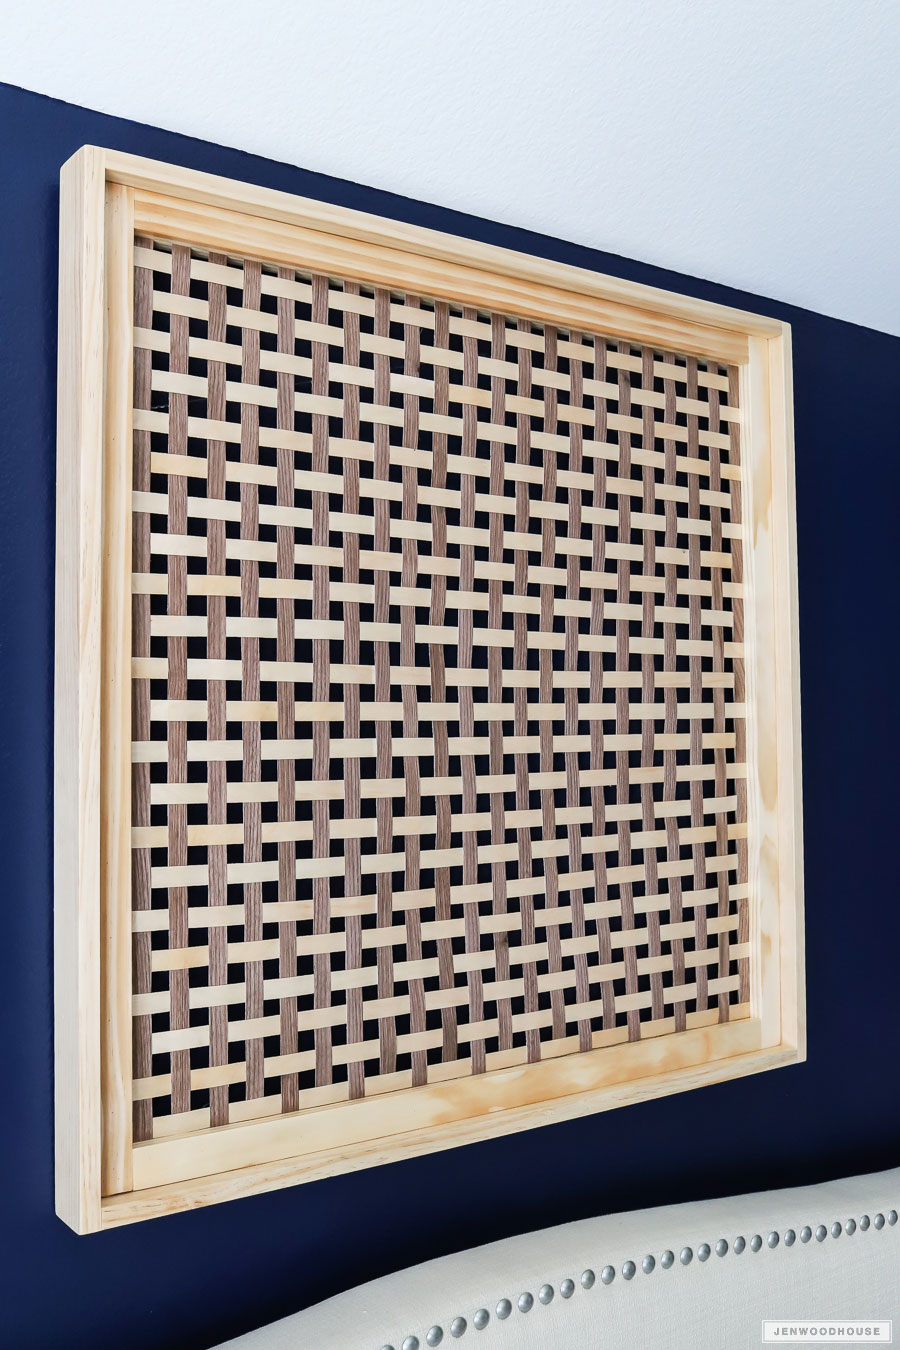
Fill all nail holes with putty, sand, and stain and/or paint, and finish as desired. I didn’t bother painting or staining – I liked the natural wood tone of the edge banding so I just sprayed a couple of coats of clear glossy polyurethane, attached hanging hardware to the back, and hung up my wooden wall art.

How to make a stunning statement wood art piece
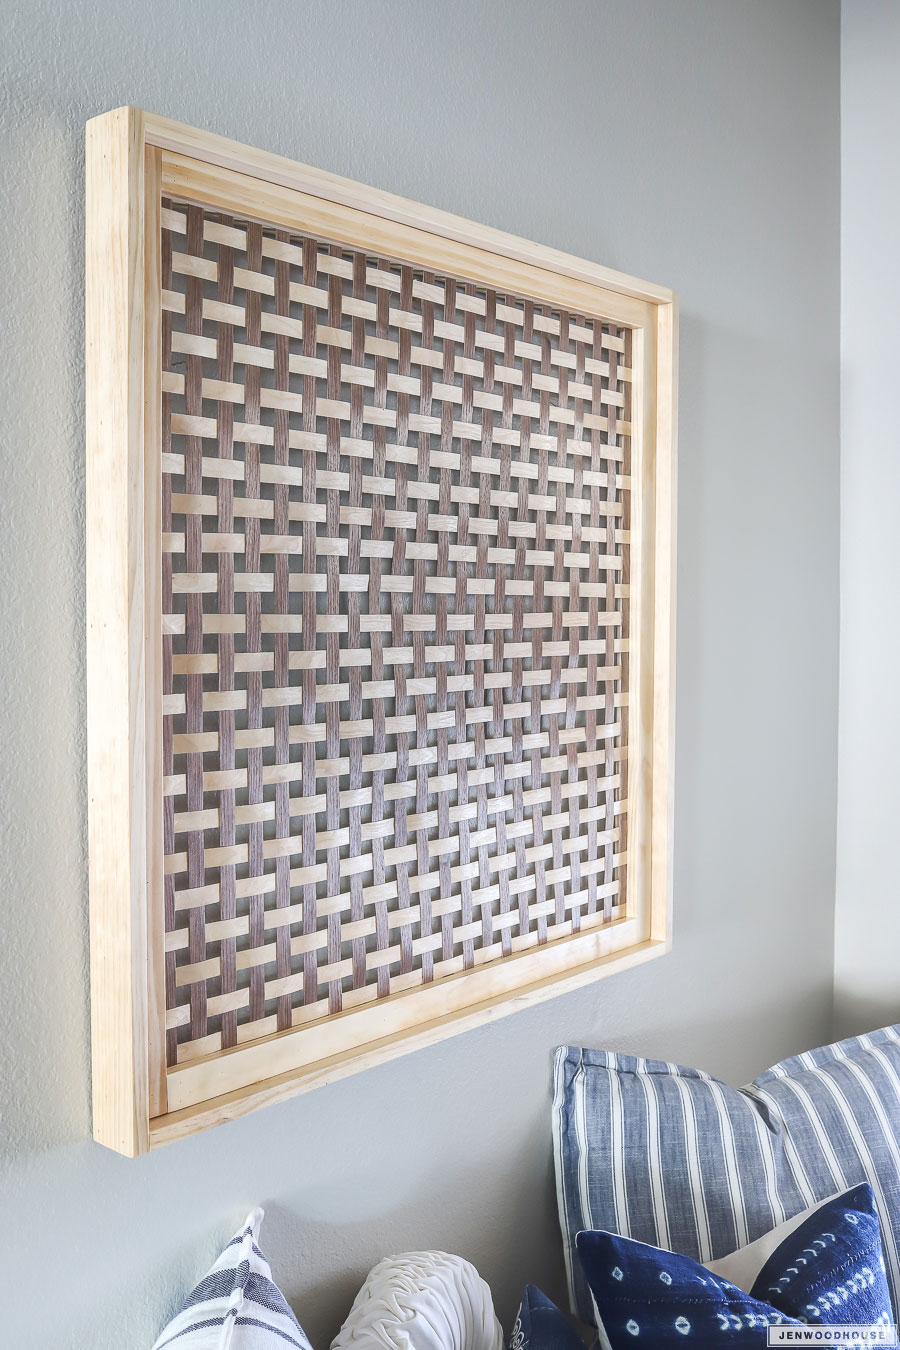
What do you think? Such a great statement art piece, right? And so easy to do! I Think I’m In Love!

How to make a stunning statement art piece out of wood
SHOP THIS POST

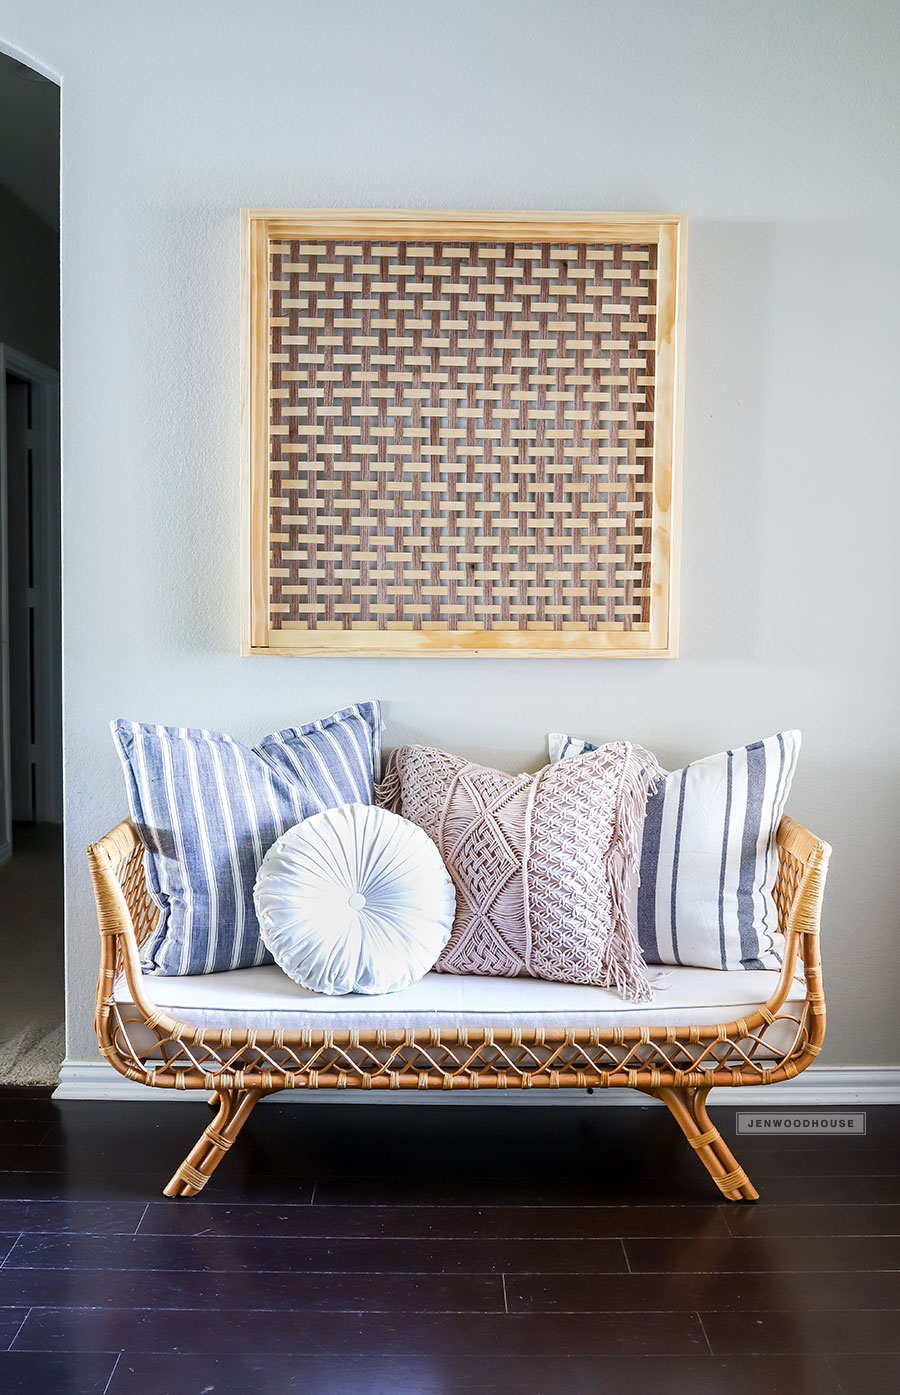
Here’s what my wooden wall art looks like against the dark walls in my bedroom – I love how striking it is:

How to make a DIY wood art wall decor - stunning statement piece
Thanks for reading, friends! So, tell me – how many hit pop songs did you know?
Catch you on The Flipside!

How to make statement artwork out of wood and veneer
*This post contains affiliate links. To read my full disclosure policy, please click here.

You may also like:

  • Acrylic Wall CalendarAcrylic Wall Calendar
  • Chevron Reclaimed Wood BedChevron Reclaimed Wood Bed
  • Sliding Barn Door Loft BedSliding Barn Door Loft Bed
  • How To Make A Vertical Succulent GardenHow To Make A Vertical Succulent Garden
  • How To Display Kids’ ArtworkHow To Display Kids’ Artwork
  • DIY Faux Fireplace with Smart TilesDIY Faux Fireplace with Smart Tiles
  • Reclaimed Wood Plank WallReclaimed Wood Plank Wall
  • Tribal Wooden DoormatTribal Wooden Doormat

Filed Under: Crafts, Decorating Tagged With: art, basket weave, challenge, statement piece, wall art, wall decor, weave, wood wall art, wooden

Reader Interactions

Comments

  1. Sheri says

    April 24, 2018 at 8:15 am

    Jen, this is gorgeous!

    Reply
    • Jen says

      April 24, 2018 at 9:22 am

      Thanks Sheri! And thanks for joining in on the fun!

      Reply
  2. bethany sy says

    April 24, 2018 at 9:20 am

    The woven lattice idea is so beautiful! And I love how it reads as a texture. Amazing! <3

    Reply
    • Jen says

      April 24, 2018 at 9:31 am

      Thanks Beth! And thanks for organizing!

      Reply
  3. Rachel says

    April 24, 2018 at 10:43 am

    Ah Jen, I can always count on your narration to make me smile or laugh! Very creative use of wood veneer. Love how this turned out– you should sell the idea to West Elm! 😉

    Reply
  4. Katie says

    April 24, 2018 at 11:26 am

    This looks so incredible. I never in a million years would have thought to use edge banding this way! And I’m seriously green with envy over your domino! It’s on my ever-growing want list of tools;)

    Reply
  5. gail says

    April 24, 2018 at 1:29 pm

    Really cool looking project Jen! The woven edge binding is really unique looking. It’s so simplistic but elegant!

    gail

    pinning!

    Reply
  6. Lisa E says

    April 24, 2018 at 4:43 pm

    Love this. Beautiful! Been wanting to do something like this with a bit bigger spacing outside as a privacy screen. Do you have any recommendations on material to use that is economical yet will last?

    Reply
  7. Sam @ DIY Huntress says

    April 24, 2018 at 5:02 pm

    Easily the most entertaining blog post I’ve read in a long time. Love the artwork, Jen!

    Reply
  8. Anika says

    April 24, 2018 at 11:38 pm

    This is SO amazing!! Love the contrast on the navy wall!
    And now I have a few tunes stuck in my head too 🙂
    Thanks so much for inviting me to the challenge. It is so much fun!

    Reply
  9. Jacque says

    April 24, 2018 at 11:42 pm

    What an awesome use of edge banding! This turned out beautiful, the texture/pattern is spot on.

    Reply
  10. Jeanie says

    April 25, 2018 at 4:06 pm

    Such a creative and unique way to use edge banding. I love it!

    Reply
  11. Kristi says

    April 26, 2018 at 2:43 am

    This is gorgeous Jen and I love it with your blue wall! Oh, and that rattan bench is totally awesome.

    Reply

Trackbacks

  1. DIY Wooden Aztec Wall Art - Addicted 2 DIY says:
    April 24, 2018 at 8:01 am

    […] Jen Woodhouse  […]

    Reply
  2. DIY Wood Art using Woodburning Tool - Hazel + Gold Designs says:
    April 24, 2018 at 8:01 am

    […] Closer / 8) Merrypad / 9) Chatfield Court / 10) Create & Babble / 11) Hazel & Gold / 12) Jen Woodhouse / 13) Sawdust 2 Stitches / 14) Wood Work Life / 15) Remodelaholic / 16)  Evan & Katelyn / 17) […]

    Reply
  3. Twisted veneer wood art - Evan & Katelyn | Home DIY | Tutorials says:
    April 24, 2018 at 8:01 am

    […] 2 Stitches Lazy Guy DIY Jaime Costiglio 3×3 Custom Wood Work Life Ugly Duckling House Jen Woodhouse The DIY Village Addicted 2 DIY Remodelaholic Reality Daydream Pneumatic Addict Kim Six Fix Her […]

    Reply
  4. Wooden Quilt Block Wall Art - Create and Babble says:
    April 24, 2018 at 8:03 am

    […] Closer 8) Merrypad 9) Chatfield Court 10) Create & Babble 11)  Hazel & Gold 12) Jen Woodhouse 13) Sawdust 2 Stitches 14) Wood Work Life 15) Remodelaholic 16)  Evan & Katelyn 17) Jaime […]

    Reply
  5. How To Make Textured Wood Wall Art - Bower Power says:
    April 24, 2018 at 8:21 am

    […] Closer 8) Merrypad 9) Chatfield Court 10) Create & Babble 11)  Hazel & Gold 12) Jen Woodhouse 13) Sawdust 2 Stitches 14) Wood Work Life 15) Remodelaholic 16)  Evan & Katelyn 17) Jaime […]

    Reply
  6. Wooden Banksy Wall Art | Mr. Fix It DIY says:
    April 24, 2018 at 8:56 am

    […] 2 Stitches, Lazy Guy DIY, Jamie Costiglio, 3×3 Custom, Wood Work Life, Ugly Duckling House, Jen Woodhouse, The DIY Village, Addicted to DIY, Remodelaholic, Reality Daydream, Pneumatic Addict, Her […]

    Reply
  7. Recycled Wood Pallet Project | Wood Art Challenge - House Becoming Home says:
    April 24, 2018 at 9:01 am

    […] Closer / 8) Merrypad / 9) Chatfield Court / 10) Create & Babble / 11) Hazel & Gold / 12) Jen Woodhouse / 13) Sawdust 2 Stitches / 14) Wood Work Life / 15) Remodelaholic / 16)  Evan & Katelyn / […]

    Reply
  8. Wood Art Challenge - Shades of Blue Interiors says:
    April 24, 2018 at 9:04 am

    […] Closer 8) Merrypad 9) Chatfield Court 10) Create & Babble 11)  Hazel & Gold 12) Jen Woodhouse 13) Sawdust 2 Stitches 14) Wood Work Life […]

    Reply
  9. DIY Plywood Mountain Wood Art - DIY Huntress says:
    April 24, 2018 at 9:08 am

    […] Custom 7) One Project Closer 8) Merrypad 9) Chatfield Court 10) Create & Babble 11) Jen Woodhouse 12) Hazel & Gold 13) Sawdust 2 Stitches 14) Wood Work Life 15) Remodelaholic 16)  Jaime […]

    Reply
  10. Reclaimed Wood Skyline Artwork | Louisville Kentucky - My Repurposed Life® says:
    April 24, 2018 at 9:15 am

    […] Closer / 8) Merrypad / 9) Chatfield Court / 10) Create & Babble / 11) Hazel & Gold / 12) Jen Woodhouse / 13) Sawdust 2 Stitches / 14) Wood Work Life / 15) Remodelaholic / 16)  Evan & Katelyn / 17) […]

    Reply
  11. Wooden Wall Art - Sawdust 2 Stitches says:
    April 24, 2018 at 9:52 pm

    […] Closer / 8) Merrypad / 9) Chatfield Court / 10) Create & Babble / 11) Hazel & Gold / 12) Jen Woodhouse / 13) Sawdust 2 Stitches / 14) Wood Work Life / 15) Remodelaholic / 16)  Evan & Katelyn / 17) […]

    Reply
  12. How to Build and Paint a Modern DIY Barn Quilt | merrypad says:
    May 1, 2018 at 8:03 pm

    […] 7. One Project Closer 9. Chatfield Court 10. Create & Babble 11.  Hazel & Gold 12. Jen Woodhouse 13. Sawdust 2 Stitches 14. Wood Work Life 15. Remodelaholic 16.  Evan & Katelyn 17. Jaime […]

    Reply
  13. Dremel Wood Carving - How to Make a Gorgeous Mandala Wall Art says:
    June 1, 2018 at 11:27 am

    […] Closer / 8) Merrypad / 9) Chatfield Court / 10) Create & Babble / 11) Hazel & Gold / 12) Jen Woodhouse / 13) Sawdust 2 Stitches / 14) Wood Work Life / 15) Remodelaholic / 16)  Evan & Katelyn / 17) […]

    Reply
  14. The Wood Art Challenge - The Non-Quadratic Non-Diffuser - Wood.Work.LIFE says:
    October 23, 2018 at 12:54 pm

    […] Closer / 8) Merrypad / 9) Chatfield Court / 10) Create & Babble / 11) Hazel & Gold / 12) Jen Woodhouse / 13) Sawdust 2 Stitches / 14) Wood Work Life / 15) Remodelaholic / 16)  Evan & Katelyn / 17) […]

    Reply

Leave a Reply Cancel reply

Your email address will not be published. Required fields are marked *

Primary Sidebar

Welcome

WANT FREE PLANS SENT STRAIGHT TO YOUR INBOX?

Footer

WANT FREE PLANS SENT TO YOUR INBOX?

  • Facebook
  • Instagram
  • Pinterest
  • RSS
  • Twitter
  • YouTube
  • About
  • FAQs
  • Disclosure
  • Sponsor / Advertise
  • Contact
© 2007-2019 · Jen Woodhouse · Privacy Policy · Terms of Use · Log in