• Skip to primary navigation
  • Skip to content
  • Skip to primary sidebar
  • Skip to footer
  • Home
  • Blog
  • About
    • Meet Jen
    • Testimony
    • Meet the Team
  • Project Gallery
    • Furniture >>
      • Beds
      • Benches & Ottomans
      • Bookshelves
      • Desks
      • Dressers
      • Tables
    • Recipes
    • Crafts
    • Decorating
    • Kids
    • Lighting
    • Organization
    • Outdoor
    • Seasonal
  • Shop
    • Free Resources
    • Apparel
    • Custom Furniture
    • Home Decor
    • Building Plans
  • Contact
    • Email Jen
    • Sponsor/Advertise
    • Disclosure

The House of Wood

The DIY Life of a Military Wife

January 13, 2016

DIY Cabin Bed

Ana White and I are alike in so many ways, it’s scary.

She has two insanely good-looking kids, a girl and a boy.
I have two insanely good-looking kids, a girl and a boy.
She has an adoring, yet manly husband who encourages and supports her awesomely creative endeavors.
I have an adoring, yet manly husband who encourages and supports my awesomely creative endeavors.
She’s ambiguously Asian.
I’m ambiguously Asian.
She has 10 million hits on her blog.
I have 10 million hits on my blog.
(Okay, so my number may be closer to… ten, but that’s not even including my mom.)

She built a cabin in Alaska.
I built a cabin in Alabama.

I mean, we’re practically LIVING THE SAME LIFE.

MY LATEST VIDEOS

How to build a DIY cabin bed - Jen Woodhouse
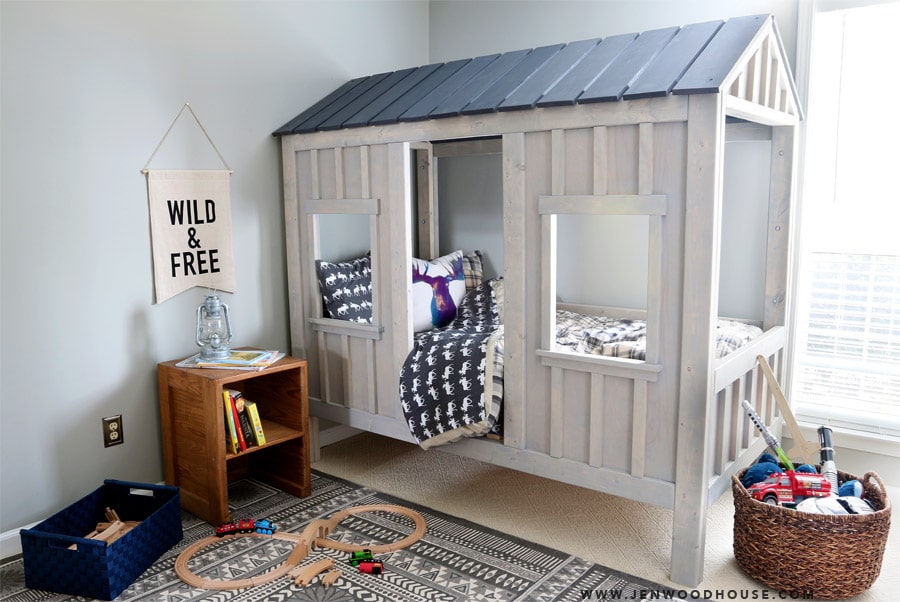
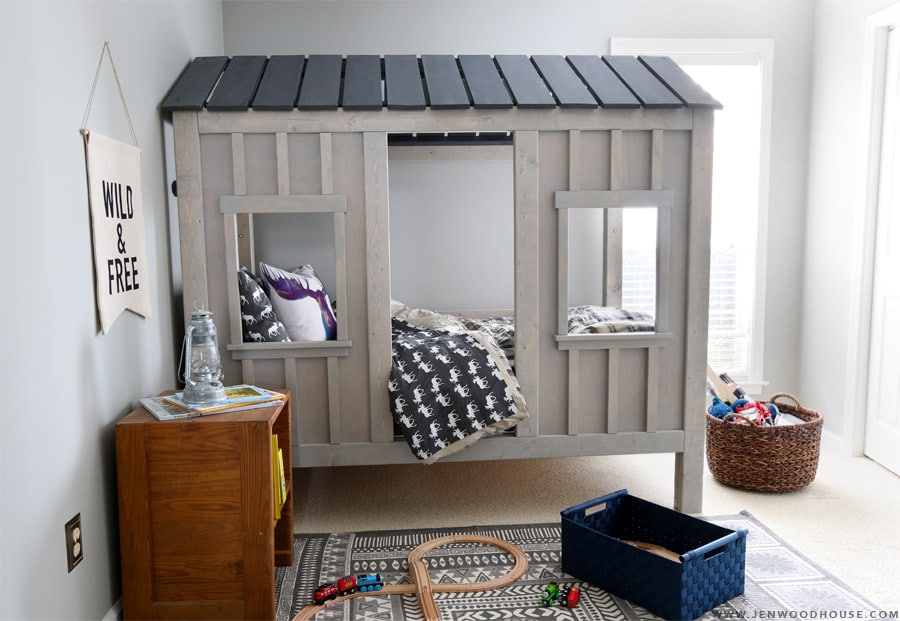
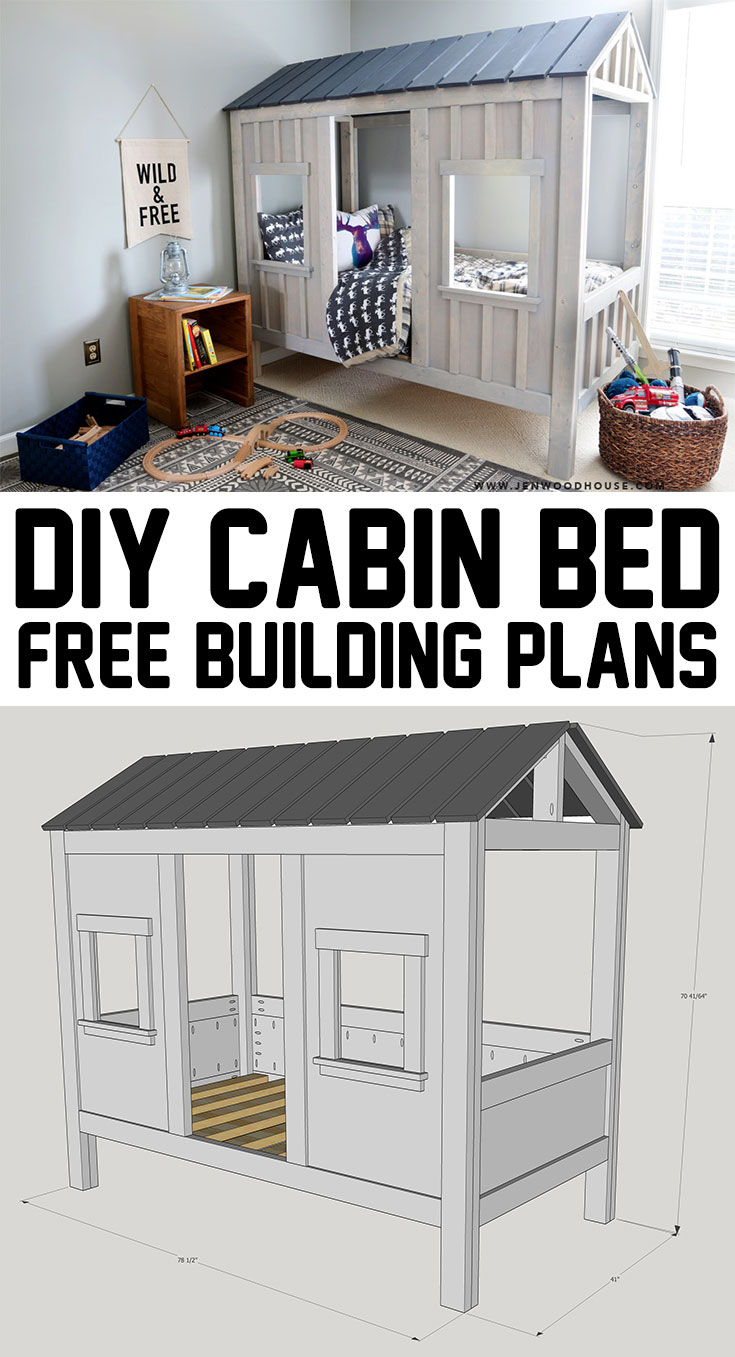
Needless to say, I am crazy excited about my latest DIY project. I teamed up with the aforementioned practically twin sister/BFF/doppelgänger, Ana White and the friendly folks at PureBond® Plywood to bring you the building plans and tutorial for this DIY cabin bed.

Remember how I built my three-year-old son a $30 platform bed that primarily served as a placeholder until I built him The Most Epic Bed Ever? Well, this is the bed I was talking about.

Pretty stinkin’ adorable, right?

How to build a DIY cabin bed via Jen Woodhouse and Ana White
*This post contains affiliate links. Click here to read my full disclosure policy.

Now, before we get started on the tutorial, I have a confession to make. I’ve been sitting on these plans for months. Literally, MONTHS! (I’m sorry.) Honestly, I was pretty intimidated to tackle this build. The thing that kept me from just digging in and getting it done was the fact that we’re moving again this Summer (Army life!) and I couldn’t quite wrap my head around how I wanted to build this bed so that it could easily be disassembled and reassembled at our new duty station. I considered bolts and cross dowels, the same metal bed rail brackets I used when I built my daughter’s bed, TimberLOK screws, and more. I mean, I racked my brain for months. I asked my woodworker friends. I googled the bejeezus out of it.

Finally, after mulling it over with Ana and her husband, we settled on these 5/16″ metal threaded inserts and so far, so good. The installation was fairly painless and the bed is super sturdy and solid. I’ll let you know if these inserts don’t hold up in a few months when it’s time to move again, but I think they’ll work out great.

How to build a Restoration Hardware-inspired DIY cabin bed via Jen Woodhouse and Ana White
If you’ve spent any time at all around here, you’ll have heard me talk about PureBond® Decorative Hardwood Plywood. Because it’s formaldehyde-free and responsibly harvested and manufactured here in North America, the PureBond® brand is always my go-to plywood when I build furniture for our home. Even more so when it comes to building furniture for my children. My little guy spends a lot of time sleeping (hallelujah for 3-hour nap times!) so I want to make sure I’m making the best choices when it comes to choosing materials for his bedroom. Plus, PureBond® Plywood is available at most Home Depot stores throughout North America, so I can always find it no matter where we’re stationed.

Once again, Ana drew up the plans in such a clever and efficient way (would you expect anything less?). Basically, you build the front, sides, and back pieces as separate panels, put them together, then add the roof and mattress slats. So smart. Be sure to download Ana’s building plans here.

I made a quick little 2-minute video showing how easily the cabin bed comes together. My hope is that this video, together with Ana’s thoughtfully laid-out plans and my tutorial, will take all the intimidation out of building this project. We’re super excited to see your versions of this DIY cabin bed, so build it and tag us (@jenwoodhouse @anawhitediy) on social media so we can see your handiwork!

Alright! So let’s get building! Are you ready?

I used pocket hole joinery for this entire project. This is the Kreg Pocket Hole Jig I use most, although the much smaller, more portable R3 model makes it easy to drill pocket holes in large sheets of plywood.

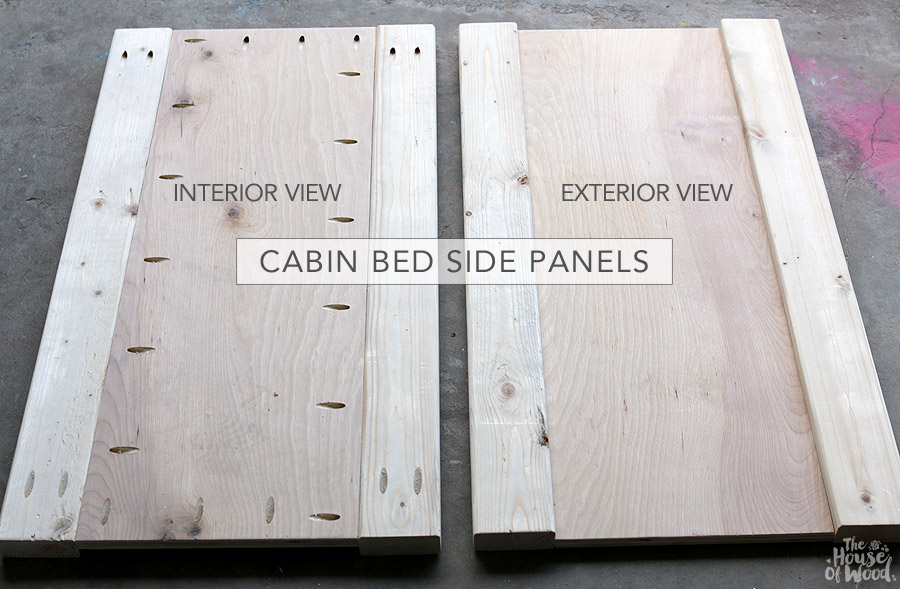
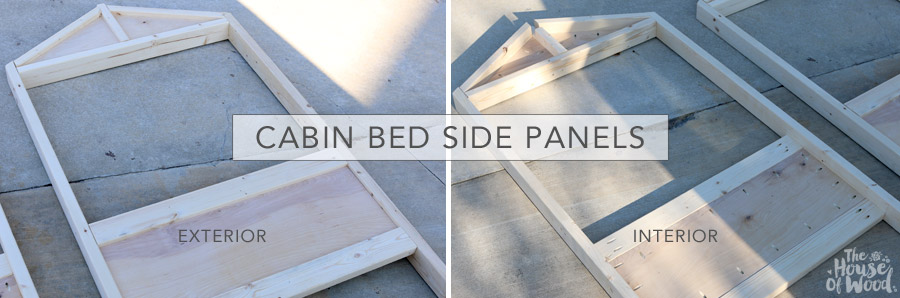
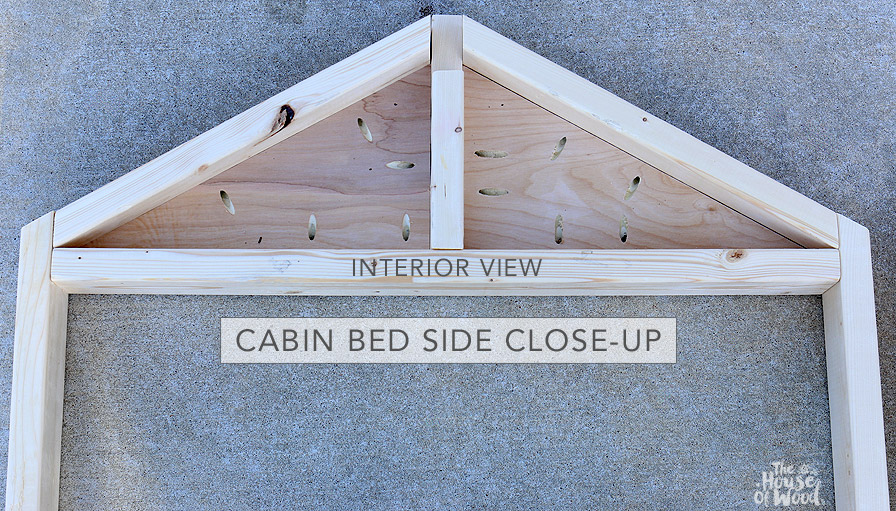
First, build the two side panels. Drill 3/4″ pocket holes into the plywood and 1-1/2″ pocket holes into the 2x4s, then join the plywood to the 2x4s with 1-1/4″ pocket hole screws. Next, attach the legs with 2-1/2″ pocket hole screws. Add the cross bar and then the gables. All of the angled cuts are detailed in Ana’s plans.

DIY RH Baby & Child cabin bed
In the plans, Ana left the rafters open, but I chose to close it off with some scrap plywood cut to size. I simply measured and cut the panels to fit, then attached them to the frame with pocket hole screws. It’s a bit of a tight fit for the drill, so if you’re going this route, be mindful of where you place your pocket holes.

RH Baby & Child DIY cabin bedRestoration Hardware-inspired DIY cabin bed
Next, build the back panel. Drill 3/4″ pocket holes into the plywood then attach the legs with pocket hole screws. Add the back cross bar with 2-1/2″ pocket hole screws.

How to build a DIY Restoration Hardware-inspired cabin bed via Jen Woodhouse
Now for the front panel. First, cut the two plywood pieces down to size, then cut out the windows with a jigsaw. Next, drill 3/4″ pocket holes into the plywood and attach it the 2×4 stiles with 1-1/4″ pocket hole screws. Then, build the front 2×4 frame with 1-1/2″ pocket holes and 2-1/2″ pocket hole screws and attach the plywood panels to the front frame. Finally, add the window trim with 1-1/4″ brad nails and wood glue.

How to build a DIY RH Baby cabin bed
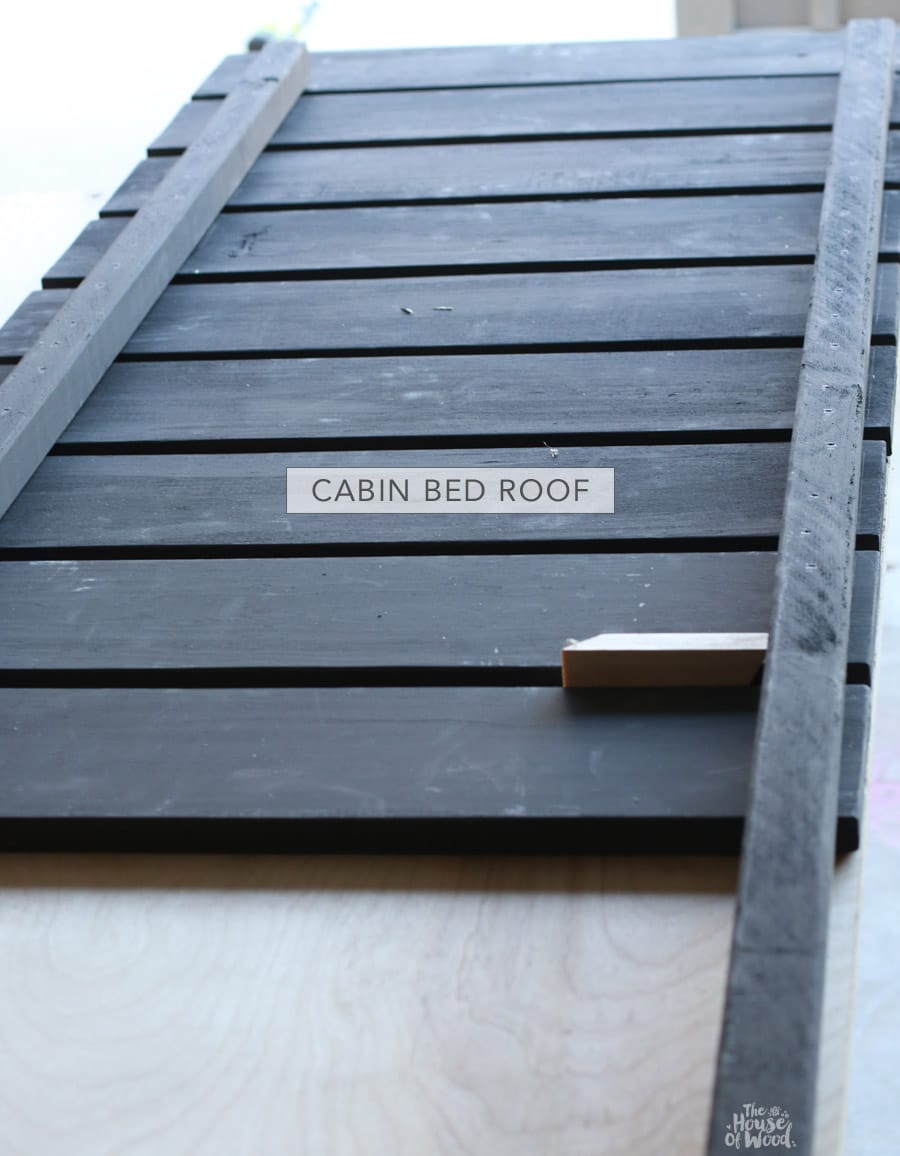
Now onto the roof. It’s best to build the roof as one panel, then take the entire panel up to the cabin bed and attach it. I used a 3/4″ spacer block to ensure that the roof slats were evenly spaced.

How to build a DIY cabin bed
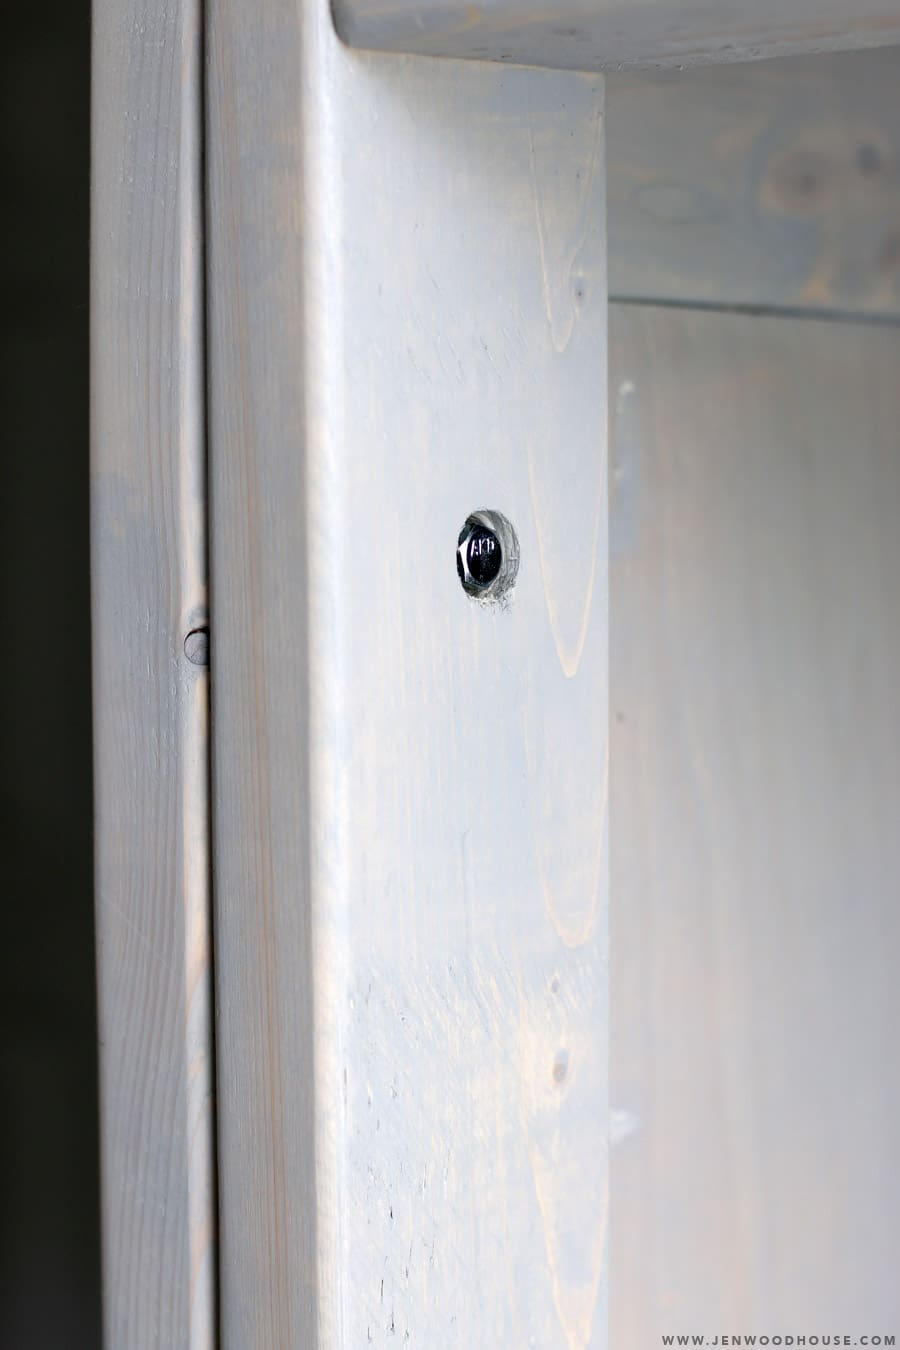
Okay, now that we have the sides, front, back, and roof panels built, it’s time to put everything together. Here’s where those metal threaded inserts come in. I purchased the 5/16″-18 size and got the power drive insert tool to go with it. The insert tool fits onto your drill so you can power-drive the inserts into the wood.

First, mark where you’re going to put the inserts. Drill a hole deep enough for the insert to sit flush in the wood. Next, mix up some epoxy and spread it on the outer threads of the insert. You may want to cover one side of the insert with painter’s tape so that the epoxy doesn’t get into the interior threads of the insert. Drive the insert into the pilot hole with the insert tool. Let the epoxy dry overnight. Meanwhile, drill holes for the bolts to come through. When you put the bed together, the bolts will thread into the metal inserts.

How to install threaded inserts
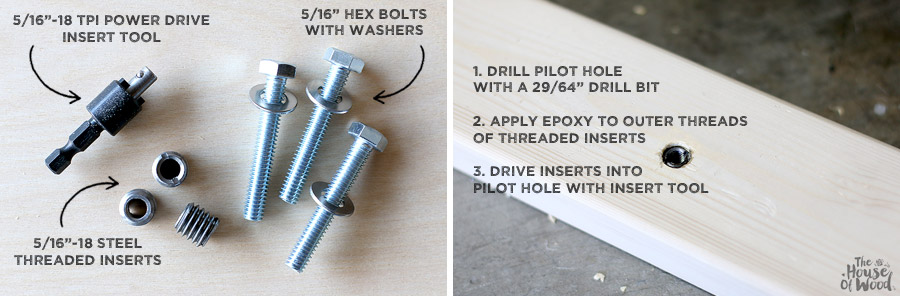
The front, back, and side panels are being held together by four bolts and inserts placed at each leg. I wanted the hardware to be somewhat concealed, so I didn’t drill the insert holes all the way through. This way, the bolts aren’t visible from the outside view of the bed. I used 2-1/2″ hex bolts.

I also countersunk the holes so that the hex bolt head would sit flush. And since we’ve got metal threading into metal, there’s no risk of the wood stripping out so we can assemble and disassemble this bed with each and every Army move. I love that!

How to install hex bolts and threaded inserts
Finally, I added the board and batten detail with brad nails and wood glue. It helps to cut a spacer block so the battens are evenly spaced. This DIY cabin bed costs about $350 to build. Not bad, considering RH Baby & Child sells a similar cabin bed for over $2,000. Yikes.

Oh, and you may notice that the ladder to climb into the bed is missing. Well, you can thank my adoring, yet manly husband for that. His motto is, “Meh. It’ll do.”

In fact, the first day we met, he was wearing a t-shirt that read, “Hi. You’ll do.”
True story.

Now, you may be wondering what could make a girl fall for a guy who would wear such a dumb shirt.
Well, all I can say is, his arms looked amazing in that shirt. So.

But… I digress.

Here’s how our little exchange went down:
Adam: Are you done building the cabin bed yet?
Jen: I just have to build the ladder and then I’m done!
Adam: Forget about the ladder! Who needs a ladder? Pfft… ladders.
Jen: Well… um, okay…

And the first thing our son notices when he sees his cabin bed for the first time?
Observe:


Yeahhh. *Forehead slap.
Mr. “It’ll Do” strikes again.

How to build a DIY cabin bed
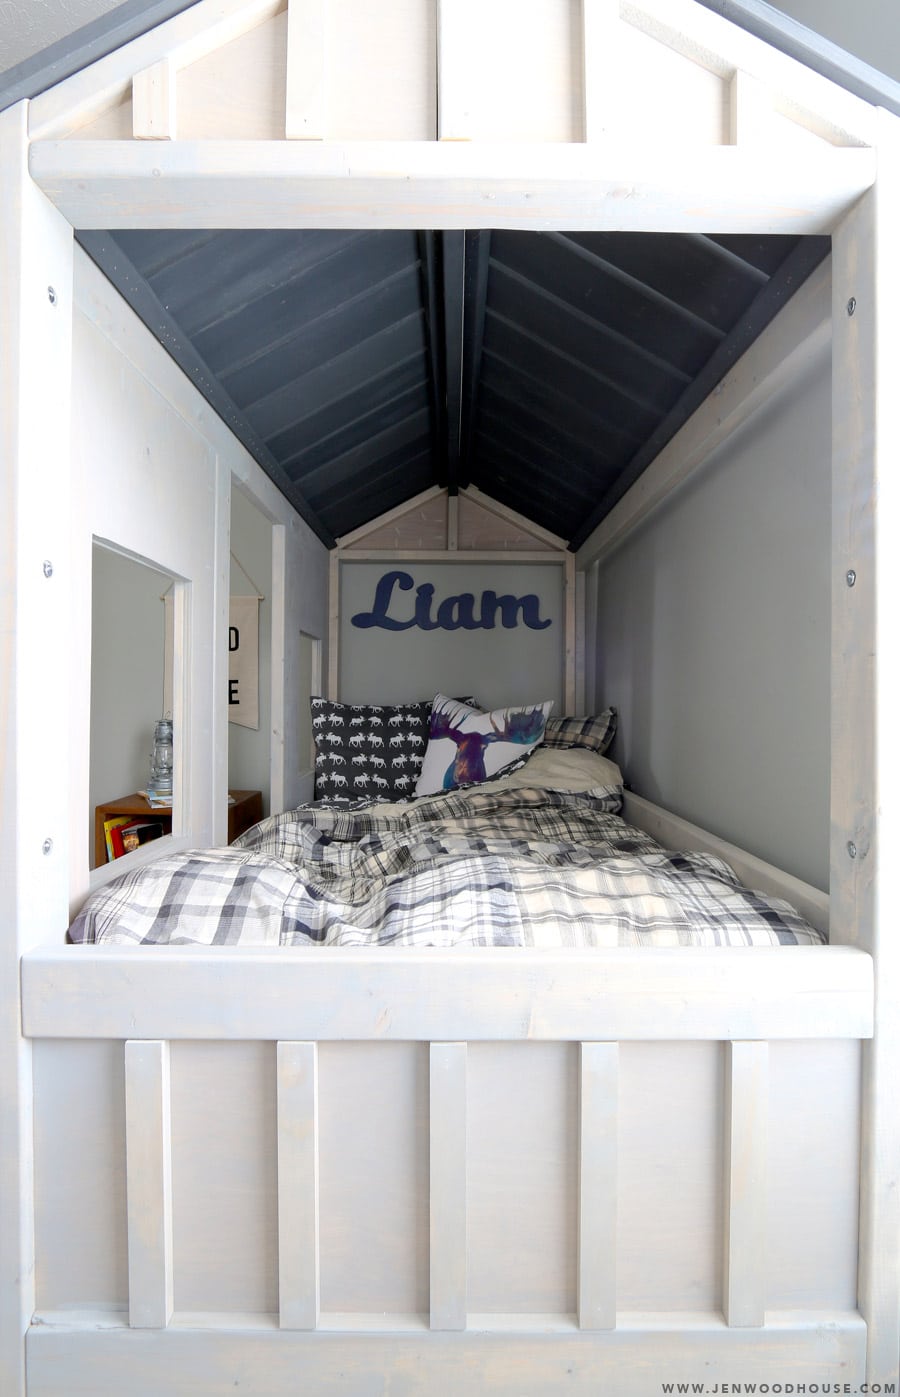
So what do you think? Super fun, right?! We absolutely love how it turned out! Seriously, I wish I had a cabin bed when I was growing up. Thanks a lot, Mom and Dad.

Alright then! What are you waiting for? You can build this DIY cabin bed for your little ones (or for yourself – no judgement). Be sure to visit Ana-White.com to download the free building plans!

How to build a DIY Restoration Hardware Cabin Bed via Jen Woodhouse
If you’re interested, here is a product source list. Click the images below and you’ll be taken directly to the product shown.

SHOP THIS ROOM

  • Area Rug
  • Navy Basket
  • DIY Nightstand
  • Lantern
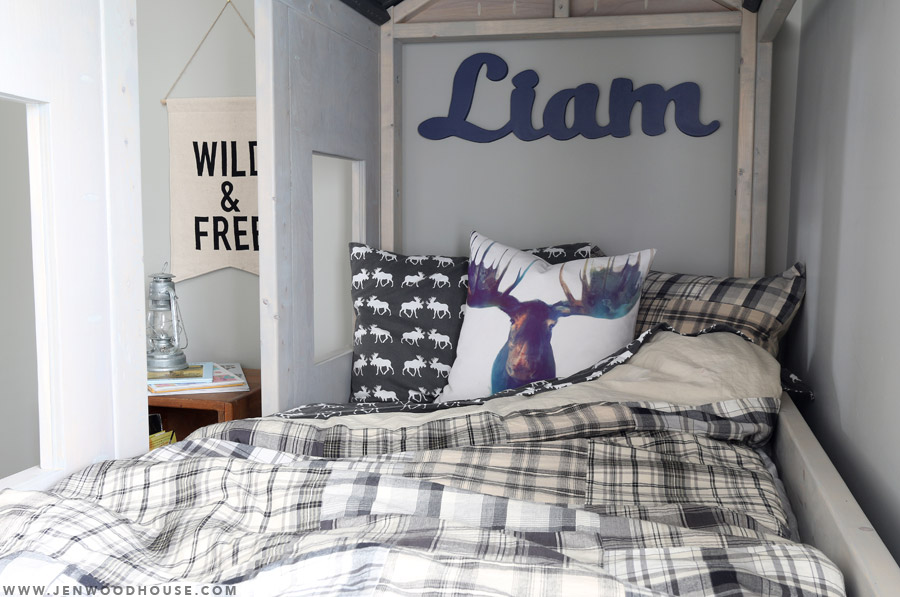
  • DIY Custom Wood Name Sign
  • Wild & Free Banner
  • Moose Flannel Sheets
  • Plaid Duvet Cover and Sham
  • Moose Throw Pillow
  • Round Basket

Thanks for reading friends! Want to know how I stained, painted, and finished this DIY cabin bed? Here’s the finishing tutorial. Be sure to follow me on Instagram and Facebook for fun, behind-the-scenes sneak peeks of new building projects.

I’d love for you to PIN and SHARE this project. Thank you!

How to build a DIY cabin bed
*A huge thank you to PureBond® Plywood for partnering with me on this post. All efforts and opinions are my own.


You may also like:

  • Restoration Hardware-Inspired Toddler BedRestoration Hardware-Inspired Toddler Bed
  • Jaime’s DIY Lego Loft BedJaime’s DIY Lego Loft Bed
  • DIY Kids ChairDIY Kids Chair
  • Restoration Hardware-Inspired NightstandsRestoration Hardware-Inspired Nightstands
  • Little Girl’s Custom Closet MakeoverLittle Girl’s Custom Closet Makeover
  • One Sheet Plywood Console TableOne Sheet Plywood Console Table
  • Toddler House BedToddler House Bed
  • Sliding Barn Door Loft BedSliding Barn Door Loft Bed

Filed Under: Beds, Design Plans, Featured, Furniture, Kids Tagged With: Ana White, bedroom, cabin, cabin bed, children, kids, loft bed, plywood, purebond, restoration hardware, RH Baby

Reader Interactions

Comments

  1. Zoe says

    January 13, 2016 at 10:35 am

    Have you already posted plans for the nightstand or is that upcoming?

    Reply
    • Jen says

      January 22, 2016 at 9:26 am

      Hi Zoe! The plans are now live: http://jenwoodhouse.com/rustic-nightstand/

      Reply
  2. Emily, Our house now a home says

    January 13, 2016 at 11:04 am

    This is so cute! I love how it turned out, the dark colored roof and the fact that it can be disassembled! I recently redid my boys’ bedroom and made built in bunk beds, I am positive if I had seen this earlier I may have been a big copy cat and created my boys with cabin beds. This is beyond adorable! From one DIY blogger to another, those plans you made are amazing!

    Reply
    • Jen says

      January 13, 2016 at 4:04 pm

      Thanks Emily! Ana drew up the plans, I built the bed. We’re pretty excited about it.

      Reply
  3. S M says

    January 13, 2016 at 12:43 pm

    Awesome – I was going to build one of these myself based on some photos of the RH bed I saw, and you just did most of the heavy lifting for me! I was going to use a used bunk bed frame and simply add panels and modify, but this looks like just a bit more work to get done, and a better solution.

    I really like that finish, so let us know how you managed to get that grey distressed look before too long!

    Reply
    • Jen says

      January 13, 2016 at 4:03 pm

      Yay! Looking forward to seeing your version!

      Reply
      • Lauren says

        December 31, 2016 at 10:23 pm

        Can I ask what size mattress you used? These plans do not fit a twin mattress.

        Reply
        • Jen says

          January 1, 2017 at 9:32 am

          Hi Lauren,
          Yes, we used a twin mattress. It is quite snug, but the mattress does fit. If I were to build it again, I would widen the bed a couple inches. Hope that helps!

          Reply
          • Stacey says

            January 4, 2018 at 6:36 pm

            Just bought all of the wood to build this. So excited to get started. When you say if you were to build it again you would widen it by a few inches, would you say another 2 inches wide and another 2 inches in length or would you go even wider?

          • Jen says

            January 7, 2018 at 4:10 pm

            Yay, so exciting, Stacey! I’d add a couple inches on each side to make it a bit wider. The length is fine as is. Good luck and happy building!

  4. Toni | SmallHomeSoul.com says

    January 13, 2016 at 1:12 pm

    I love love love this! If I had small kids at home I would make this for them. It could easily be modified for a girl with some window flower boxes or pretty curtains. You are crazy talented. And I loved the periscope reveal to your son 🙂

    Reply
    • Jen says

      January 13, 2016 at 4:03 pm

      Thanks! Oooh… flower boxes would look so adorable on this bed!

      Reply
  5. Annet M says

    January 13, 2016 at 8:14 pm

    I love the phrase “ambiguously Asian”. Haha.
    Love the bed, though not quite my cup of tea, but love the solution for those threaded inserts. I’ll definitely be keeping those in mind for future builds and I’ll be eager to here if it all holds up well.

    Reply
  6. Alison says

    January 20, 2016 at 12:37 pm

    I think this is awesome. My only question is “isn’t it hard to make the bed up and change sheets with it being against a wall and having the cabin walls to maneuver around?”

    Reply
    • Vanja says

      February 16, 2016 at 8:56 pm

      This is what I was wondering as well. How would you change the sheets?

      Reply
  7. Holly says

    January 30, 2016 at 9:38 pm

    This is so great. I’m so excited. Just emailed this to my husband. Maybe I am missing it, but what paint colours did you use? Is it a stain? How long did it take to paint? And how long did it take to build? Thank you for posting this!

    Reply
  8. ERin says

    February 2, 2016 at 8:24 am

    Hi Jen! LOVE these plans! I’m planning on building this for my little guy who is also insanely good looking so we have that in common. However, his room will be beached theme so I am going to change up the esthetic a bit. I’m wondering, how did you calculate the angles for your roof cuts? I need my roof slats to be a bit longer as I plan to attach a thatch roof and the thatch available is 30″ long. Would appreciate any help you could give as to how I might go about this modification. Thanks for posting these amazing plans and thanks to ana too, I’m a huge fan of hers as well.

    Reply
    • Jen says

      February 2, 2016 at 10:41 am

      Hi Erin,

      Yes, you can just make the rafters longer but this would end up with a 6″ overhang on the ends of the roof – it may be a problem if you want the bed against the wall on the back. We can modify the Sketchup plan to a steeper angle to accommodate the 30″ roof if you don’t want the added overhang.

      Reply
      • ERin says

        February 23, 2016 at 3:07 pm

        Hi Jen,

        The thatch roof came today and they recommend a longer overhang. I’m thinking with the flexibility of the thatch material I may still be ok on pushing up against the wall. Going to try tackling this project this weekend. I’ll let you know how it goes!

        Thanks so much!
        Erin

        Reply
  9. Allison says

    February 6, 2016 at 11:52 am

    This may have already been answered but what size mattress are you using in this cute bed?

    Reply
    • Jen says

      February 6, 2016 at 8:40 pm

      Thanks Allison. It’s a twin size!

      Reply
  10. Tyson says

    February 12, 2016 at 8:32 am

    Any update on when you’ll share the stain/finishing techniques used?

    Thanks!

    Reply
    • Sam says

      February 12, 2016 at 11:34 am

      So I built mine, and started staining it this past weekend. For the roof panels, the I used Varathane Carbon Grey – came very close to the final product here. For the panels, I mixed some Minwax classic grey and Varathane Antique White 50/50 and came pretty close, maybe a little darker grey than her final product, so I may do a quick coat of the white again to lighten it up and attempt to get more variations in the colors.

      Also – if you build this, a few of the quantities on the cut list were off, so pay attention to that, otherwise it was spot on.

      Reply
      • Karen says

        February 14, 2016 at 9:26 pm

        I’m in the process of building this. I too noticed that a few quantities were a little off. Since you have already run through the plans, would you be able to tell me if you found the “steps for additional cutting instruction” for the 4-2×4 @10″ long under the side panel cut list. I can’t seem to find any additional cutting instruction for those. I am assuming they are the decorative rafters inside the side headers but those measurements on that image don’t seem like it would match the 10″ cuts, even with the angles. Any help would be appreciated.

        Reply
        • Sam says

          February 15, 2016 at 10:11 am

          Yes – those are the angled pieces in the top portion of each end. I cut to 10″ to get the 4 pieces, then set my angles and re-cut to the exact dimensions outlined in the drawings/photos.

          Reply
          • Karen says

            February 15, 2016 at 4:35 pm

            Perfect. Thanks so much for your help!

    • Jen says

      December 19, 2016 at 10:21 am

      Hi Tyson,
      The stain/finishing tutorial is here: http://jenwoodhouse.com/cabin-bed-finishing-tutorial/

      Reply
  11. Noel says

    March 6, 2016 at 8:13 am

    Jen,

    Love the bed. I’m almost finished making this for my son, but what twin mattress did you use? All the mattresses I see are 39″ wide and the bed slats are only 38″. Is it a very tight fit with no room around it? Thanks.

    Reply
    • Karen says

      March 6, 2016 at 10:37 pm

      I finished this a week or so ago and didn’t bother measuring our twin mattress ahead of time. Ours is an extremely tight fit, especially in the corners. I can still make his bed, but it would have been much easier if there was an extra inch on each side to allow space for bedding and a less snug fit of the mattress. It works, and still looks nice, but It’s a very tight fit.

      Reply
      • Jen says

        March 7, 2016 at 9:22 am

        I’ll pass on that info onto Ana so she can modify the building plans if she chooses to. Thanks Karen!

        Reply
        • Adam says

          July 12, 2016 at 3:03 pm

          I haven’t seen this answered yet and like Noel, i’m confused how a standard 39×75 twin bed would fit in this.

          Can you post the sketchup plans? I’d be happy to edit and send back to you

          Reply
          • Jen says

            July 12, 2016 at 3:31 pm

            Sorry, Adam, I don’t have the Sketchup files – Ana, who wrote the plans may be willing to share. There’s a link to her plans in the post. Best of luck on your build!

  12. CR says

    March 19, 2016 at 9:47 am

    We LOVE this bed and are so excited to build it! Do you happen to know the dimensions to adapt it for a full-sized bed?
    Thanks!

    Reply
    • Jen says

      March 19, 2016 at 9:59 am

      No, I built the twin-size. Sorry!

      Reply
      • Nick says

        September 19, 2016 at 12:30 pm

        My sons twin mattress is 38×75. Im in the process of building the cabin, but the inside seems like it wont fit. Am I missing something?

        Reply
  13. Liz says

    April 2, 2016 at 2:39 pm

    Hi Jen!! My husband is going to build this bed for our son and we were wondering what colors paint or stain you used? Thanks!!

    Reply
  14. Liz says

    April 3, 2016 at 3:49 pm

    Are you planning on posting a list of the stain and/or paint you used? We are getting ready to build this bed for our son and we love the colors you used!

    Reply
    • Jen says

      April 4, 2016 at 8:03 am

      Hi Liz!
      The stain/finishing tutorial is here: http://jenwoodhouse.com/cabin-bed-finishing-tutorial/

      Reply
  15. Martina says

    April 4, 2016 at 5:57 pm

    Absolutely love this project and can’t wait to build for my twins. Loved the RH version but couldn’t afford. This is exactly the same cabin. I know it’s a lot to ask but any chance you have the plans for a full size bed?

    Reply
    • Jen says

      April 4, 2016 at 6:09 pm

      No, sorry. I built the twin-size.

      Reply
  16. Roberta says

    May 7, 2016 at 10:29 pm

    What a cute bed! I am sharing this on Pinterest.

    Reply
  17. EB says

    July 27, 2016 at 9:36 pm

    Hi! is it difficult to change the sheets? awesome post and great job!!!!!

    Reply
    • Jen says

      July 28, 2016 at 9:38 am

      Thanks EB! It’s definitely more challenging to change the sheets than a standard bed, but because the sides are open, it makes it more accessible. If I were to build again, I’d make the sides a little wider so the mattress isn’t so snug in there. I don’t imagine it’s any more difficult than changing sheets on a bunk bed.

      Reply
      • EB says

        July 28, 2016 at 10:04 am

        Thanks! and good tip to make it wider 😉

        Reply
  18. Joanna says

    September 16, 2016 at 9:01 pm

    Like everyone else, I loved this bed as soon as I saw it and am dying ti make it. What I really REALLY appreciate though is the link to the hex bolt inserts!! I am currently working on a bed for me and need that ability to disassemble easily. This completely saved me. Thank you!

    Reply
  19. Enrique R. Franco says

    September 20, 2016 at 9:00 am

    Hello dear, I’ll appreciate if you send design plans in PDF format.

    Reply
    • Jen says

      September 20, 2016 at 10:16 am

      Hi Enrique,
      You can download the PDF plans here: http://www.ana-white.com/2016/01/free_plans/cabin-bed-jen-woodhouse

      Reply
  20. Hylco Broos says

    October 29, 2016 at 2:59 am

    Dear Jen (and offcourse Ana),

    Thank you for the amazing building-plan for this amazing Cabin bed!
    I am currently converting all the dimensions to meters (taking the dimensions of my sons matras in consideration) so I can start making this bed for his third birthday.

    My hands are itching to begin this project, thank you once again.

    Reply
  21. Beth says

    November 19, 2016 at 8:37 am

    This is incredible!! Well done, Jen! I love, love, love this bed!

    Reply
  22. Dianne says

    December 7, 2016 at 1:26 pm

    What a great bed! Do you remember what length the 5/16″ hex bolts you used were? Thanks!

    Reply
    • Jen says

      December 7, 2016 at 2:50 pm

      Thanks Dianne! I can’t remember what length the hex bolts were, but they need to be long enough to go through two 2×4 boards, but not go all the way through… so I think 2-1/2″ long. Hope that helps!

      Reply
  23. Katie says

    December 19, 2016 at 9:30 am

    Hi Jen! I loved the bed and am almost finished building for my little guy for Christmas! We’re going to be moving in about 6 months so I wanted to use the hex bolts and inserts soI can disassemble when the time comes. I bought the inserts and driver tool, but I wasn’t sure what length of hex bolts to buy. What was the length that you used? Thanks in advance!!

    Reply
    • Jen says

      December 19, 2016 at 10:24 am

      Hi Katie,

      I think I used 2-1/2″ hex bolts. They need to be long enough to join two 2x4s together, without going all the way through. Hope that helps!

      Reply
      • Katie says

        December 20, 2016 at 11:13 am

        You’re amazing! Thank you soooooo much!!!!

        Reply
  24. Matt O'Nuallain says

    January 3, 2017 at 11:11 am

    Maybe a stupid question but what kind of lumber did you use? Common board, select pine, poplar? Thanks

    Reply
    • Jen says

      January 3, 2017 at 12:31 pm

      Hi Matt,
      It depends on the project, really. I use all kinds of stock, from framing lumber to exotic hardwoods. For this particular project (cabin bed), I used hardwood plywood, framing lumber, and common 1/ boards.

      Reply
  25. Ashleigh says

    February 22, 2017 at 9:33 am

    Can anyone tell me how long this took them? Also, if anybody knows of where I could get full bed plans. I would be willing to pay for them. Thanks.

    Reply
  26. Johnny K says

    March 26, 2017 at 12:48 am

    I want to commend you ladies for an excellent project. I have some criticisms that I don’t want you to take to heart, so here it goes:

    Just so that you know I am not talking out of my rear, I have a profession architecture degree, with 32 years experience in residential construction.

    Details, details, details….not enough. The drawings need specifications for everything, including the locations of every screw, drilled holes, how to make every connection, etc. The bolt connections are smart including the threaded inserts, but trial and error is the correct approach for your followers.

    What isn’t detailed in the drawings, needs clarification with photographs including over all and close up.

    Also, since most people don’t own or have access to a wood shop, additional tips and tricks should be included as to how to check angles, ensure the drilled holes line up, and cutting multiple pieces of the same length with some sort of jig or other method (I personally used a clamp and the master cut and made sure all pieces were the same size).

    The material list is off, the 2×4’s are short by 3 bringing the total to 20. There are too many 2×2’s. What everyone should do is first measure their mattress, then adjust the width of the bed to accommodate accordingly.

    It’s an excellent project, but I think you can take it further since the time needed including material costs is not a weekend excursion. Keep up the good work.

    Reply
    • Jen says

      March 26, 2017 at 9:58 am

      Thank you for the kind words and for taking the time to provide us with your professional insight, Johnny. The plans that I sell are much more detailed and most do provide screw location, etc.

      Generally speaking, my website is for entertainment purposes only – I am not a trained professional like yourself. I am simply a stay-at-home mom figuring things out on my own and sharing what I’ve learned, in hopes to inspire other folks like me to start building. Part of our journey is problem-solving and learning, which most of my readers enjoy and find rewarding.

      I am usually available to answer any questions along the way, but again, with the free plans, my time is limited. I do, however, provide 24-hour support to those who purchase my plans. While I understand where you’re coming from, this is a one-woman show and I do the best I can with what is available to me. Thanks again!

      Reply
      • John says

        March 27, 2017 at 11:56 am

        HI Jen,
        Awesome plan, the one quesion I have is how did you secure the roof panels to the bed. Also I’m thinking I should make the project a couple inches wider to make it easier to fit the twin mattress, if i choose to do that, will the side panels also have to be widened to accomodate the change?

        Reply
      • Katherine says

        September 27, 2017 at 5:59 pm

        Hi Jen,
        Does this mean that you have more detailed plans of this particular build for sale that I could purchase? My hubby and I are planning to build this bed for our son’s 3rd birthday! 🙂

        Reply
  27. Dick Davidson says

    April 17, 2017 at 4:23 pm

    Did those of you who have built this bed use a box spring or just a twin mattress?

    Reply
  28. Katie says

    June 27, 2017 at 4:26 pm

    Hi. I’m looking at building this for my son but we will be PCSing in less than a year. Can you tell me how well it held up through your last move? Also any advice for improvement with PCSing in mind? Thanks from a fellow army wife!

    Reply
    • Jen says

      June 28, 2017 at 9:00 am

      Hi Katie,
      Our cabin bed held up great for our move! The threaded inserts were awesome – I definitely recommend going this route when you build so the bed disassembles/assembles easily.

      Reply
  29. David says

    August 1, 2017 at 9:26 am

    Would you offer the sketchup file (.skp) through email? I would love to see it in Sketchup!

    Reply
    • Jen says

      August 1, 2017 at 9:38 am

      Unfortunately, I don’t have the sketchup file. Ana created the plans for this project.

      Reply
  30. Crystal says

    October 2, 2017 at 1:47 pm

    I love Ana White’s plans as well and used one to make my girls a castle bunk bed. That they adore. This bed is super adorable and you did a great job!

    Reply
  31. Ruthdiana says

    October 15, 2017 at 6:52 am

    Jen, this is an awesome idea and looks great! I’ve never done a cabin bed before, but looking at yours makes me want to try one. Love it!

    Reply
  32. Cherie says

    November 19, 2017 at 10:53 am

    Would you be able to tell me the color of the walls in the bedroom?

    Reply
  33. Craig says

    November 30, 2017 at 8:06 pm

    Do you have the plans for the stairs?

    Reply
  34. Niki etchison says

    December 26, 2017 at 9:36 am

    I am interested in building this bed but for a toddler size mattress, do you sell plans to accommodate a toddler mattress?

    Reply
  35. Jordyn says

    April 15, 2018 at 4:10 pm

    Hey! Do you have a materials list I can’t seem to find or see it?! Also did you use a box spring?

    Reply
    • Jen says

      April 15, 2018 at 6:31 pm

      Hi Jordyn,
      The materials list is included in the plans. No, I did not use a box spring. 🙂

      Reply

Trackbacks

  1. DIY PureBond Cabin Bed says:
    January 14, 2016 at 7:37 pm

    […] instructions complete with a comprehensive video (see it below)….the total package Click here to see it all for […]

    Reply
  2. DIY Kids Cabin Bed | City Mom Crafts says:
    January 21, 2016 at 7:13 pm

    […] can head over to Jen’s site to see more pictures and hear about how she did this adorable cabin bed […]

    Reply
  3. Free Plans: DIY Rustic Nightstand says:
    January 22, 2016 at 9:10 am

    […] you guys so much for the love and excitement over my son’s new cabin bed! We’re pretty excited about it. There were a few questions and comments regarding how […]

    Reply
  4. DIY Kids Cabin Bed – City Mom Crafts says:
    January 22, 2016 at 11:22 am

    […] can head over to Jen’s site to see more pictures and hear about how she did this adorable cabin bed […]

    Reply
  5. DIY Cabin Bed - Bob Vila says:
    February 24, 2016 at 9:01 am

    […] Jen from the House of Wood was inspired to build a bed of epically adorable proportions for her small son, which led her to team up with fellow blogger pal, Ana White, to create the plans to bring her inspiration into action. Keep reading to see how she put together this cabin bed that is truly what kids’ dreams are made of. […]

    Reply
  6. Sunday Shoutouts! - A girl and a glue gun says:
    March 6, 2016 at 7:09 am

    […] I want this Cabin bed!!! […]

    Reply
  7. Spring 2016 Home Tour - The House of Wood says:
    March 25, 2016 at 8:00 pm

    […] 3-year-old son’s room. His bed is also a DIY project. The tutorial for his DIY cabin bed is here. I teamed up with my good friend Ana White on this project. I would have loved to have a cabin bed […]

    Reply
  8. Restoration Hardware Inspired Playhouse says:
    March 30, 2016 at 3:20 am

    […] because just as I was about to wrap up the basic design Jen at The House of Wood published her plans for the bed version. Her tutorial does a lovely job showing how you can build the plans so that […]

    Reply
  9. Rustic Cabin Kids Bed says:
    April 11, 2016 at 7:00 pm

    […] Jen from The House of Wood recently built her three-year-old “The Most Epic Bed Ever,” and let me tell you, it’s pretty spectacular! Jen teamed up with Ana White on this cabin bed and they even made a short video showing how easily the bed comes together to take the intimidation out of the build. The project came in at $350, which is a far cry from paying almost three grand at RH Baby & Child! […]

    Reply
  10. DIY Cabin Bed Finishing Tutorial - The House of Wood says:
    April 14, 2016 at 5:01 am

    […] asking and I’m happy to finally share how I stained, painted, and finished my son’s DIY cabin bed! I teamed up with the friendly folks at Rust-Oleum to bring you this finishing tutorial. Are you […]

    Reply
  11. Restoration Hardware Cabin Inspired Playhouse - The Created Home says:
    April 26, 2016 at 3:43 am

    […] because just as I was about to wrap up the basic design Jen at The House of Wood published her plans for the bed version. Her tutorial does a lovely job showing how you can build the plans so that […]

    Reply
  12. Restoration Hardware Cabin Inspired Playhouse - The Created Home says:
    April 26, 2016 at 3:43 am

    […] because just as I was about to wrap up the basic design Jen at The House of Wood published her plans for the bed version. Her tutorial does a lovely job showing how you can build the plans so that […]

    Reply
  13. 25 DIY Playhouses says:
    June 2, 2016 at 6:42 am

    […] in… and it is also a great way to prevent them from falling out of bed at night! Head over to The House of Wood to find out how to make your own version of this fun […]

    Reply
  14. DIY Cabin Bed Your Kids Are Going To Love » iSeeiDoiMake says:
    July 14, 2016 at 7:32 am

    […] DIY Cabin Bed Your Kids Are Going To Love […]

    Reply
  15. Our Cabin Themed Playroom - The Created Home says:
    August 8, 2016 at 2:46 am

    […] great news for me and for you, because they are so incredible at creating plans. Here is a link. If you are interested in making it a playhouse you will need to make some modifications. I am […]

    Reply
  16. | BHG Style Spotters says:
    August 29, 2016 at 7:00 am

    […] Here’s another take on the house bed, only this one is a cabin bed! This is kind of a nice mix of the bed nook and the house bed above. It is super cute and cozy without being too closed off or enormous. [photo and plans from Jen Woodhouse] […]

    Reply
  17. Jude's Big Boy Room | Ellie And Addie says:
    August 30, 2016 at 4:46 pm

    […] here. You guys, I just cannot get over how much I love this bed. BTR took the plans from Jen Woodhouse and modified them ever so slightly to work for us. And it came out absolutely perfect. And if you […]

    Reply
  18. Joshua’s Bedroom Makeover – The Building Nest says:
    September 7, 2016 at 9:41 pm

    […] bed – I built that cabin bed for Joshua for his birthday. I found a great building plan from Jen Woodhouse. Check out the plan […]

    Reply
  19. These Cool Kids Rooms Are So Amazing, You'll Want Them for Yourself - The Cuteness says:
    October 17, 2016 at 1:02 am

    […] source […]

    Reply
  20. Top 20 DIY Projects of 2016 says:
    December 31, 2016 at 7:01 am

    […] 1. DIY Cabin Bed The year started off with a bang when I teamed up with Ana White and Purebond Plywood to build my son’s cabin bed. This build got a lot of attention – it won Best Kids Project at BobVila.com and was featured in countless online publications, but best of all, so many of you built this cabin bed for your own homes! I just love that! One of my favorite projects, by far. […]

    Reply
  21. Top 10 Nursery Trends Predictions 2017 | Nestling Collective says:
    January 2, 2017 at 5:05 pm

    […] Photo source: Jen Wood House […]

    Reply
  22. Yes!!!! I've been waiting for plans for ages!!! Weston will love this ...in ... - Woodwork Cafe says:
    January 15, 2017 at 3:20 pm

    […] Source […]

    Reply
  23. Children's Cabin Bed - Our Country Designs says:
    February 3, 2018 at 6:58 pm

    […] got the original idea from The House of Wood. You can find the DIY Plans here. The plans are easy to follow and the design is relatively […]

    Reply

Leave a Reply Cancel reply

Your email address will not be published. Required fields are marked *

Primary Sidebar

Welcome

WANT FREE PLANS SENT STRAIGHT TO YOUR INBOX?

Footer

WANT FREE PLANS SENT TO YOUR INBOX?

  • Facebook
  • Instagram
  • Pinterest
  • RSS
  • Twitter
  • YouTube
  • About
  • FAQs
  • Disclosure
  • Sponsor / Advertise
  • Contact
© 2007-2018 · Jen Woodhouse · Log in