Being a mom of young children will drive anyone to drink. Sometimes I wish I did because it certainly would take the edge off. Every day, I don’t know why I am still so surprised by the things that come out of my mouth:
“No, Liam. We don’t eat lint.”
“Evie, please don’t bedazzle the dog.”
“No, you may not have cupcakes for breakfast.”
Ah, motherhood. It is, bar none, the toughest job in the history of ever. Sadly, I’m allergic to alcohol. This is a self-diagnosis only because the last time I tried drinking alcohol, I went blind. Literally. BLIND. And I had ONE DRINK. And it was some fruity drink. I remember walking around in the bar, trying desperately to find the restroom, and all I could see were people’s shoes and black fuzzy clouds everywhere. True story. So, from then on, I haven’t touched the stuff. But I hear it does wonderful things, like trick you into seeing your children as the perfect angels they are.
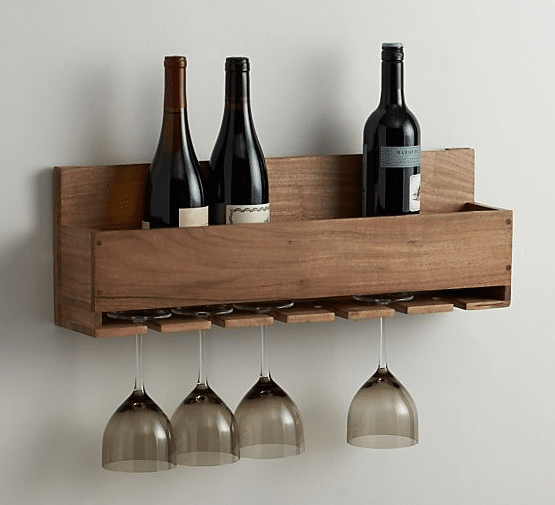
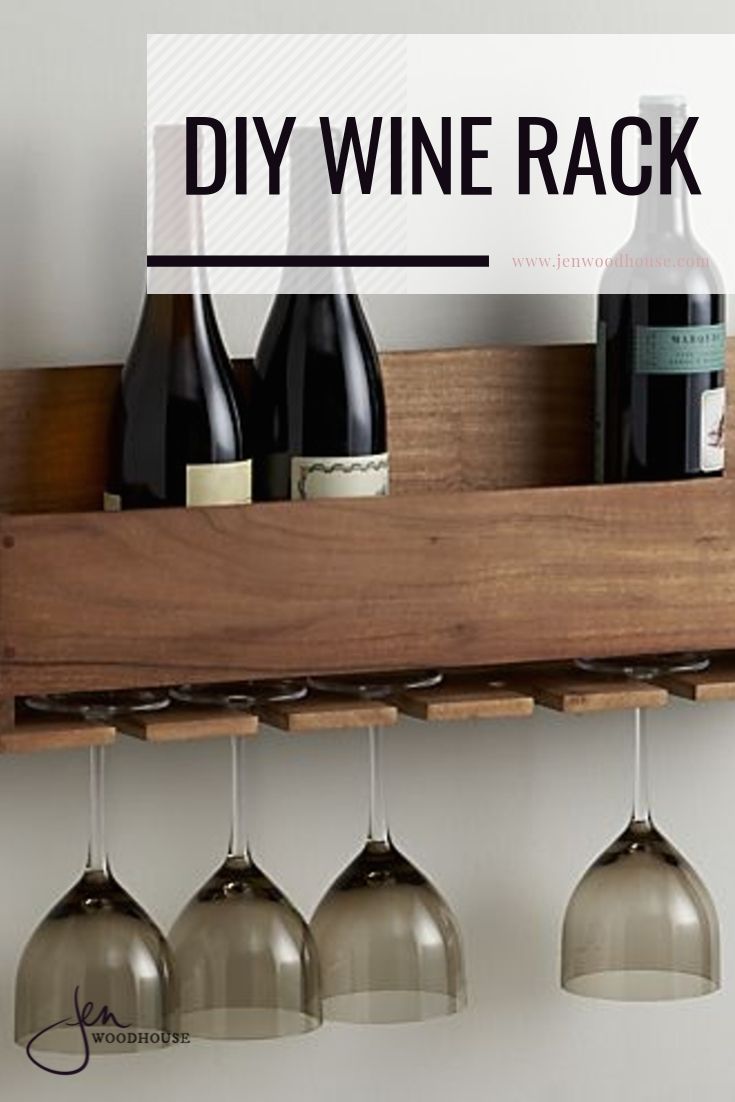
But don’t let my inability to drink deter you from building this sweet little wine rack I spied from Crate and Barrel:
I just had to draw up the plans for it right away! I have a ton of scrap wood in the garage that is in desperate need of some use and this project would be the perfect candidate for just that. As soon as it warms up, that is. We’re still digging ourselves out from under 12″ of snow. Yeah. I’m so ready for Spring, aren’t you? Mostly because that means I can send the children out into the sunshine and not worry about googling “how to treat frostbite.”
But until then, I’m happy to share the plans on how to build this wine rack with you today!
*This post contains affiliate links. To read my full disclosure policy, click here.
Download the PDF plans for this wine rack here.
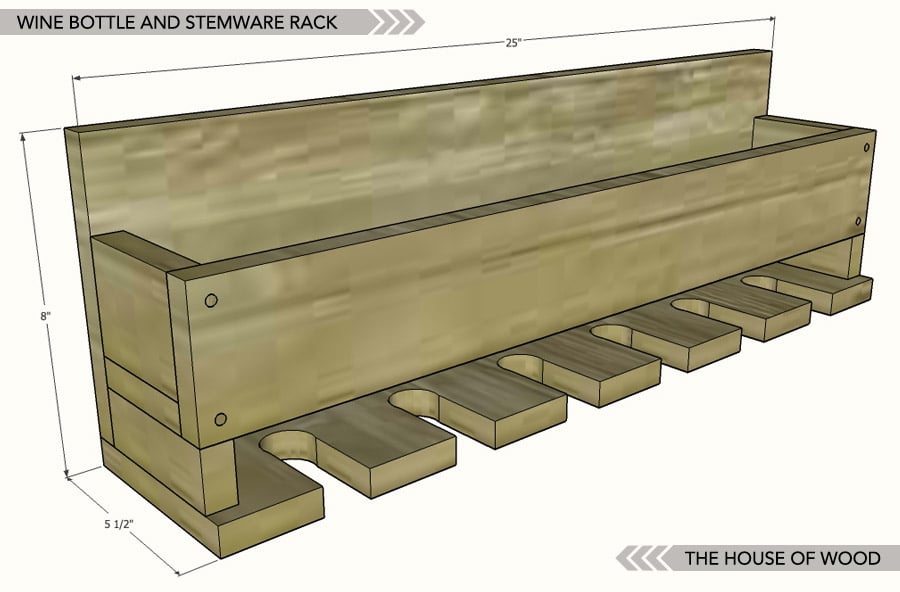
- 25″ of 1×6
- 25″ of 1×8
- 9″ of 1×2
- 1 – 1x4x6′
- 1-1/4″ Pocket Hole Screws
- 1-1/4″ Wood Screws
- 1-1/4″ Brad Nails
- Wood Glue
- Hanging Hardware
Cut List:
- 1 – 1×6 @ 25″ (stemware hanger)
- 1 – 1×8 @ 25″ (back)
- 2 – 1×2 @ 4-1/4″ (sides)
- 2 – 1×4 @ 25″ (ledge and front)
- 2 – 1×4 @ 2-3/4″ (sides)
Tools:
- Tape Measure
- Pencil
- Speed Square
- Drill with Countersink Drill Bit
- Circular Saw
- Kreg Jig
- Jigsaw
- Brad Nailer or Hammer
- Safety Glasses
- Hearing Protection
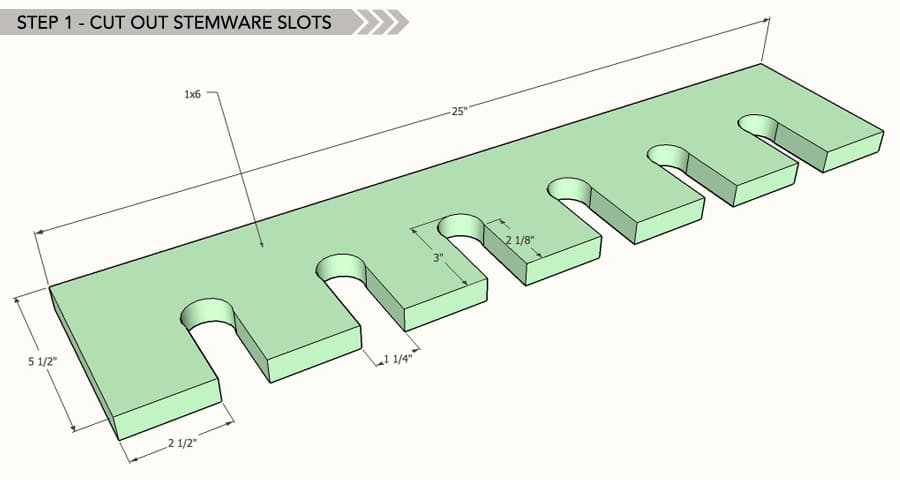
Step 1
Using a jigsaw, cut out the stemware slots as shown:
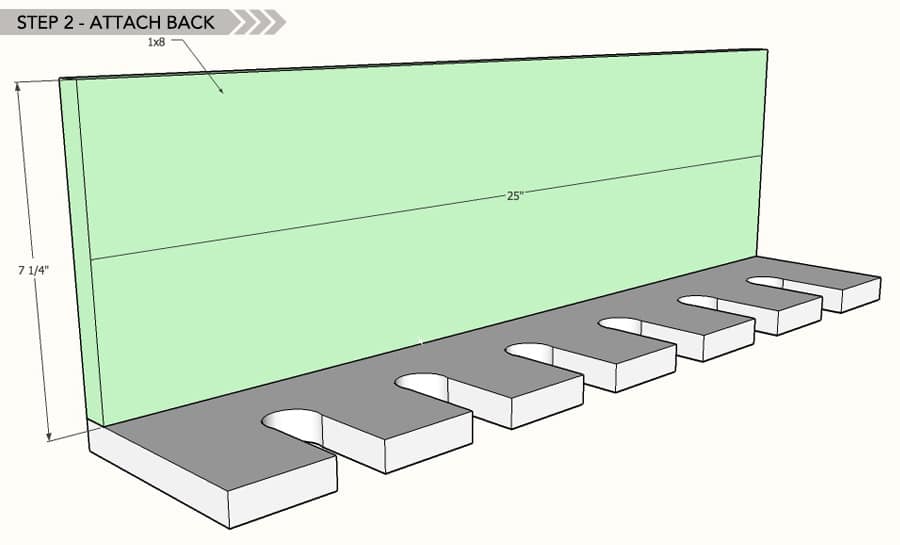
Drill 3/4″ pocket holes into the back board facing down and use 1-1/4″ pocket hole screws to attach it to the stemware rack. Alternately, you can use 1-1/4″ brad nails and wood glue to build this wine rack. However, I prefer to use screws over nails, whenever possible, just to assure strength and durability over time. The last thing you want is half a dozen bottles of wine crashing to the floor. Oh, the horror. That would be blasphemous.
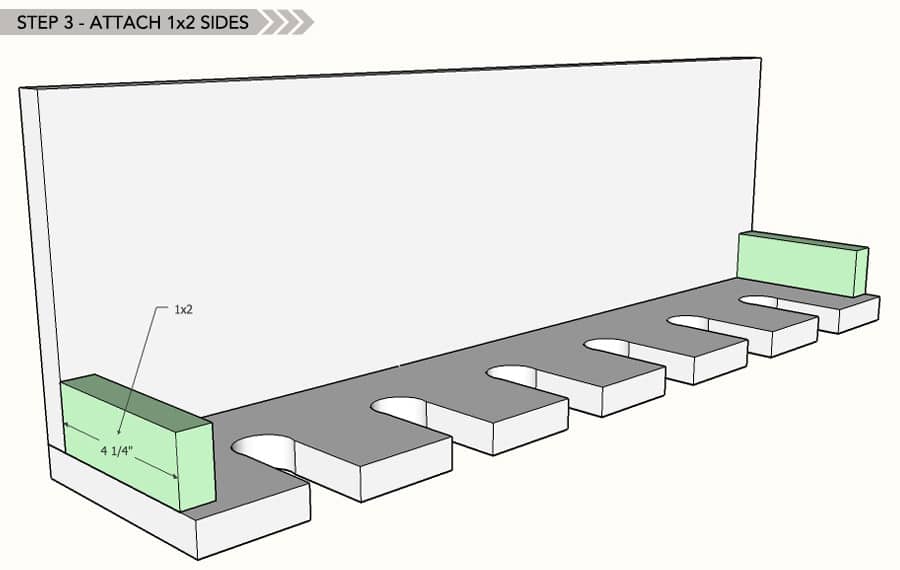
Attach the 1×2 side pieces with 3/4″ pocket holes and 1-1/4″ pocket hole screws. Attach the 1×2 to the stemware rack with 1-1/4″ brad nails nailed from underneath.
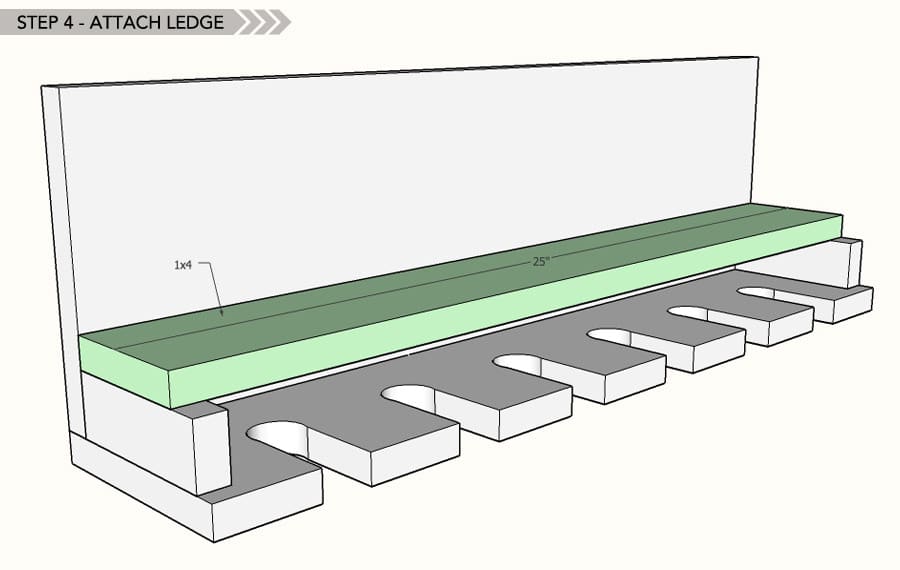
Drill 3/4″ pocket holes into the 1×4 ledge and attach it to the back with 1-1/4″ pocket hole screws. You can also nail in 1-1/4″ brad nails on top to attach the ledge to the 1×2 sides.
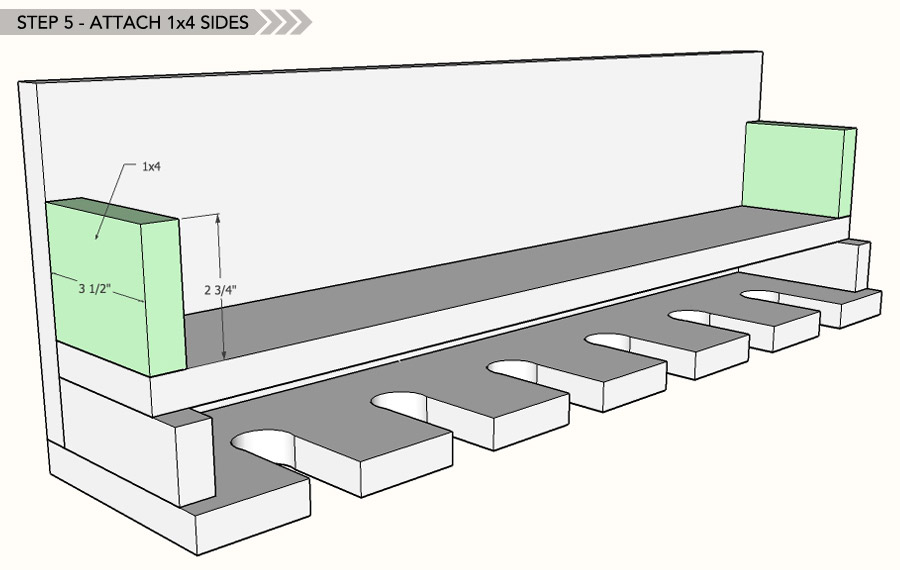
Drill 3/4″ pocket holes into the 1×4 sides and attach it to the back with 1-1/4″ pocket hole screws. Use glue on the joint where it meets the ledge.
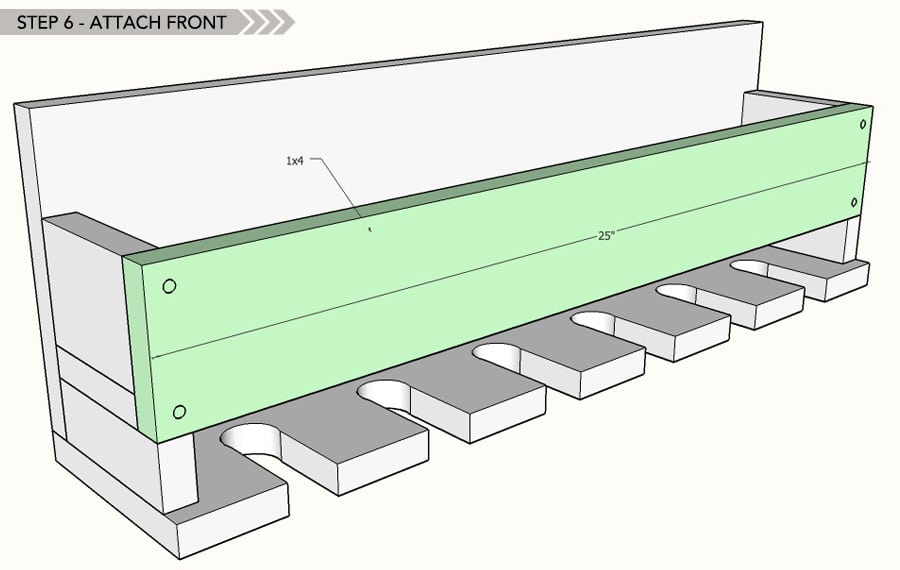
Pre-drill countersunk pilot holes into the front board and attach with 1-1/4″ wood screws. Fill the holes with wood putty or wood plugs.



You should really make the sketchup files available too.
What color stain did you use on this? I love it!
I haven’t built this myself yet. The C&B photo says it’s acacia wood. It looks like they just left it natural.
Poplar is a good choice for staining. There is a cool stain technique out there my wife had used. You take steel wool place it in a mason jar along with vinegar. But the steel wool rust for a while until you notice a nice deep rusty brown color. Looks great on poplar. I do suggest using a pre stain since there’s large variation in poplar from yellows and greens to purples in the wood. You can multiple coats of the homemade stain. if you’d like I can send you a picture of some of the projects we have completed with this vinegar steel wool stain
Love the plans! I’m just a bit confused about the size of the wood for the stemware hanger and ledge. Are they both supposed to be 1x4s? The width of the hanger seems to be larger than the ledge. Also, 1x4s are not usually 4.25″.
Great catch, Monique! The ledge is a 1×4 and the stemware board is a 1×6. The plans have been revised. Thanks for catching that – good eye!
Update: I just built this yesterday according to my revised plans and everything checks out. Happy building! Let me know if you have any other questions.
The wine rack looks great. Perfect for quick use wine. It would be cool to see one made for a larger wine storage maybe two or more rows where the bottles would be upside down or on their side keep the cork wet for longer term storage.
Hi. How do you secure this to the wall? If giving as a gift are they supposed to drill their own holes 16″OC?
I recommend attaching D-ring hangers to the back for hanging.
Hello! I’m curious what type of hangers you used on the back to affix this to the wall. Since it’s carrying a decent amount of weight I’m curious!
Can you post the sketchup file for this please?
I built this one, and finishing it using french cleats to hang it for my friends who ordered from me…
What type wood did you use? How much would your charge to make?
Can you show me how you attach french cleats please? x
I love these plans but was wondering if you have them in pdf format please? Also wether you would be ok with me sharing it on my wood working group?
This is a great tutorial! I’m going to make one for my kitchen.
This is great! I’m going to adjust it a little and make one for my kitchen cubby.
I absolutely love this DIY wine rack idea! The design is both stylish and functional, and I can’t wait to try making one for my home. Thanks for sharing such clear instructions and inspiration!