*This post is brought to you by The Home Depot.
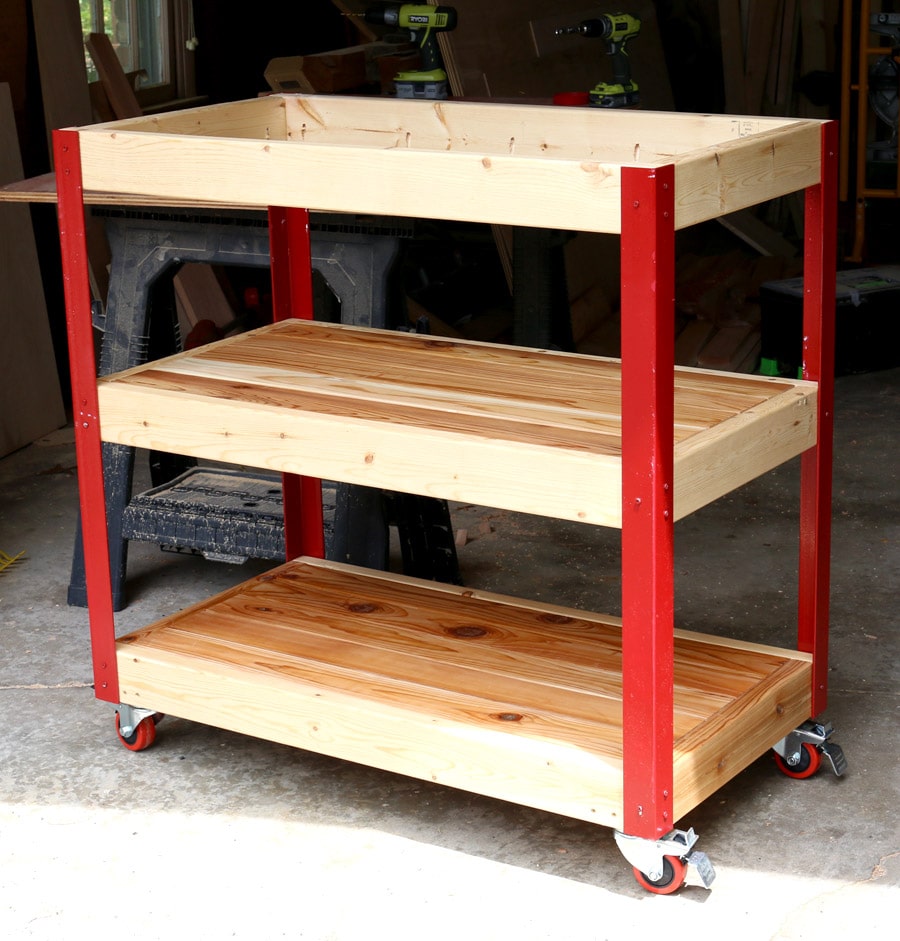
Hi friends! I’m super excited to share my latest project with y’all! And what perfect timing, right? Father’s Day is quickly approaching. Wouldn’t this rolling grill cart make the perfect gift for your favorite Grill Master?

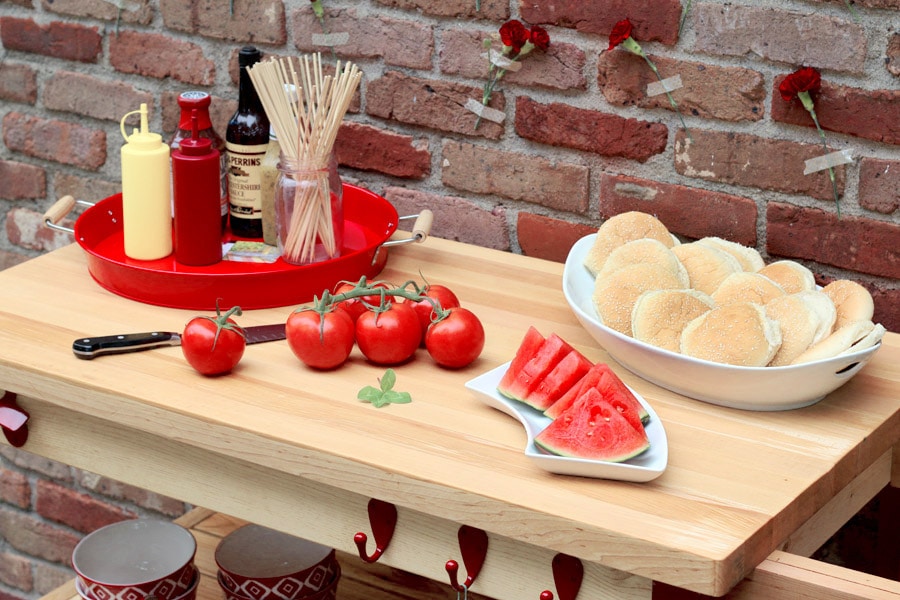
My dad is a USC grad (and rabid fan), so I had no choice but to paint the metal pieces Trojan red! I built this cart out of metal, cedar, and reclaimed butcher block. You guys. I had no idea that butcher block was so stupid expensive! But I totally lucked out on this one – I snagged this butcher block from my neighbor’s garage (he gave me permission – relax), who rescued it from a local bakery that was shutting down. Isn’t it beautiful? It was an enormous countertop that they used to bake bread on. Well, not bake, but you know what I mean… cut, slice, knead, pound, hammer… what? I’m a builder, not a baker. Whatevs.
The butcher block was so thick and massive, that I cut out the piece I needed, then had to cut that piece in half to fit it into the planer. We had to send it through a planer quite a few times because the wood was bowed, dirty, and gross from sitting in a garage for ages. And it’s still this thick even after planing the crap out of it. When we were cutting and planing it, the wood smelled like bread. Isn’t that amazing?
Seriously. Look at this thing. Ugh, so beautiful, I can’t even deal. Butcher block is my new favorite building material. I want to butcher block ALL THE THINGS!
(Did she just use ‘butcher block’ as a verb? Yep. I did. Boom.)
 So what are y’all doing this weekend? Wanna build a grill cart with me? I’ll be co-hosting the DIY Workshop at The Home Depot, teaching folks how to build a rolling grill cart this Saturday in Birmingham, Alabama! I am so excited to meet you guys. So come on out, bring your friends, and let’s build together!
Here are the workshop deets:
Where: The Home Depot Store #881
3670 Galleria Circle
Birmingham, Alabama
When: Saturday, June 20th
Time: 10:00 a.m. to 11:30 a.m.
Cost: Free!
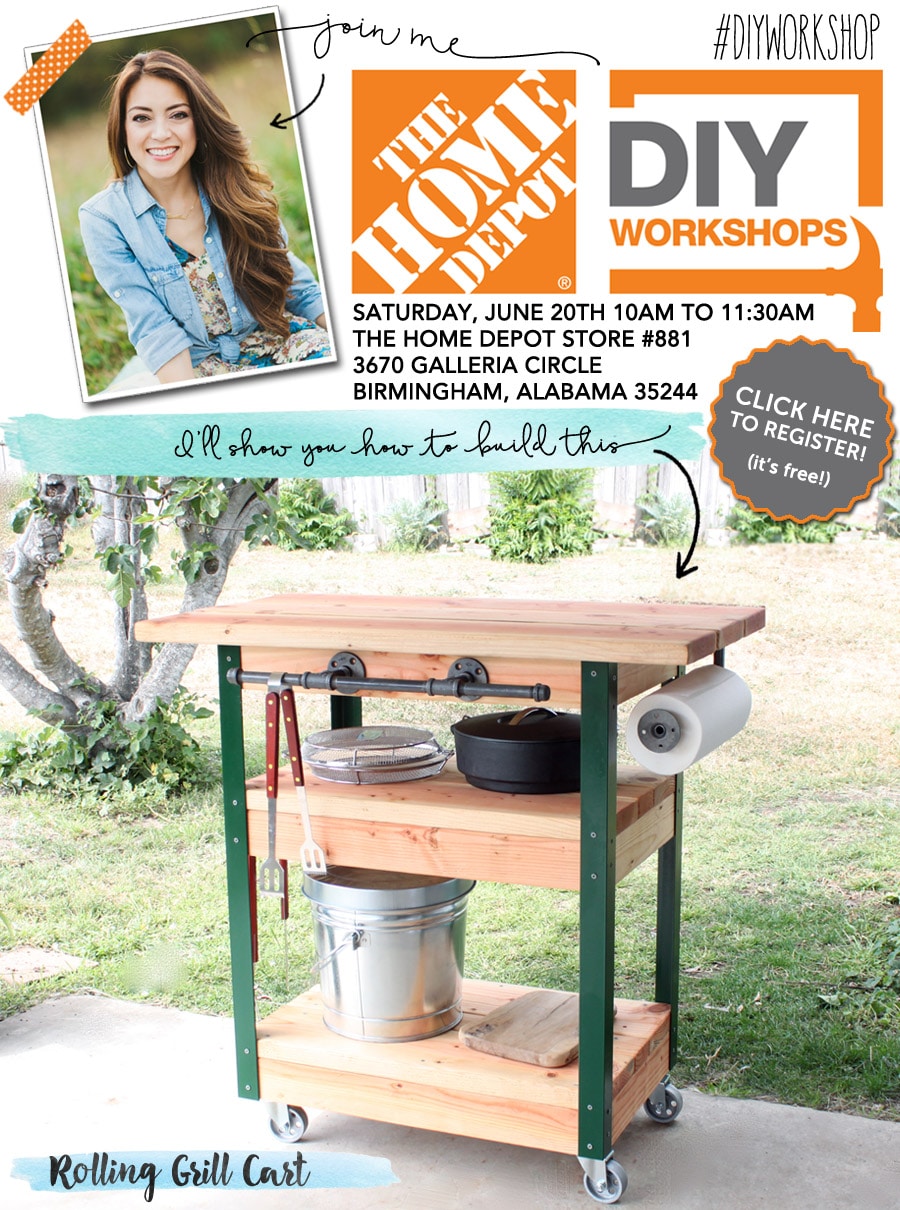 If you’re not in the Birmingham area, don’t worry – you can click here and enter your zip code to see if your local store will be hosting this workshop. But wait… there’s more! A few of my blogging buddies will be hosting all over the country:
- Jaime – That’s My Letter – Store #1286 – 4405 Milestrip Road, Buffalo, NY
- Katrina – Chic Little House – Store #1532 – 3870 Quebec Street, Denver, CO
- Chris – Man Made DIY – Store #4706 – 11616 Aurora Avenue North, Seattle, WA
- Michelle – Decor and the Dog – Store #2104 – Southdale Shopping Center, Des Moines, IA
You don’t want to miss this event – it’ll be exactly one ton of fun. REGISTER HERE and let us you know you’re coming! We’d love to meet you.
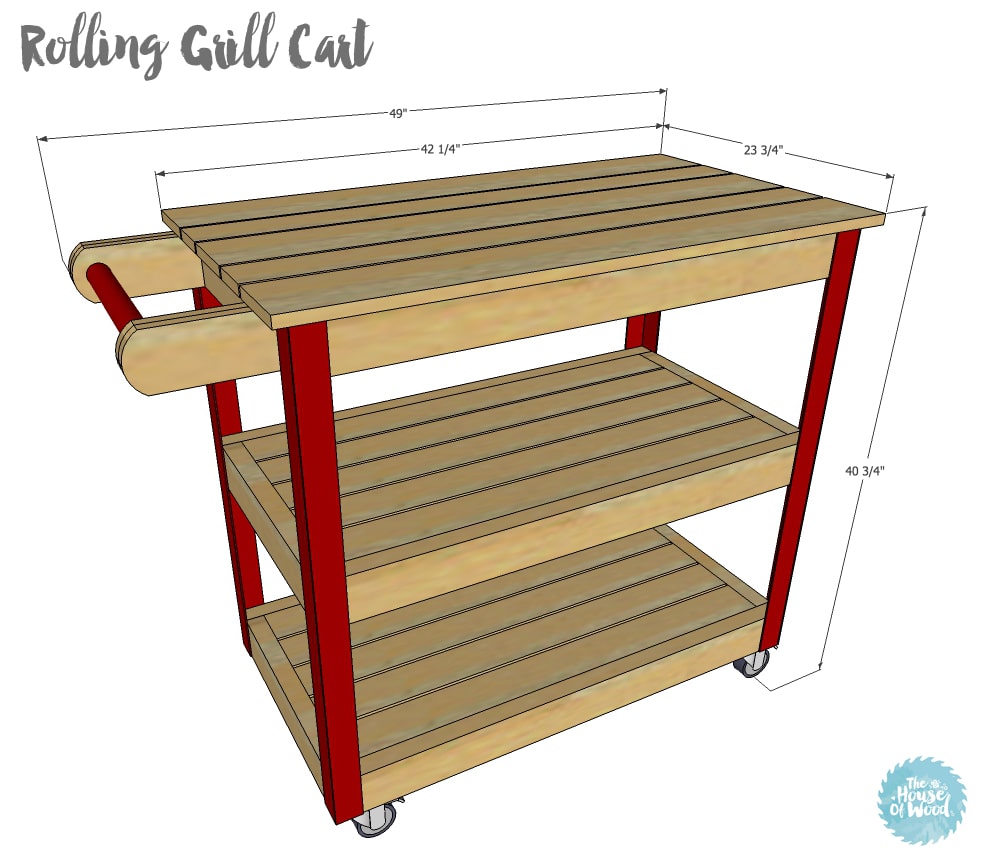
The grill cart was designed by Ben Uyeda of Homemade Modern, so we’ll be building his version at the workshop. Here are the plans for his grill cart. He even put together a super helpful how-to video! If you’d like to build my customized version, I’ve drawn up the plans for you.
 Okay, now onto the tutorial! Hunker down, kids, it’s gonna be a long one.
*This post contains affiliate links. To read my full disclosure policy, click here.
First, you’re going to build three frames. These will be your three shelves. Build the frames by pre-drilling pilot holes and attaching with 2-1/2″ deck screws. When drilling close to the edge, you always want to pre-drill your holes to avoid splitting the wood.
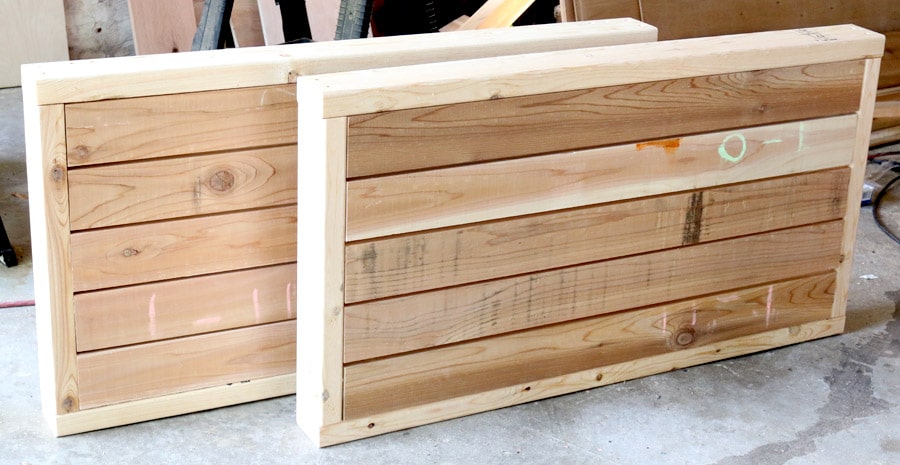
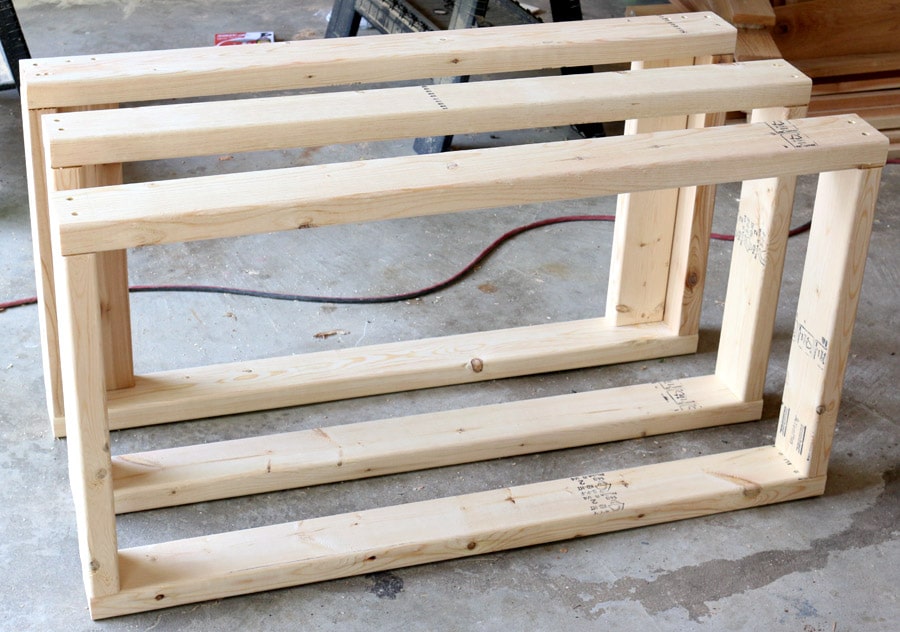 Boom, boom, boom, three frames done. Oh, and pay no attention to the different frame in the back. I’m going to show you how not to make the same mistakes I did. I wrote it up correctly in the plans, so when all else fails, follow the plan.
Next, I used pocket hole joinery to attach the 1×4 boards to the frames so that the screw holes are hidden underneath. I use this Kreg Jig model to drill the pocket holes. Also, I used a 1/4″ scrap piece of plywood as a spacer, to space the boards out evenly. I just love the variations of color and tone in cedar, don’t you?
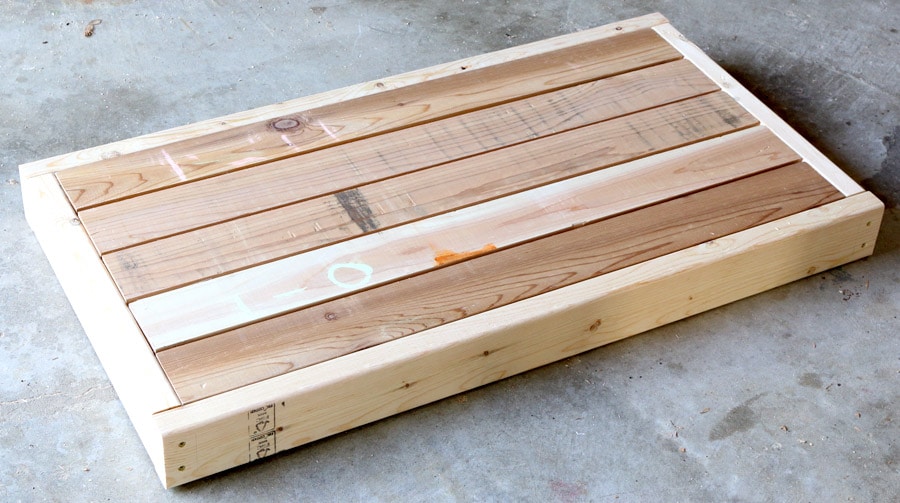 Do this for just two of the frames, because you’ll be using either butcher block or some other material for the top.
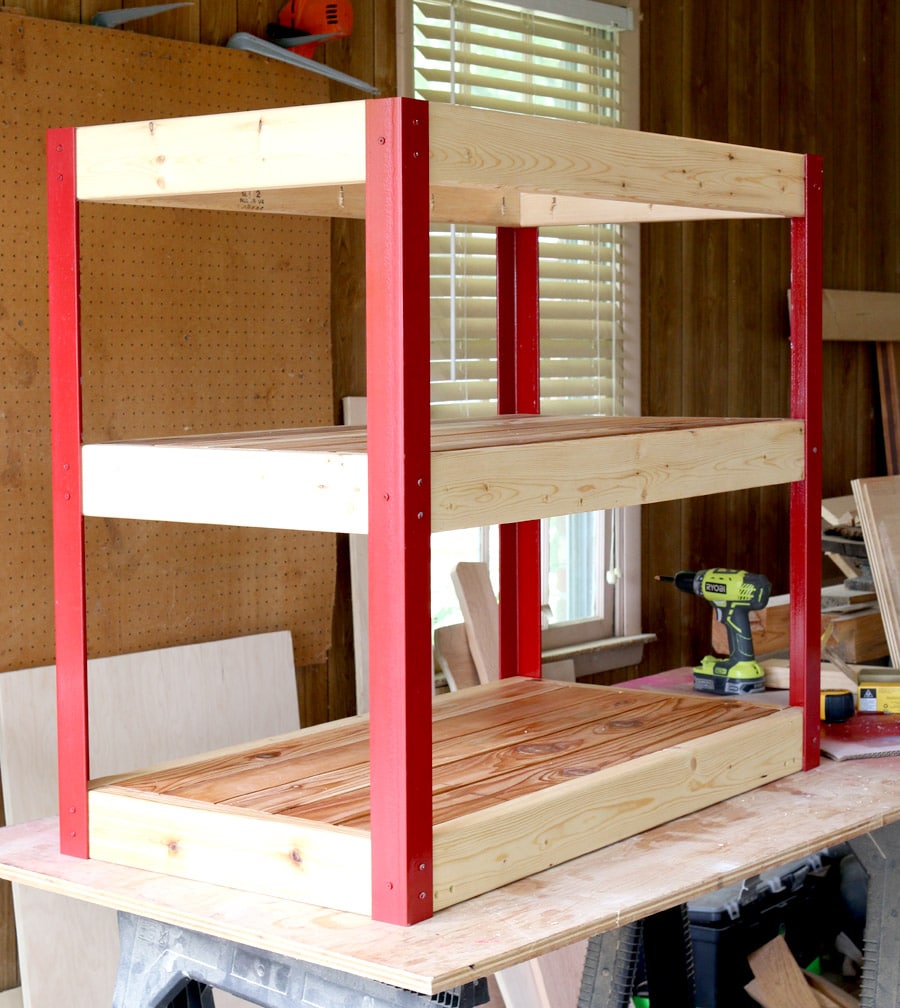
 Now it’s time to play with metal! To drill holes into steel, I used a drill press fitted with a 3/16″ drill bit. Using a drill press isn’t necessary, it just made it easier to ensure perfectly perpendicular holes. I periodically sprayed the drill bit and angle irons with WD-40 as I was drilling to cool off the drill bit. If you don’t, you may run the risk of burning up or breaking your drill bit.
After all the holes were drilled, I sanded the rust and blemishes off the angle irons with a 150-grit sanding block. Even though I bought the angle irons new, they had some rust spots and a whole lotta grossness on them. Then I sprayed them down with some brake cleaner. My husband uses this stuff to clean his firearms, so we had some on-hand.
After the angle irons are cleaned and prepped, they’ll need to be painted or sealed to prevent rust and rot from moving in. I sprayed on some primer and let it cure. After the primer was dry, I sanded the angle irons to smooth out the surface, then sprayed it with 2-3 coats of red spray paint. It says on the label that it “stops rust” so I’m taking their word for it. The reviews were good too, so I went with it.
To attach the angle irons to the wood, I used 2-1/2″ deck screws. You’ll want to be aware of where the other screws are placed so you don’t have a hardware collision. Don’t ask me how I know. Ah, foresight, you elusive creature you.
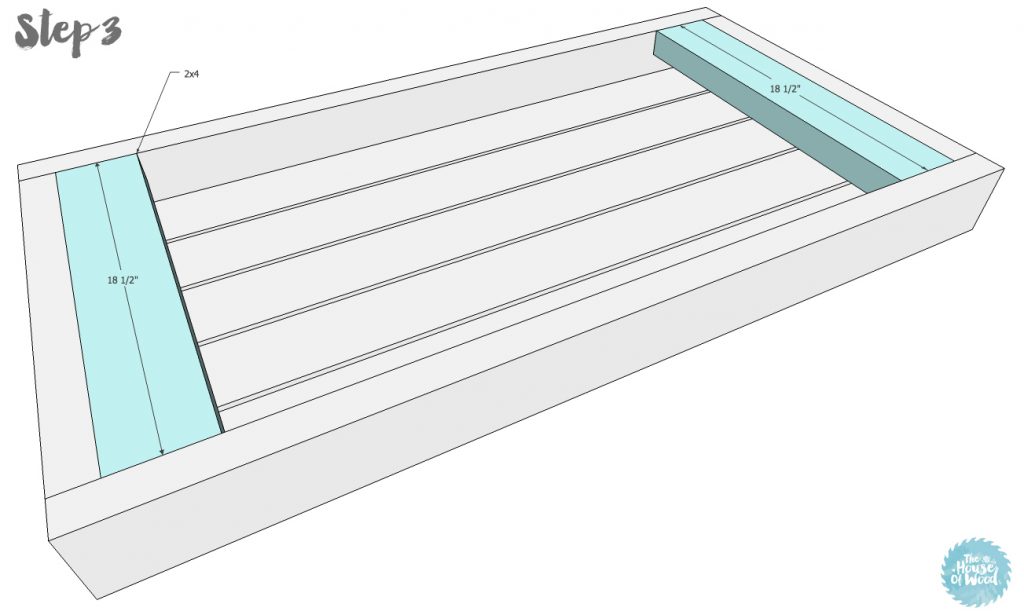
 Okay, so remember how in the fifth photo, that last frame was different? The casters will be attached to the underside of the bottom frame, so you’ll need to add some support boards to attach the casters to. In the plans, you’ll first build the frame, then attach the slats, and then attach the boards where the casters will be attached (see figure below). But when I built this, I added the caster support boards before the slats, then had one heck of a time getting my drill in there to attach the slats. Doh! Once again, foresight. Good thing I made all the mistakes so you won’t have to. You’re welcome.
 Then I attached the casters to the caster support boards with lag screws. I didn’t include the lag screws in the materials list in the plan, because you may need to use different fasteners, depending on the casters you choose. I chose these fancy casters because they swivel and lock, but mostly because the wheels matched my USC Trojan theme. #priorities
Also, notice I drilled 1-1/2″ pocket holes facing up, into the top frame. This will be how I attach the butcher block top in later steps.
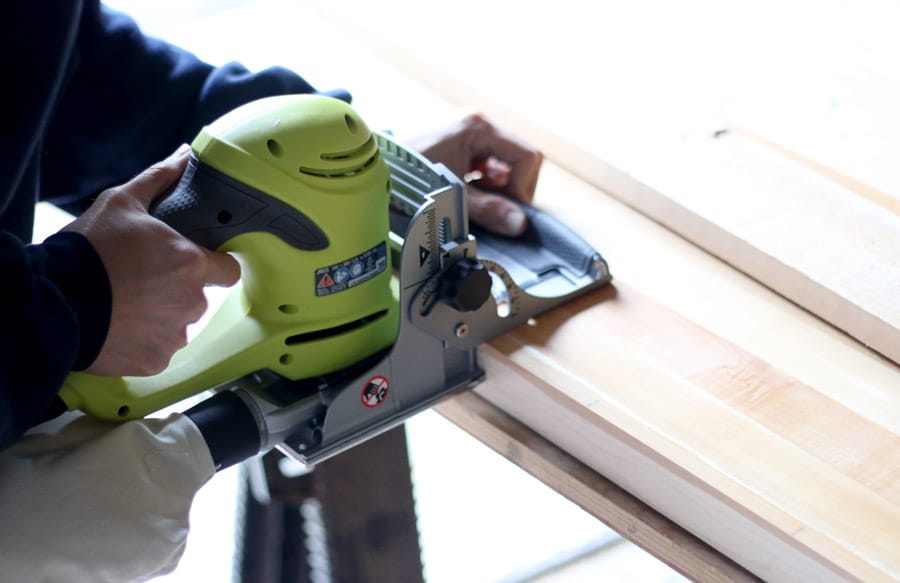
 Okay, so let’s talk more about this beautiful butcher block, shall we? I had to cut the butcher block in half to fit it into the planer, remember? Well, after it was all planed down, I had to put it back together. You guys. I learned a new joinery method: biscuit joinery!
My friend Brad from Fix This Build That makes and sells these gorgeous cutting boards, so I hit him up with a bunch of questions on how to properly join butcher block. Had I known how easy it is to make biscuit joints, I would have done it sooner. Oh my goodness, you guys. This is not rocket surgery. You are going to flip out when you see how easy it is. Watching this video was super helpful.
I bought this biscuit joiner after reading the great reviews on it. Sure, there are bigger and better ones out there, but this one was the right price point and it did the job perfectly well. Basically, you hold the tool like so and push it into the edge of the wood. The blade cuts little slots into the wood and you use wood biscuits to hold the joints together, along with a healthy dose of wood glue.
 How cute are my little slots? Wait. that didn’t sound right.
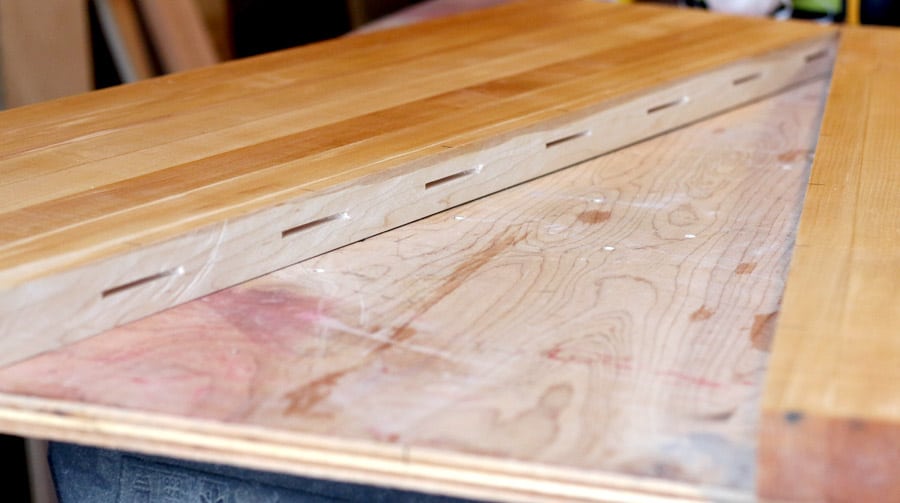 Now squeeze some glue into the slots as well as along the cut edge and insert the biscuits. Some glue will squeeze out when you insert the biscuits. Totally fine. You need to use enough glue so that it squeezes out the seam, like this:
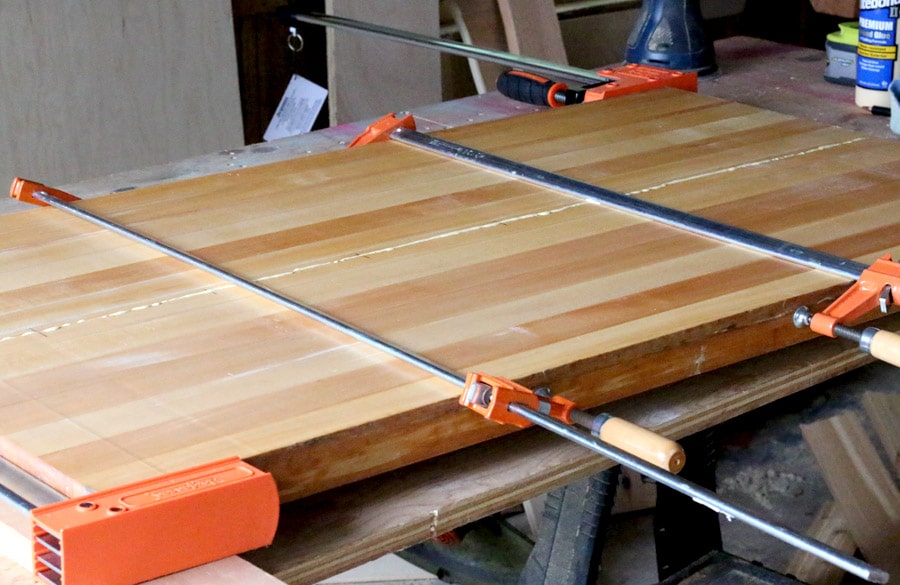 Then clamp it together, making sure your edges are aligned and square. Wait about 30 minutes for the glue to set a little, then scrape it off with a putty knife. The glue will come off in one long strip. Easy peasy! It’s a little tricky to scrape around where the clamps are, but you can always sand off the remnants later. I let the glue cure overnight before removing the clamps.
I had a couple of bar clamps already, but for this project, I bought two of these heavy duty parallel clamps. They certainly aren’t cheap, but they are pretty dang awesome so I’m happy to have them in my workshop. I plan on investing in a few more soon when my husband is okay with it.
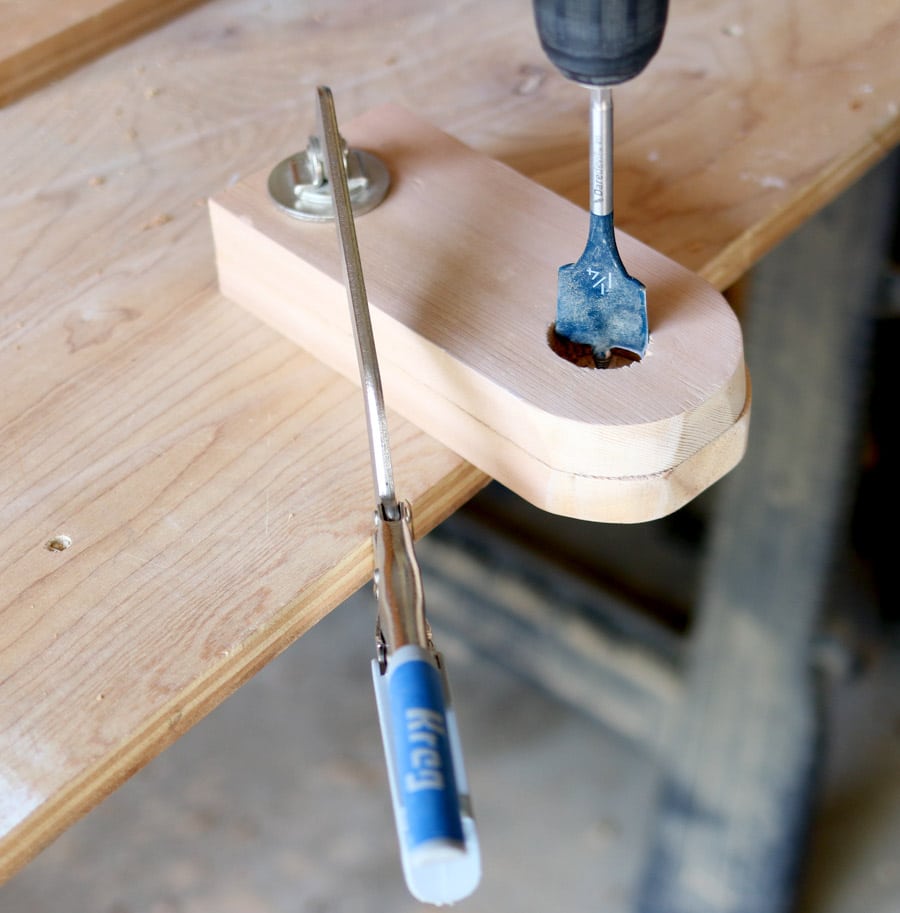
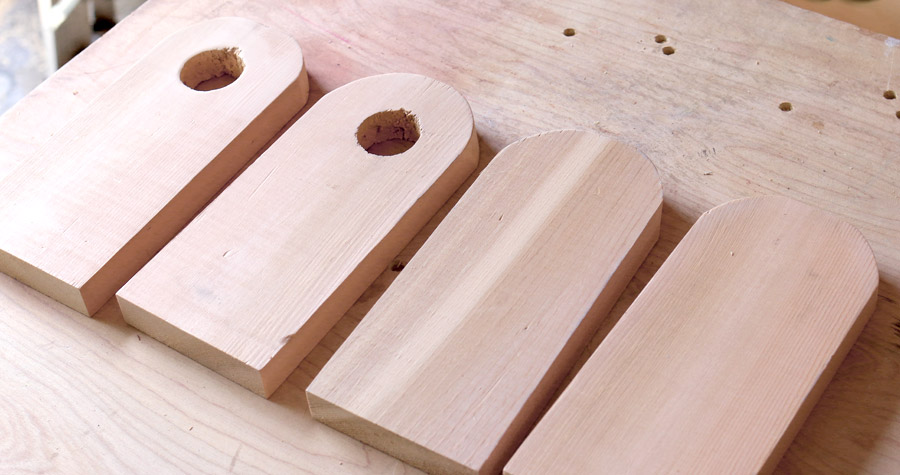
Next, I added a handle to pull the grill cart around with. I cut these pieces with a jigsaw, then used a 1-1/4″ spade bit to drill the hole for the dowel. Clamp it together and drill through both pieces to ensure the holes line up.
 Next, attach the handle supports to the cart with 1-1/4″ pocket holes and slide the dowel through. Finally, attach the butcher block top with 2-1/2″ pocket hole screws. I added an additional board to the underside, in the middle, just in case the butcher block sagged. I don’t think it will, but why build when you can overbuild?
Although I used weather-resistant cedar lumber, I wanted to make sure the cart was protected by some kind of finish. I chose to use tung oil on the bottom two shelves, which really brought out the beautiful grain and color in the cedar. To the top, I applied several coats of food-safe butcher block oil.
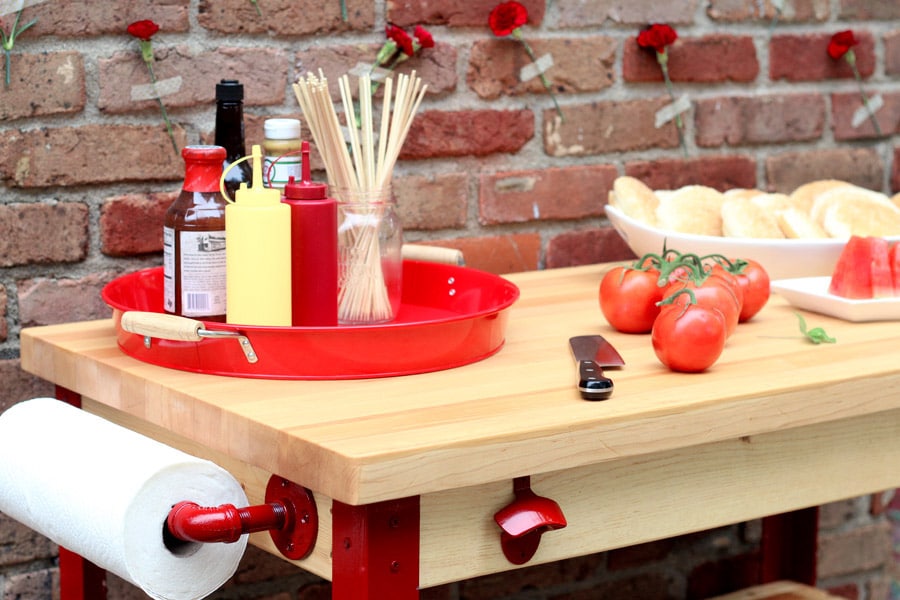
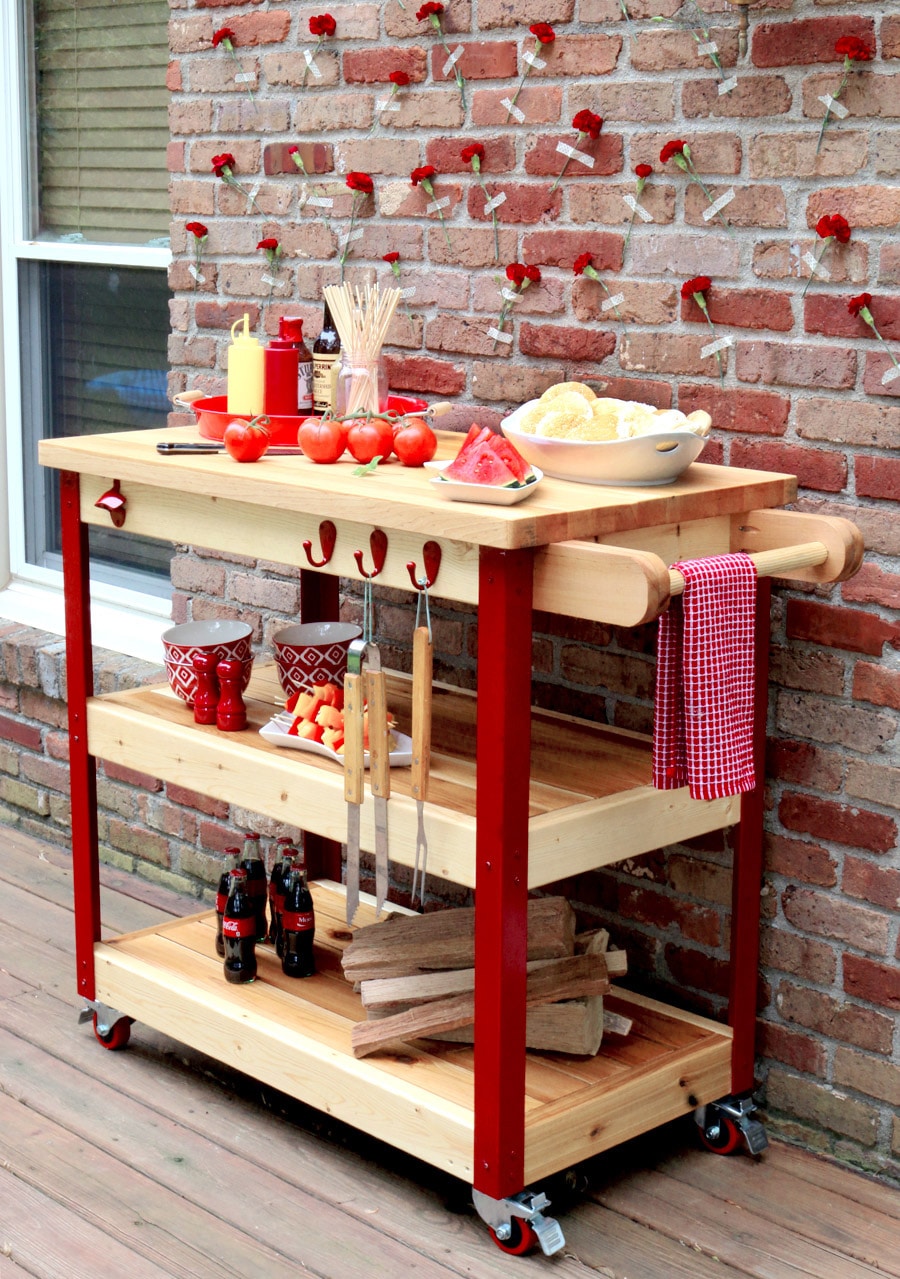 I added a few hooks for grilling utensils, as well as a bottle opener.
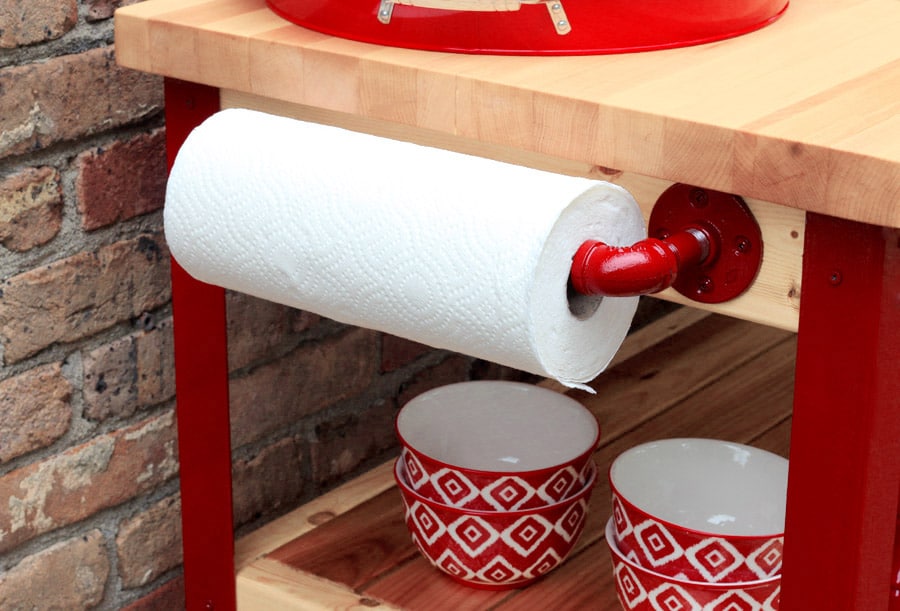
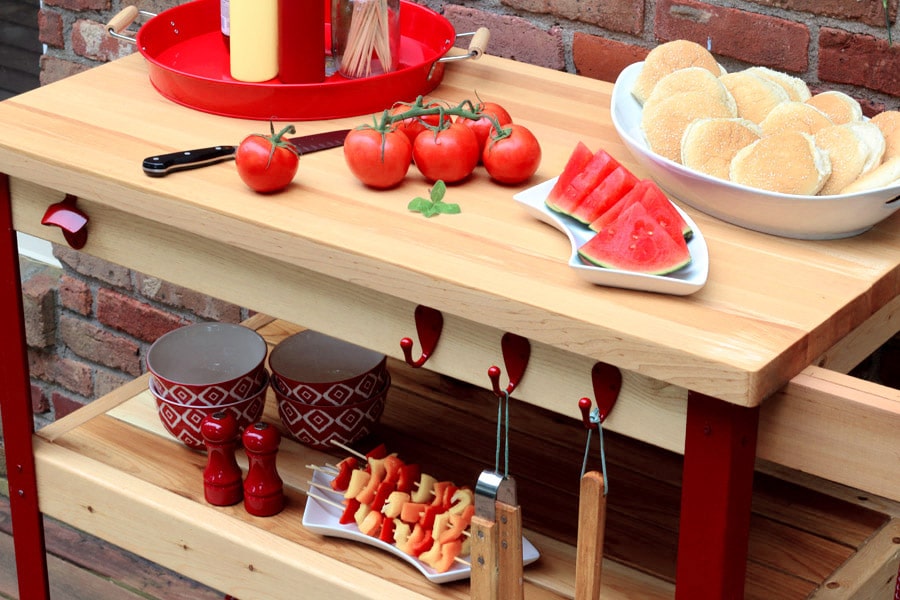 The paper towel holder is made out of galvanized pipe pieces.
Love this project? Want to learn how to build it for yourself? Come to one of the DIY Workshops at The Home Depot! It’ll be awesome. I dare you to build this grill cart and put your own spin on it! Oh, yes. The gauntlet has been thrown down. I’d love to see your customized version, so if you build it, be sure to share it on Instagram, Twitter, or Facebook and tag me with #jenwoodhouse and #DIYWorkshop so I can see it!
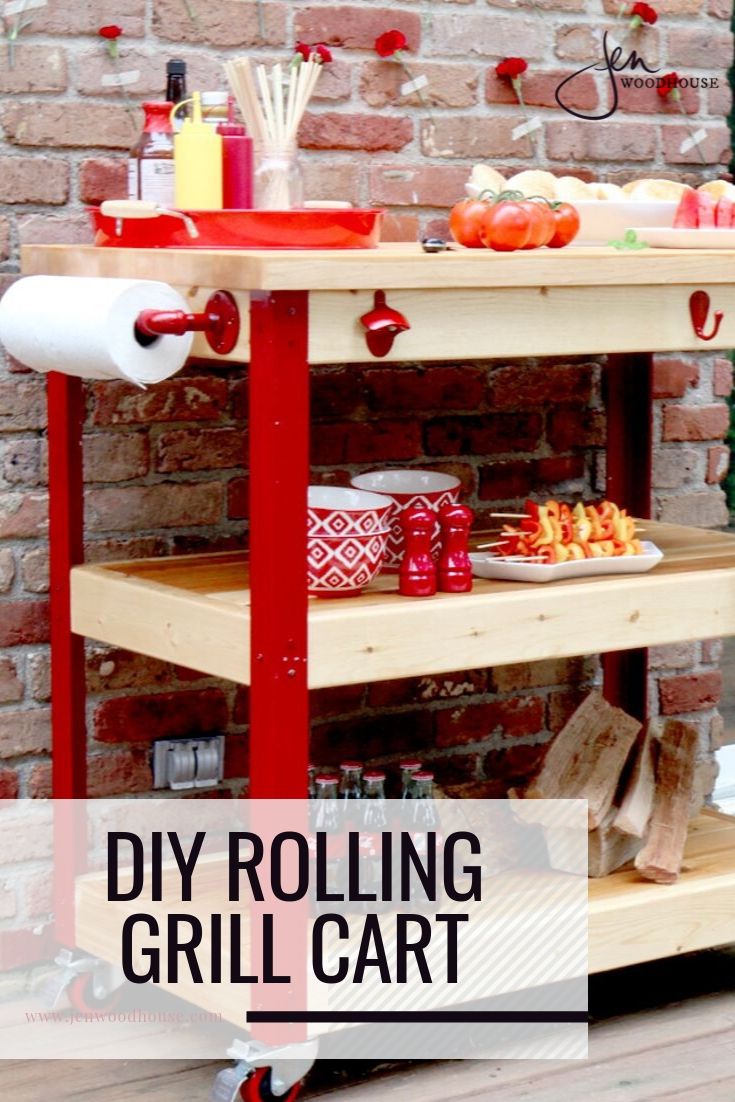
Feel free to pin and share this project using the image below. Have a great Father’s Day weekend you guys! See you out there.
Pin for later!

*I acknowledge that The Home Depot is partnering with me to participate in this Workshops Program. As a part of the Program, I am receiving compensation in the form of products and services, for the purpose of promoting The Home Depot. All expressed opinions and experiences are my own words. This post complies with the Word Of Mouth Marketing Association (WOMMA) Ethics Code and applicable Federal Trade Commission guidelines.


can you please send me the “recipe” for this wonderful cart? maybe im overlooking it, but i can’t find the dimensions for your original cart– with the red decor. I don’t know what those metal supports are called? and the lockable casters?
And what kind of screws,ETC–what tools?
I will gladly pay for the plans, also.
Thankyou!
Hi Patricia,
Thanks! Just click the gray button that says “Download PDF plans” and it’ll bring you to a PDF file, which you can save and/or print. The metal parts are angle iron and the casters are just regular 3-inch locking swivel casters. The materials and tools needed are listed in the PDF plans. Hope that helps!
Did you encounter problems using a 2 1/2 inch softwood pocket screw to secure the hardwood butcher block top?
If you don’t mind a slightly shorter grill cart with black legs, Rockler Woodworking and Hardware has 32″ legs (#60749) with the holes already in the bottom of the legs to accept the casters (#47034) which would make the project some what easier. I’m not sure if you could paint the legs as they have a baked on finish. For a novice, this would help, and if you needed it higher you could add the 3″ riser blocks (#44836) to bring it up to 35″.
Hi Jen
Cart looks beautiful. What SW did you use to create the initial design and mark measurements before you went into creating frames?
Avi
Thank you for free plans 😁
Hi, love the plans! Question – what metal should we use for angle irons? Steel and aluminum are both available in store. Also how strict should we be about the 2inches exactly? Would 1.5 inches width be sufficient for the angle irons? We are having issues finding exactly the right pieces.
Thanks in advance for any tips!