• Skip to primary navigation
  • Skip to content
  • Skip to primary sidebar
  • Skip to footer
  • Home
  • Blog
  • About
    • Meet Jen
    • Testimony
    • Meet the Team
  • Project Gallery
    • Furniture >>
      • Beds
      • Benches & Ottomans
      • Bookshelves
      • Desks
      • Dressers
      • Tables
    • Recipes
    • Crafts
    • Decorating
    • Kids
    • Lighting
    • Organization
    • Outdoor
    • Seasonal
  • Tools 101
    • Tool Reviews
    • Favorite Tools
  • Shop
    • Free Resources
    • Building Plans
    • T-Shirts
    • Home Decor
    • Custom Furniture
  • Contact
    • Email Jen
    • Sponsor/Advertise
    • Disclosure

The House of Wood

The DIY Life of a Military Wife

December 4, 2015

Industrial Wood & Steel Console

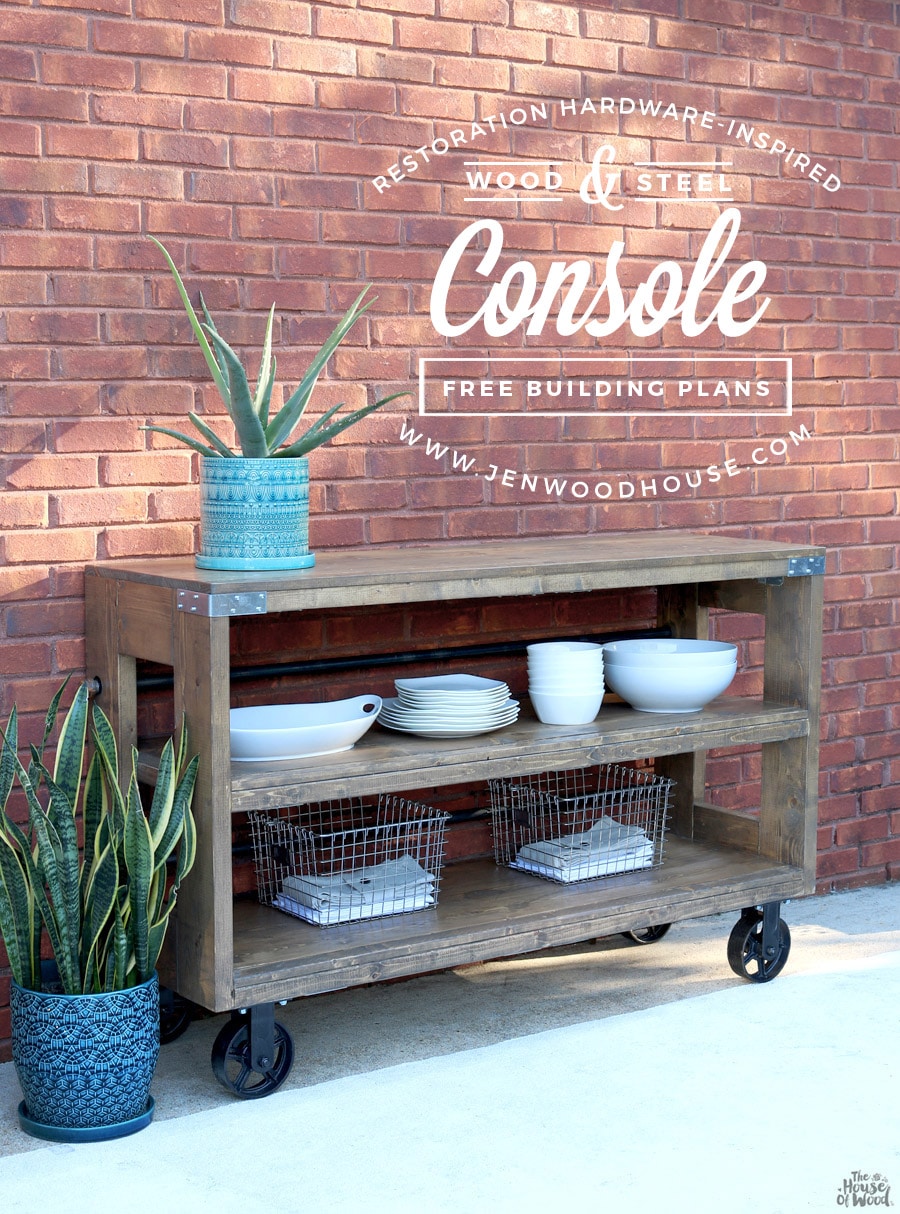
Ever since I laid eyes on this Restoration Hardware wood & steel console, it’s been on my “To Build” list. I am happy to say, it’s finally moved from “To Build” to “BUILT!” Most times I’ll write down a task, just so I can cross it off the list, like “feed children” or “take shower.” Obviously, I don’t need to write those things down to remember to do them (most of the time), but there’s something about crossing things off of lists that I find so therapeutic. That’s not weird, right?

Hi. I’m Jen and I’m a habitual list-maker and task crosser-offer.

How to build a DIY Restoration Hardware-inspired Wood and Steel Console via Jen Woodhouse
Well, I’m glad to have this one crossed off my list because I’ve been drooling over it forever. Be sure to follow me on Instagram, Facebook, or Periscope for an exclusive, behind-the-scenes look at my upcoming projects. If you do, (thank you – you’re awesome!) you would have seen sneak peeks of this project (as well as the mistakes and headaches along the way – but more on that later). I am SO excited to finally share the plans with you today!

Click here to download the PDF plans for this Wood & Steel Rolling Console.

*This post contains affiliate links. To read my full disclosure policy, click here.How to build a DIY Restoration Hardware-inspired wood and steel console with Simpson Strong-Tie
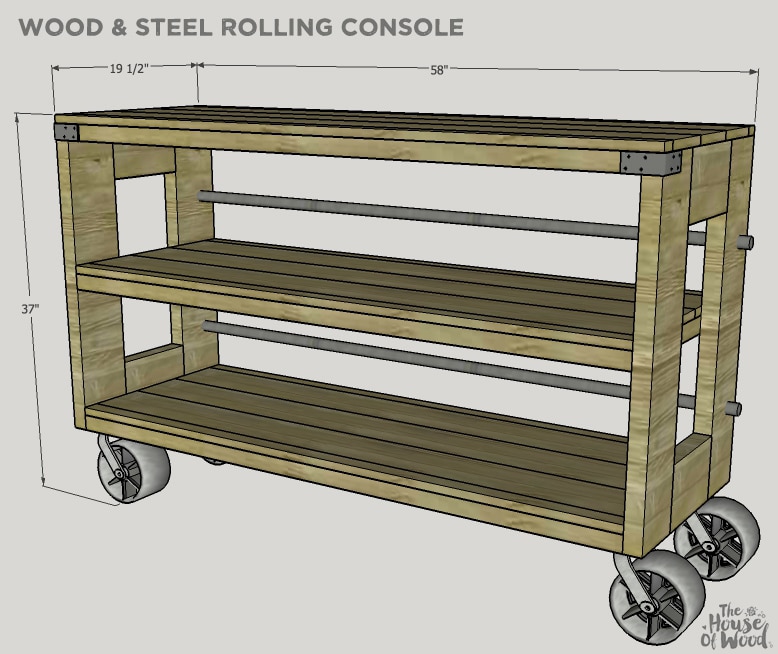
I teamed up with the fine folks at Simpson Strong-Tie to bring you the tutorial for this project. I love the industrial design element that the metal angles add and Strong-Tie products are super strong to build with. You might remember me talking about this product when I built my first workbench. For this project, however, I used several different connectors: Rigid Tie™ RTA2Z  connectors, GA2 gusset angles, and A44 angles.

Are you guys familiar with Simpson Strong-Tie? I bet you are and you just don’t realize it. If you look at your house, deck, pergola, or any other building or structure, you’ll most likely see metal connectors such as joist hangers, roof truss connectors, straps, mending plates, etc. that are joining the lumber together. Simpson Strong-Tie makes a dizzying array of connectors so you’re bound to find one (or several) that will meet your needs; they’ve been the building industry standard for over 60 years. Pretty impressive, right?

So if these connectors can hold up a house, you better believe this console is as solid as a rock and built to last.

How to build a DIY industrial console with Simpson Strong-Tie
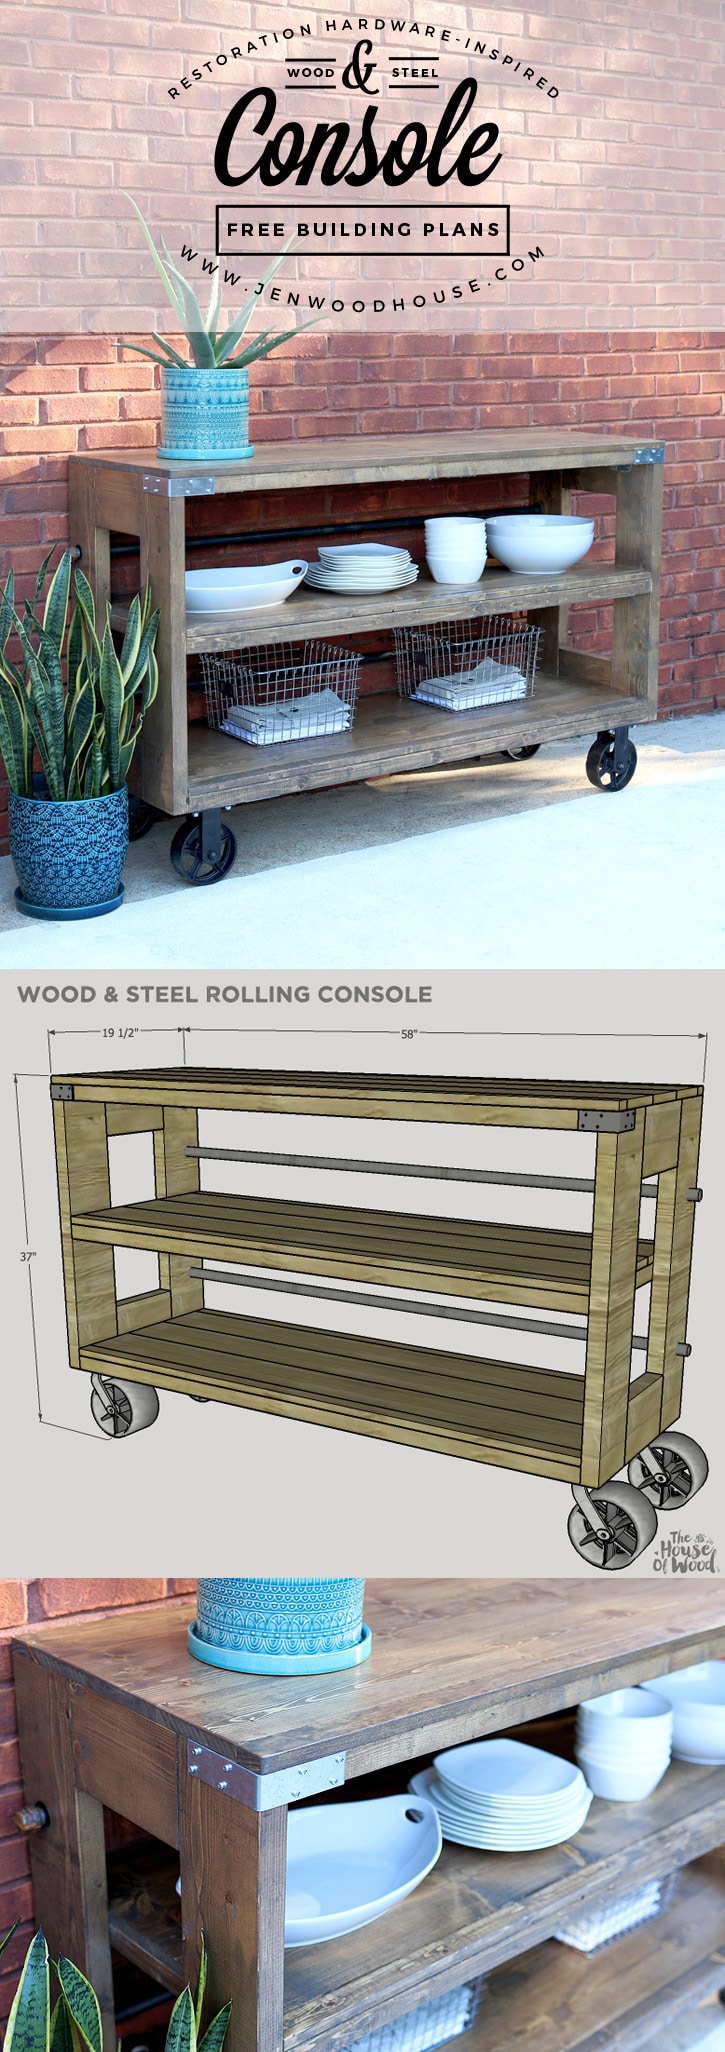
HOW TO BUILD A WOOD & STEEL ROLLING CONSOLE WITH SIMPSON STRONG-TIE

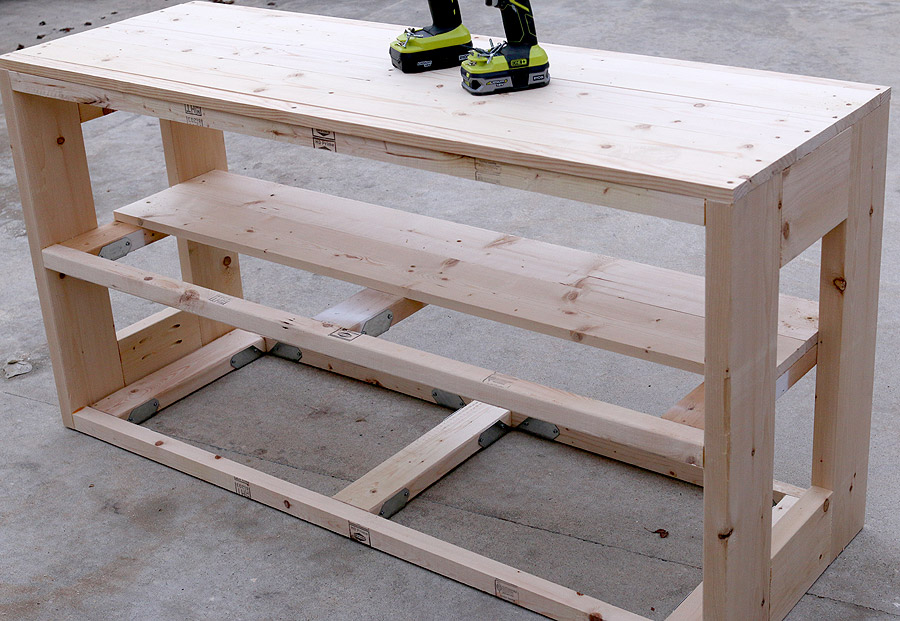
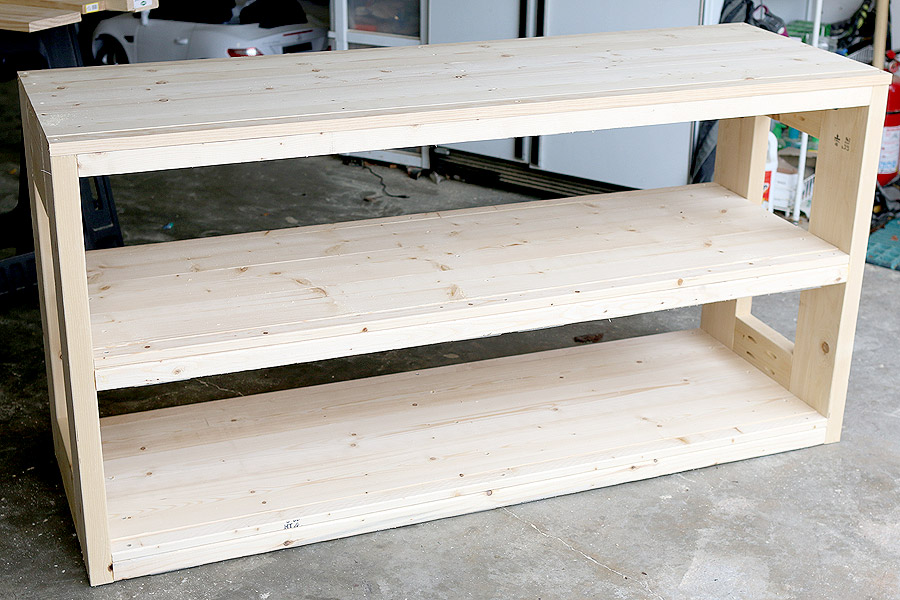
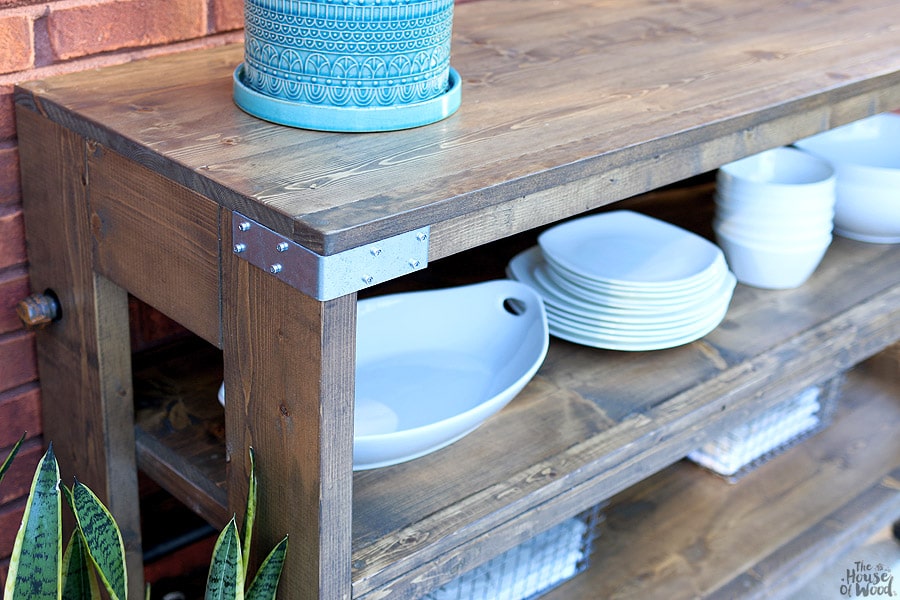
Here’s what the carcass looks like (flipped upside down in the photo below).

*Note: the plans include two additional 2×4 pieces attached to the bottom of the console because I had to go back and add them to attach the casters in later steps. While my photos may slightly differ from the plans, the plans are correct, so when in doubt, follow the plan.

Using Simpson Strong-Tie connectors to build the console carcass
I used Simpson Strong-Tie’s Strong-Drive® wafer-head screws to attach the connectors. You guys. I absolutely LOVE these screws – you don’t have to pre-drill pilot holes so these screws save me a bunch of time and effort. #worksmarternotharder

Then, by planking the 1x boards on top, I was able to hide the RTA2Z connectors from view.

Building a console with Simpson Strong-Tie connectors
And here’s another tip: I highly recommend owning at least two cordless drills if you’re able. It’s a great time-saver because you don’t have to change out drill bits when working with different screw heads.

When I was attaching the 1×6 boards to the carcass, I had one drill fitted with a countersink drill bit and the other with a Phillips head bit so I could pre-drill and countersink the pilot holes into the 1x boards with one drill, then grab the other drill to drive the screws in. And in no time at all, I had the entire console built.

How to build a Restoration Hardware-inspired console using Simpson Strong-Tie connectors
Okay, so after this is where things got a little hairy. Whenever I begin a project, the first thing I do is sketch up a plan, then once I build it, make mistakes, and find more efficient ways of building, I go back and revise the plan so that you’re set up for success. In other words, I’ve made plenty of mistakes along the way so you don’t have to. You’re welcome.

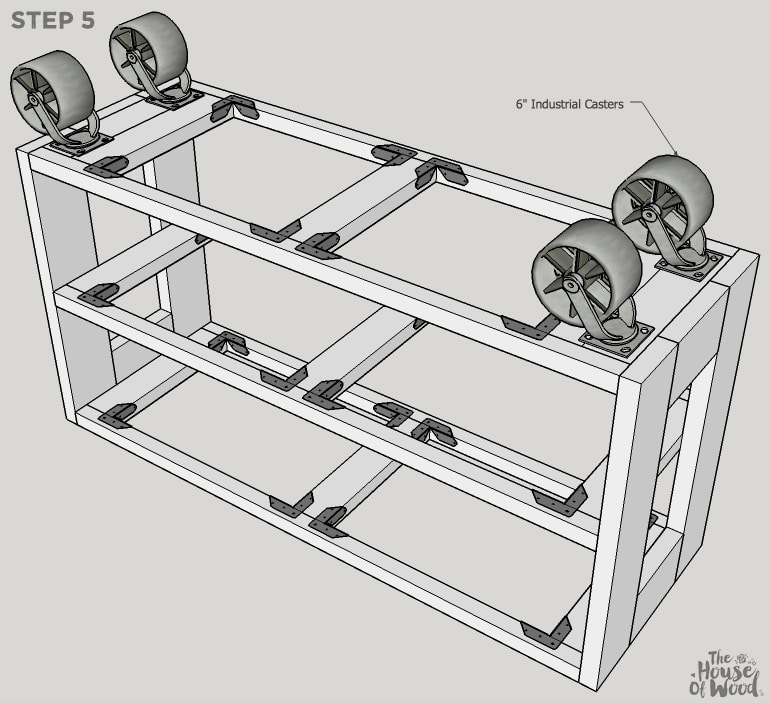
Once again, the plans are written correctly, so you should be fine as long as you build according to plan. But let’s go back a bit, because I don’t want this tutorial to be misleading. In the photo above, you’ll see that I built the entire console before installing the casters. Well, they say that hindsight is 20/20, right? If I were to do it over again, I would have installed the casters at this step:

rh-console-step05
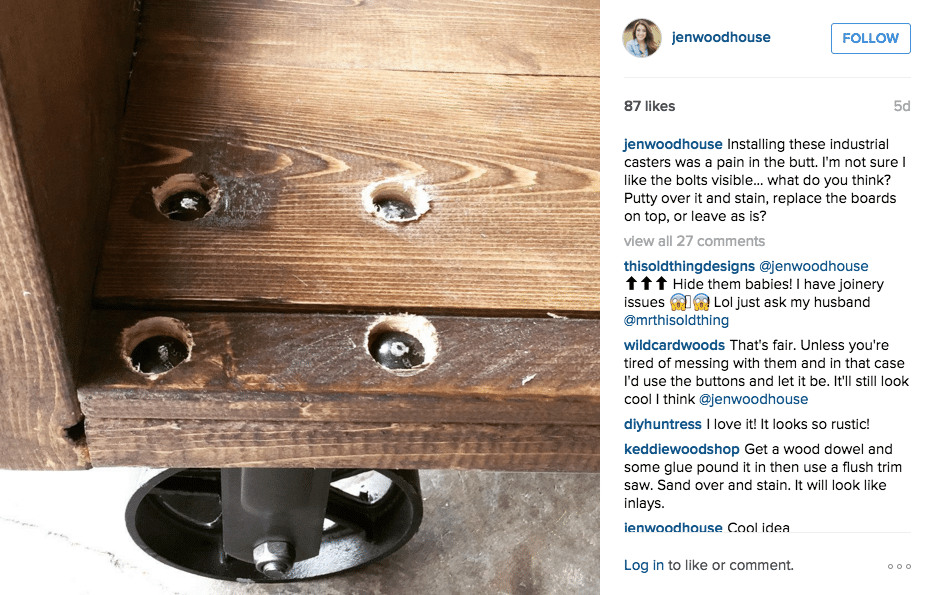
I posted the photo below on Instagram after installing the casters (see? You totally should be following because it’s always a party over there). I decided that I didn’t like the carriage bolts being visible, so I had to redo everything. Well, not everything, but seriously. What a time-suck.

Oh, and thank you to everyone who offered advice and suggestions, by the way. They were very much appreciated!

jen-woodhouse-instagram
In the plans, you should install the casters at Step 5. First, pre-drill holes for the carriage bolts, then using a 7/8-inch forstner bit, countersink the hole so that the locking nut will sit just below the surface of the wood so that the top 1x boards (which you’ll add later) can lay flat on top. Insert the carriage bolts from the bottom up so that the locking nuts are on top. Hope that made sense. Basically, all you’ll be doing is hiding the hardware beneath the top 1x boards, instead of how I screwed it up in the picture above (see what I did there?). Ugh. Just looking at all that extra work gives me a headache. Do as I say, not as I do. By the way, I bought the 6-inch steel casters from here.

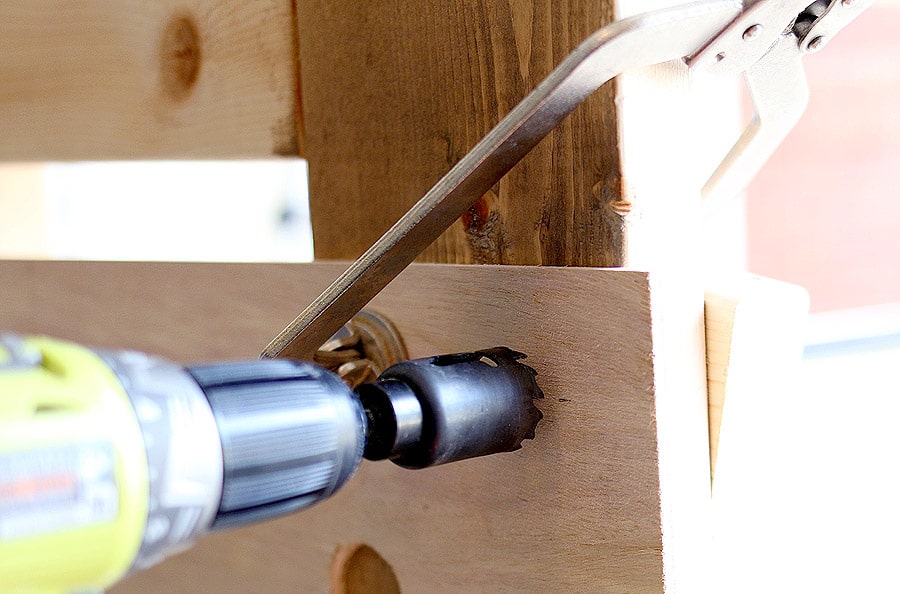
I used a 1-1/4-inch hole saw to drill the holes for the pipe to sit in, clamping a couple pieces of scrap wood to minimize tear-out from the hole saw.

How to use a hole saw
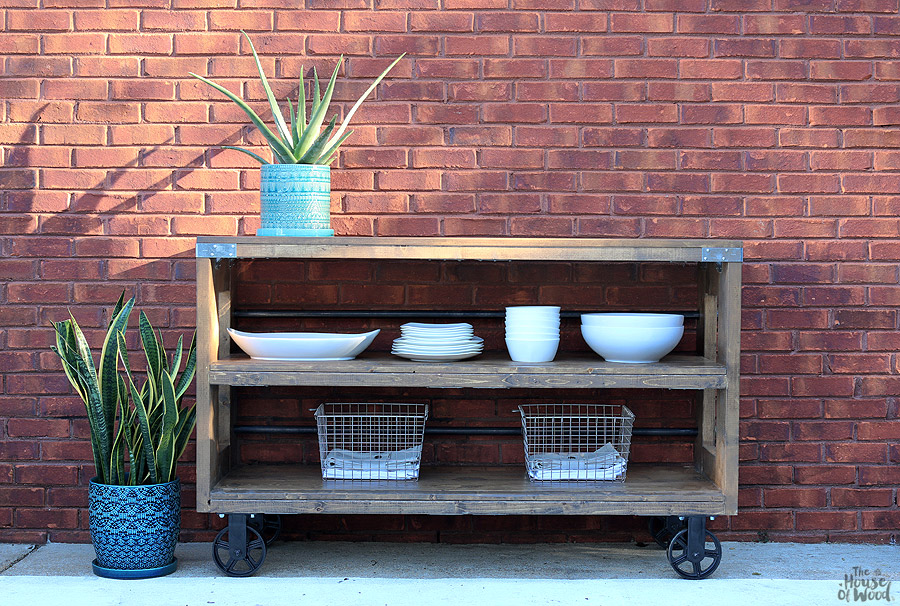
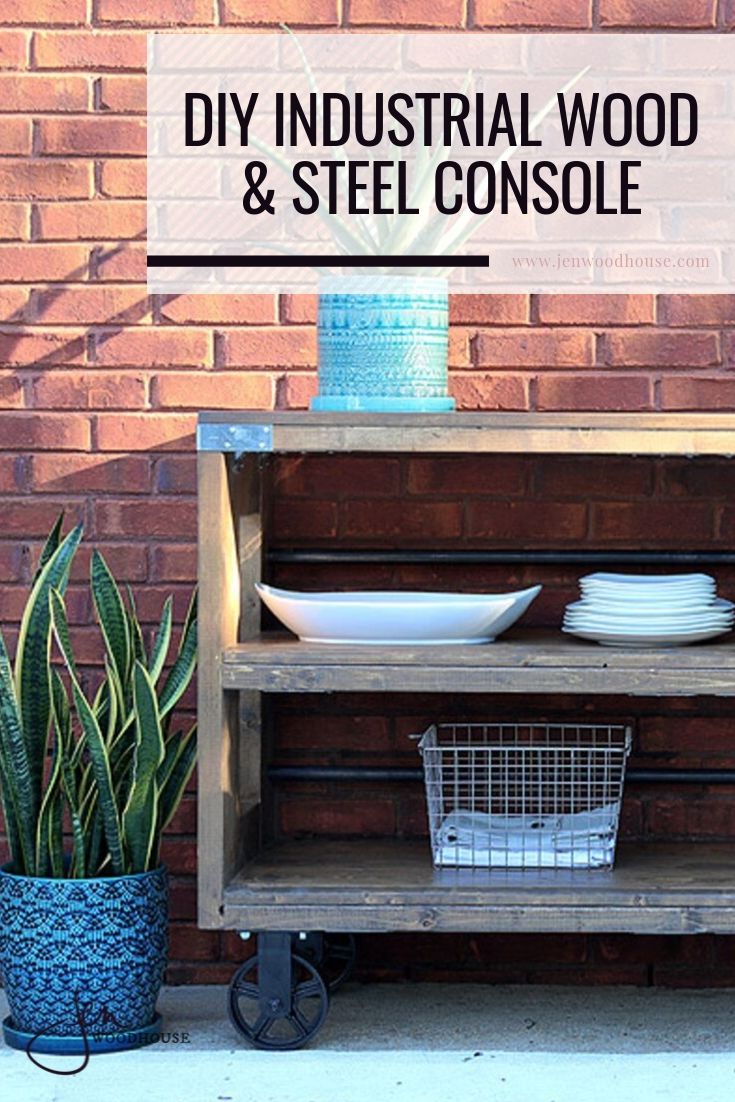
Finally, I inserted the 3/4-inch pipes along the back of the console, screwed the pipe caps on each end, and attached the A44 angles – which are purely decorative, not structural.

wood-and-steel-console
Please excuse the rust on the pipe caps. Of course it would rain cats and dogs as soon as I rolled this thing outside. Lovely.

So what do you think? Are you digging the rustic, industrial look of this console as much as I am? Pretty stinkin’ close to the original, right? Except my DIY version is well over a thousand dollars less. Boom shakalaka.

How to build a DIY industrial console with Simpson Strong-Tie
Now all I have to do is find a place for it in my house. Just another thing to add to my To Do list. But thank goodness for To Do lists because otherwise, my kids would be surviving off a sleeve of Saltines and I would literally smell like the walking dead. Speaking of The Walking Dead… GLENN!!! Ahhh!!!

Thanks for reading, friends! Be sure to download the free PDF plans so you can build this wood & steel rolling console. Good luck, be safe, ask questions if you need to, and get ‘er done!

SHOP THIS POST

Oh, and be sure to PIN IT so you don’t forget it!

How to build a DIY Restoration Hardware-inspired wood and steel console via Jen Woodhouse
*Big thanks to Simpson Strong-Tie for sponsoring this post. All efforts, completed To Do lists, and professions of undying love are purely my own.

You may also like:

  • Rustic Industrial Bar CartRustic Industrial Bar Cart
  • Brainstorming A Bar Cabinet – Part 2Brainstorming A Bar Cabinet – Part 2
  • Pottery Barn-Inspired Coffee BarPottery Barn-Inspired Coffee Bar
  • 10 Stunning DIY Consoles10 Stunning DIY Consoles
  • Brainstorming A Bar Cabinet – Part 1Brainstorming A Bar Cabinet – Part 1
  • Large Balustrade Coffee TableLarge Balustrade Coffee Table
  • Brainstorming A Bar Cabinet – The Grand Finale!Brainstorming A Bar Cabinet – The Grand Finale!
  • Easy Kids Indoor PlayhouseEasy Kids Indoor Playhouse

Filed Under: Design Plans, Featured, Furniture, Organization, Outdoor, Tables Tagged With: bar, buffet, console, industrial, pipe, restoration hardware, rh, rolling, simpson strong-tie, steel, strong-tie, table, wood

Reader Interactions

Comments

  1. Thom says

    December 13, 2015 at 3:46 pm

    I really love how it came out it’s beautiful. So now its going on my to do list I’m guilty of doing the same thing with the list but like you said there is nothing like the satisfaction of crossing it of the list. Anyhow great build and thank you for the plans.

    Reply
    • Jen says

      December 14, 2015 at 10:11 pm

      You’re so welcome, Thom! Good luck with your To Do list! 🙂

      Reply
  2. Danielle says

    December 17, 2015 at 1:23 am

    What stain did you use?! Love the way yours looks!

    Reply
  3. Molly says

    December 30, 2015 at 5:48 am

    Great work….

    Reply
  4. Sullivan says

    December 30, 2015 at 12:08 pm

    This is a great piece and quite functional, too. You did a fantastic job on this project.

    Reply
  5. Sarah says

    January 7, 2016 at 6:59 am

    Amazing!! Can I ask what stain color you used?

    Reply
    • Jen says

      January 7, 2016 at 10:11 am

      Thanks Sarah! I believe the name of the stain color was “Provincial.”

      Reply
  6. Kristin says

    January 11, 2016 at 2:43 pm

    Hi there beautiful job! when you added the 1×6 boards did you then putty the holes? Thanks 😀

    Reply
    • Jen says

      January 11, 2016 at 4:09 pm

      Thanks Kristin! Yes, I countersunk the pilot holes so that the screw heads would be hidden beneath the wood, then I covered the holes with wood filler.

      Reply
  7. Susan the Farm Quilter says

    January 19, 2016 at 10:47 pm

    Absolutely amazing!!! I love it!!! I couldn’t tell a difference between yours and the inspiration piece! Thank you for the plans…following you on IG and need to figure out how to follow you here too!

    Reply
  8. Christine says

    January 26, 2016 at 12:55 pm

    I love the table top! How did you get it so flat and solid? Did you have to plane the boards to get them to fit like that?

    Reply
    • Jen says

      February 8, 2016 at 9:12 am

      Thanks Christine! No, I didn’t plane the boards. I spend a great deal of time choosing the flattest, straightest boards I can find, and even then, after I clamp and join them, I have to spend quite some time with a belt sander. Hope that helps!

      Reply
  9. Randy says

    February 8, 2016 at 7:07 am

    Where did you find the mental brackets? I have looked everywhere for them & all the stores have thinner ones than featured on your table

    Reply
    • Jen says

      February 8, 2016 at 9:13 am

      Hi Randy,
      I used the Strong-Tie A44 angles. Here’s a link: http://amzn.to/20R8mZj

      Reply
  10. Patrick Currin says

    February 8, 2016 at 7:32 am

    My wife and I are going to build this awesome cart. The material list looks pretty easy to come by but do you have approximate cost for materials?

    Reply
    • Jen says

      February 8, 2016 at 9:27 am

      Awesome to hear, Patrick! I believe the cost was around $260 to build. Good luck and have fun!

      Reply
    • Patrick Currin says

      February 8, 2016 at 11:02 am

      When you attach the 2 X 2 and 2 x 4 braces you glue and screw them in. Since you have to screw them through the outside facade sis you use wood putty or other covers to fill the holes? Is there another way to screw them in without it showing?

      Reply
  11. Patty says

    February 26, 2016 at 10:58 pm

    What an inspiration your site is!!! Buying the furniture from a manufacturer is NOT affordable, but your projects are! Hubby is searching for the hardware and has promised to build one!!
    Thank you for providing the plans!

    Reply
  12. Bridget says

    July 7, 2016 at 9:39 am

    I love this plan – I am using it (but tweaking it some because of my novice level as a builder) for a class project (see my website). I am making a rolling cart for my classroom using bookshelves as a base …. do you know if the Simpson Strong Ties are made as a “flat connector”? I noticed in your plans that they are angled…

    Also – I am wondering how you actually make your plans – the graphic aspect. Any help is appreciated!

    Reply
    • Jen says

      July 7, 2016 at 9:50 am

      Thanks Bridget! Yes, Simpson Strong-Tie makes a huge variety of connectors – pretty much anything you can think of! I use Google Sketchup to draw up my plans. Thanks so much for stopping by and good luck with your class project!

      Reply
  13. Kalyn says

    September 25, 2016 at 9:45 am

    Where did you find the casters?

    Reply
  14. Sara @ finditfixitorbuildit.com says

    January 31, 2017 at 5:50 pm

    Beautiful! It’s so functional and it looks great. Thanks for the instructions:)

    Reply
  15. CM Warn says

    March 25, 2017 at 6:47 pm

    Amazing cart

    Reply
  16. Alli says

    April 25, 2017 at 11:51 am

    Love this piece and just printed out the instructions for my husband and I to take on this weekend. What stain/finish did you use if you don’t mind sharing???

    Reply
  17. carolyn sanderson says

    June 9, 2017 at 3:57 pm

    gorgeous and great job! where did you buy the CASTERS? i want to make this and want strong casters like your photo.

    Reply
  18. Tony Martin says

    July 16, 2017 at 12:00 am

    Where did you get the casters from? The one built I used 4×4 for legs. And the casters cheapest I’ve found was $80 for 4

    Reply
    • Jen says

      July 16, 2017 at 1:31 pm

      Hi Tony,
      I bought the casters from Northern Tool.

      Reply
  19. Brian Famous says

    March 11, 2018 at 10:45 am

    Love this design too! We just extended our deck last year, and something to this effect would definitely fill in some of the empty space AND give us a level of storage and organization!
    Thanks for the idea and the inspiration!

    Reply
  20. BEN Wolf says

    May 22, 2018 at 6:54 pm

    Hi Jen, I have tried to sign up to receive plansmultiple times and have not received anything. I love this cart and would love to build it. Thanks so much!!!! Ben

    Reply
    • Jen says

      May 23, 2018 at 12:09 am

      Hi Ben,
      I’m showing that the email with the plans was sent on April 7th – maybe it ended up in your spam folder? I’m re-sending the plans now – let me know if you still aren’t able to download them. Thank you!

      Reply
  21. Mary B Downing says

    October 12, 2018 at 1:31 pm

    I have been trying to get the plans for the wood and steel console and I haven’t gotten them yet. Could you please send them to me.

    Reply
    • Jen says

      October 12, 2018 at 4:59 pm

      Hi Mary,
      I’m showing that the plans were sent on Aug 20th at 8:56am. Could they have ended up in your spam folder?

      Reply
  22. mary downing says

    October 12, 2018 at 6:43 pm

    I looked, but didn’t see them. Would you mind sending them one more time. I will keep a look out in both places.

    Reply
    • Jen says

      October 13, 2018 at 9:14 am

      Hi Mary,
      Of course. I just re-sent the plans. Thanks!

      Reply
      • mary downing says

        October 13, 2018 at 9:23 pm

        got them. Thank you.

        Reply

Trackbacks

  1. DIY Bookshelf with Simpson Strong-Tie® says:
    February 16, 2016 at 8:32 am

    […] Strong-Tie® products. I used their connectors and fasteners when I built my DIY Workbench and Restoration Hardware-inspired industrial rolling console, so when they approached me about being a 2016 Brand Ambassador, I couldn’t say “heck […]

    Reply
  2. 13 Simple Ways to Get Your Patio Party-Ready - The Finishing Touch says:
    May 20, 2016 at 4:35 pm

    […] furniture you already have (or make this great cart!) to create an easy-access drink station right on the […]

    Reply
  3. My “Table” Plan says:
    June 26, 2016 at 3:27 pm

    […] The House of Wood is another resource with lots of plans and step-by-step instructions. […]

    Reply
  4. Restoration Hardware Wooden and Metal Console – XmasGive.com – Patio Guides says:
    September 19, 2016 at 6:11 am

    […] Previous Previous post: NINE + SIXTEEN: House Search for: […]

    Reply

Leave a Reply Cancel reply

Your email address will not be published. Required fields are marked *

Primary Sidebar

Welcome

WANT FREE PLANS SENT STRAIGHT TO YOUR INBOX?

Footer

WANT FREE PLANS SENT TO YOUR INBOX?

  • Facebook
  • Instagram
  • Pinterest
  • RSS
  • Twitter
  • YouTube
  • About
  • FAQs
  • Disclosure
  • Sponsor / Advertise
  • Contact
© 2007-2019 · Jen Woodhouse · Privacy Policy · Terms of Use · Log in